1. Introduction
This manual provides detailed instructions for the safe and effective use of your HFS 7-inch Woodworking Bench Vise. This heavy-duty front screw vise is designed for secure workholding on a workbench, crafted from durable iron with a protective coating for longevity. Please read this manual thoroughly before installation and operation to ensure proper function and safety.

Image 1.1: The HFS 7-inch Woodworking Bench Vise. This image shows the main components of the vise, including the screw mechanism, guide rods, and mounting plates, all finished in black.
2. Safety Information
Always observe the following safety precautions when using the woodworking bench vise:
- Ensure the vise is securely mounted to a stable workbench before use.
- Do not overtighten the vise, as this can damage the workpiece or the vise itself.
- Keep hands and fingers clear of moving parts, especially the jaws and screw mechanism, during operation.
- Wear appropriate personal protective equipment (PPE), such as safety glasses, when working with the vise and associated tools.
- Inspect the vise regularly for any signs of wear, damage, or loose components. Do not use a damaged vise.
3. Package Contents
The HFS Woodworking Bench Vise package includes:
- 1 x HFS 7-inch Woodworking Bench Vise (Model 19418-7IN)
Note: Mounting hardware (bolts, nuts) may be included, but additional fasteners suitable for your specific workbench material and thickness may be required. A handle for the main screw is typically user-supplied or crafted.
4. Specifications
| Feature | Specification |
|---|---|
| Brand | HFS |
| Model Number | 19418-7IN |
| Size | 7 inches |
| Material | Iron, solid surface |
| Color | Black |
| Item Weight | 8.78 pounds |
| Package Dimensions | 15.55 x 7.83 x 2.13 inches |

Image 4.1: Dimensional overview of the HFS 7-inch Woodworking Bench Vise. This image illustrates the overall length (11.8"/30cm), width (5.9"/15cm), and jaw height (1.6"/4cm) of the vise components.
5. Setup and Installation
Proper installation is crucial for the stability and performance of your bench vise. Follow these steps to securely mount the vise to your workbench:
- Prepare the Workbench: Identify a suitable location on your workbench. The vise is typically mounted flush with the front edge of the bench. Ensure the mounting surface is strong enough to support the vise and the forces applied during use.
- Position the Vise: Hold the vise in its intended position on the underside of your workbench. Mark the locations for the mounting holes. It is recommended to create a wooden block or jaw liner to compress against the workbench for optimal stability and to protect your workpieces.
- Drill Mounting Holes: Carefully drill pilot holes through your workbench at the marked locations. Ensure the drill bit size is appropriate for your chosen mounting bolts.
- Attach the Vise: Secure the vise to the workbench using appropriate bolts, washers, and nuts. Tighten all fasteners firmly to prevent any movement during operation.
- Install the Handle: The main handle for the screw mechanism is typically user-supplied. Insert a suitable wooden or metal rod into the designated hole on the main screw to serve as the handle.
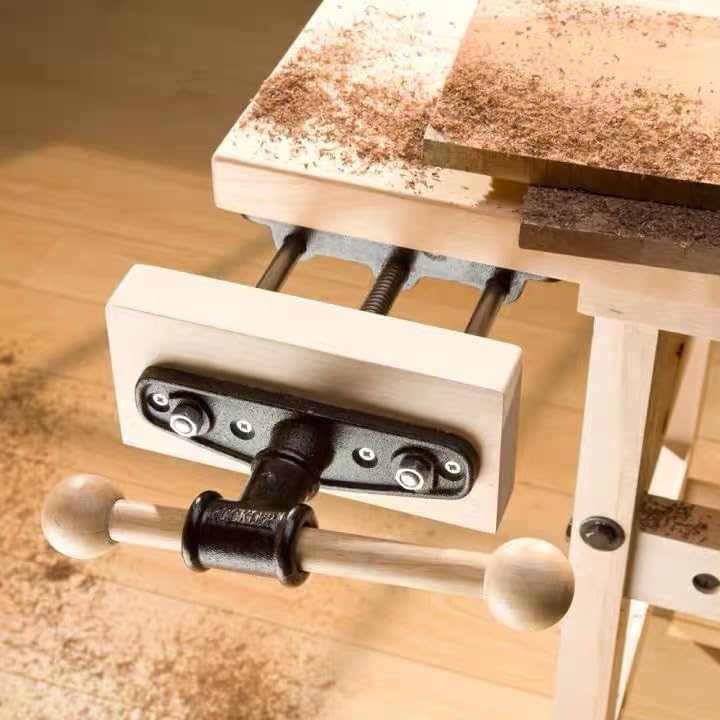
Image 5.1: The HFS Woodworking Bench Vise installed on a workbench. This image demonstrates how the vise is mounted underneath the workbench surface, with the movable jaw and handle extending outwards for operation.
6. Operating Instructions
The HFS Woodworking Bench Vise is designed for straightforward operation:
- Loosening the Jaws: To open the vise jaws, pull up the handle and hold it. This action disengages the vise nut, allowing the movable jaw to slide freely along the guide rods.
- Adjusting the Jaws: With the handle pulled up, adjust the jaws to a suitable opening for your workpiece.
- Securing the Workpiece: Release the handle. The vise nut will re-engage. Turn the main handle clockwise to tighten the screw and firmly secure the workpiece between the jaws. Ensure the workpiece is held securely but avoid excessive force that could damage it or the vise.
- Releasing the Workpiece: Turn the main handle counter-clockwise to loosen the screw and release the workpiece.

Image 6.1: Close-up view highlighting the convenient operation of the HFS 7-inch Woodworking Bench Vise. This image focuses on the main screw and guide rods, emphasizing the ease of adjustment.
7. Maintenance
Regular maintenance will extend the life and ensure the smooth operation of your HFS Woodworking Bench Vise:
- Cleaning: After each use, clean any sawdust, debris, or wood shavings from the screw mechanism, guide rods, and jaws. A brush or compressed air can be effective.
- Lubrication: Periodically apply a light coat of machine oil or grease to the main screw and guide rods to ensure smooth movement and prevent rust. Avoid excessive lubrication that could attract sawdust.
- Inspection: Regularly check all mounting bolts for tightness. Inspect the vise body, jaws, and screw for any signs of wear, cracks, or damage. Address any issues promptly.
- Rust Prevention: The vise features a protective paint coating. If the coating is scratched or worn, consider applying a rust-inhibiting paint or oil to exposed iron surfaces to prevent corrosion.
8. Troubleshooting
If you encounter issues with your HFS Woodworking Bench Vise, refer to the following common problems and solutions:
| Problem | Possible Cause | Solution |
|---|---|---|
| Jaws do not open/close smoothly or evenly. | Lack of lubrication, debris in screw/guide rods, bent guide rods, or uneven mounting. | Clean and lubricate the screw and guide rods. Inspect guide rods for damage. Re-check mounting for levelness and tightness. |
| Vise feels loose or wobbly on the workbench. | Loose mounting bolts or inadequate workbench support. | Tighten all mounting bolts. Ensure the workbench surface is solid and provides sufficient support. Consider adding reinforcement if necessary. |
| Difficulty engaging/disengaging the quick-release mechanism. | Debris, lack of lubrication, or mechanism wear. | Clean the quick-release mechanism thoroughly. Apply a light lubricant. If wear is significant, contact HFS support. |
9. Warranty and Support
HFS products are manufactured to high standards. For specific warranty information, please refer to the documentation included with your purchase or visit the official HFS website. If you require technical assistance, have questions about installation, or need to report a defect, please contact HFS customer support through their official channels. Contact information can typically be found on the product packaging or the HFS brand store on Amazon.


