Introduction
This manual provides essential information for setting up, operating, maintaining, and troubleshooting your Lenovo ThinkCentre Tiny M70q G5 desktop computer. Designed for efficiency and convenience, this mini PC offers powerful performance in a compact form factor.
The ThinkCentre Tiny M70q G5 features an Intel Core i5-14400T processor, 16GB DDR5 RAM, and a 512GB NVMe SSD, ensuring rapid responsiveness and efficient data handling. It comes pre-installed with Windows 11 Pro and includes a wired keyboard and mouse for immediate use.

Figure 1: Lenovo ThinkCentre Tiny M70q G5 with keyboard and mouse. This image illustrates the compact size of the desktop and the included peripherals, ready for setup.
Setup
1. Unboxing and Initial Inspection
Carefully remove all components from the packaging. Ensure the following items are present:
- Lenovo ThinkCentre Tiny M70q G5 Desktop
- Wired Keyboard
- Wired Mouse
- Power Adapter and Cable
- Documentation (this manual, warranty information)
Inspect all components for any signs of damage. If any items are missing or damaged, contact your vendor immediately.
2. Connecting Peripherals
- Connect the Keyboard and Mouse: Plug the USB connectors of the keyboard and mouse into any available USB-A ports on the ThinkCentre Tiny.
- Connect the Monitor: Use an HDMI or DisplayPort cable to connect your monitor to the corresponding port on the rear of the ThinkCentre Tiny.
- Connect to Network (Optional): For a wired connection, plug an Ethernet cable into the RJ-45 port. For wireless, ensure your Wi-Fi network is available after initial setup.
- Connect Power: Plug the power adapter into the DC-in port on the rear of the ThinkCentre Tiny, then connect the power cable to an electrical outlet.

Figure 2: Front and Rear Ports of the ThinkCentre Tiny M70q G5. This diagram labels all available ports, including USB, audio, video (HDMI, DisplayPort), and Ethernet, crucial for connecting external devices.
3. Initial Power On
Press the power button located on the front of the ThinkCentre Tiny. The system will boot up, and you will be guided through the initial Windows 11 Pro setup process. Follow the on-screen instructions to configure your operating system, user accounts, and network settings.
Operating Instructions
1. Windows 11 Pro Overview
Your ThinkCentre Tiny M70q G5 comes with Windows 11 Pro pre-installed. Familiarize yourself with the Windows 11 interface, including the Start Menu, Taskbar, and File Explorer. For detailed information on Windows 11 features, refer to Microsoft's official documentation.
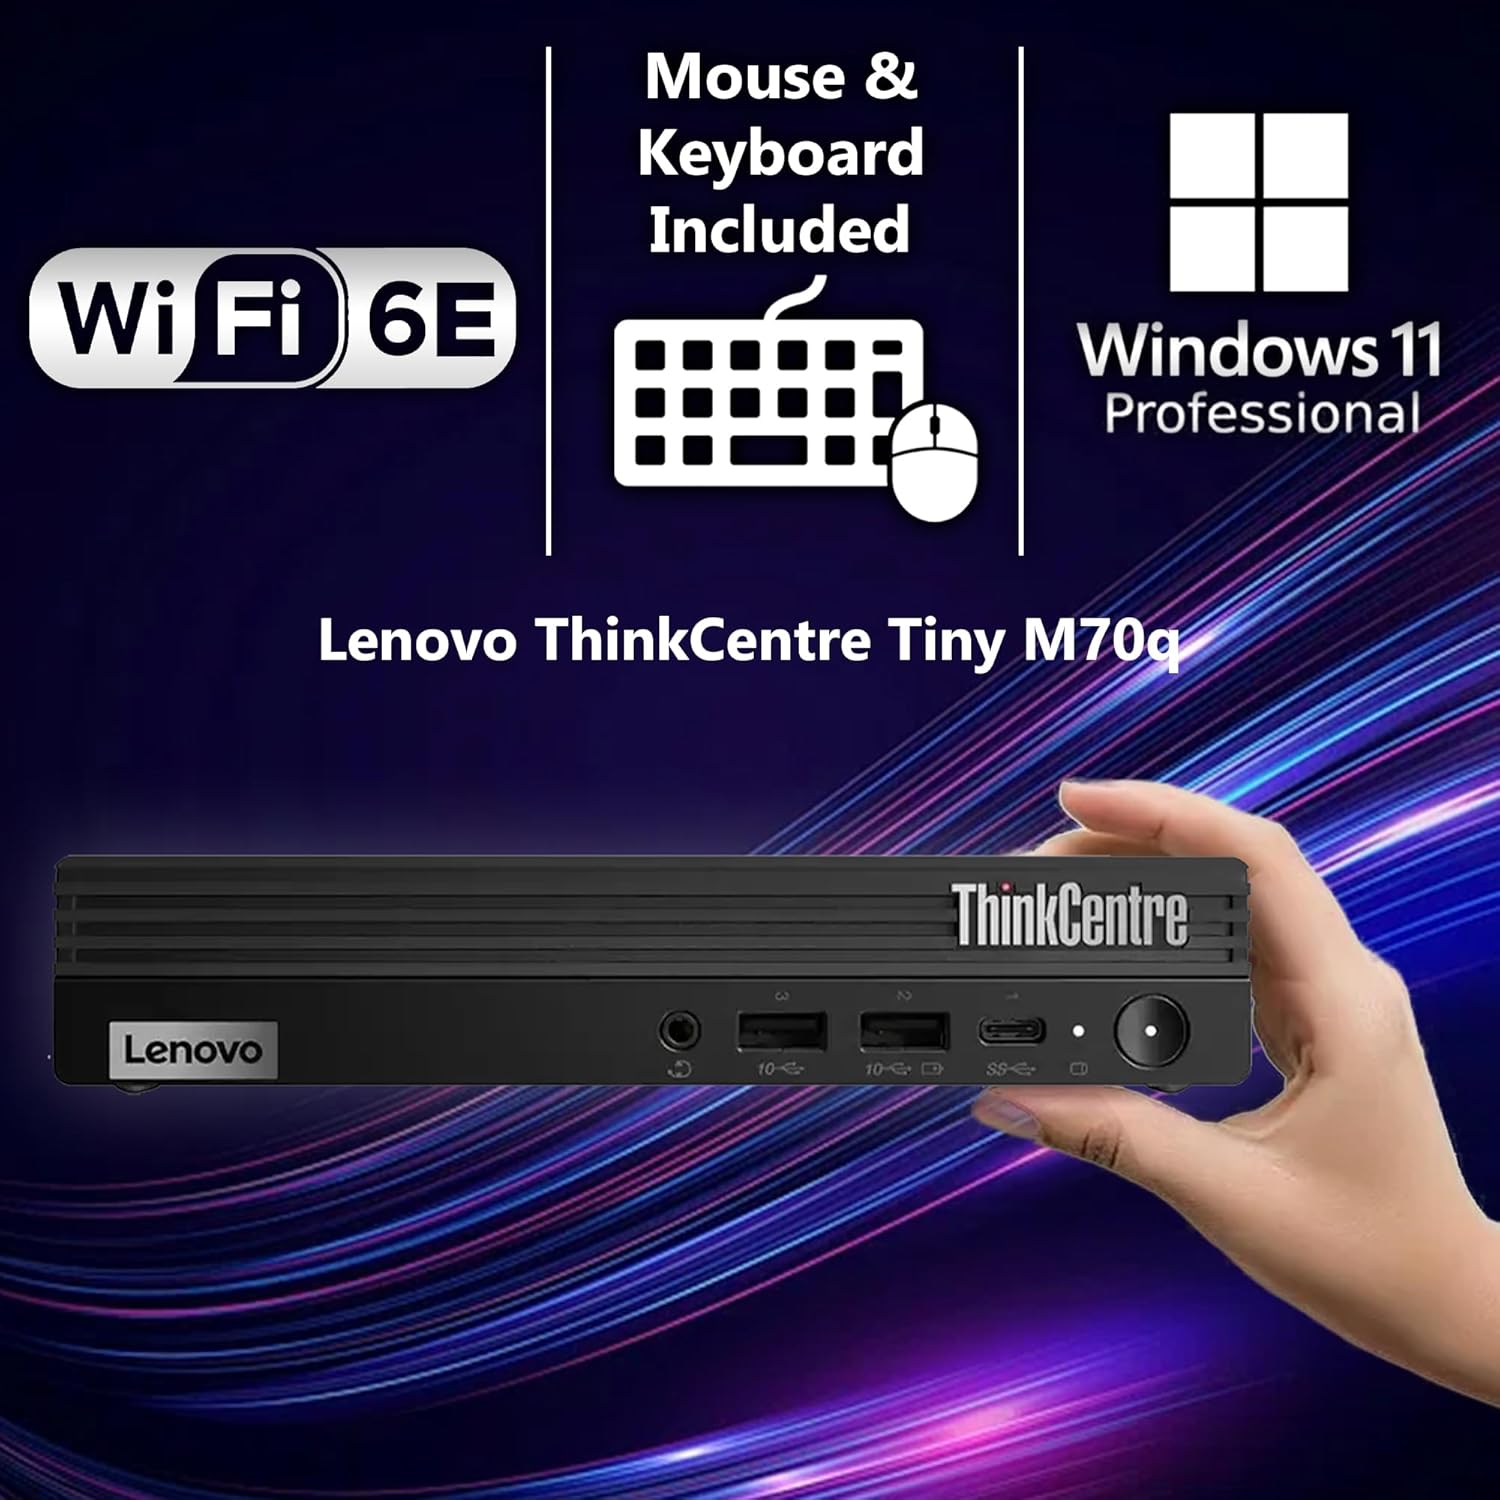
Figure 3: Lenovo ThinkCentre Tiny M70q G5 highlighting key features. This image emphasizes the compact design and the inclusion of Wi-Fi 6E, a keyboard, mouse, and Windows 11 Professional.
2. Network Connectivity
- Wired Connection: If you connected an Ethernet cable during setup, your system should automatically connect to the network.
- Wireless Connection (Wi-Fi 6E): To connect to a Wi-Fi network, click the network icon in the taskbar, select your desired network, enter the password if prompted, and click Connect. The system supports Wi-Fi 6E for high-speed wireless connectivity.
3. Using USB Ports and Smart Power On
The ThinkCentre Tiny M70q G5 is equipped with multiple USB ports, including USB-A (5Gbps and 10Gbps) and USB-C (5Gbps). Some USB-A ports support "Always On" and fast charge capabilities, allowing you to charge devices even when the PC is off or in sleep mode. The USB-A port with "Smart Power On" allows you to power on the system by pressing a key on a connected keyboard.
Maintenance
1. Cleaning Your Device
To maintain optimal performance and appearance, regularly clean your ThinkCentre Tiny M70q G5:
- Use a soft, lint-free cloth slightly dampened with water or a mild cleaning solution to wipe the exterior surfaces.
- For dust accumulation in vents, use compressed air. Ensure the system is powered off before cleaning vents.
- Avoid using harsh chemicals, abrasive cleaners, or solvents.
2. Software Updates
Keep your operating system and drivers updated to ensure security, stability, and performance:
- Windows Updates: Go to Settings > Windows Update to check for and install the latest Windows updates.
- Driver Updates: Periodically check the official Lenovo support website for updated drivers for your specific model.
3. Data Backup
Regularly back up your important data to an external drive or cloud storage to prevent data loss.
Troubleshooting
This section provides solutions to common issues you might encounter.
No Power / System Not Turning On
- Ensure the power adapter is securely connected to both the ThinkCentre Tiny and a working electrical outlet.
- Verify the power outlet is functional by plugging in another device.
- Try a different power cable if available.
No Display on Monitor
- Check that the monitor is powered on and its input source is correctly selected (HDMI/DisplayPort).
- Ensure the video cable (HDMI or DisplayPort) is securely connected to both the ThinkCentre Tiny and the monitor.
- Try connecting the monitor to a different video port on the ThinkCentre Tiny if available, or try a different monitor/cable to isolate the issue.
Network Connectivity Issues
- Wired: Check the Ethernet cable connection. Verify your router/modem is working correctly.
- Wireless: Ensure Wi-Fi is enabled in Windows settings. Restart your Wi-Fi router. Check if other devices can connect to the same Wi-Fi network.
- Run the Windows Network Troubleshooter (Settings > Network & internet > Advanced network settings > Network troubleshooter).
System Performance is Slow
- Close unnecessary applications running in the background.
- Check for and install any pending Windows updates or driver updates.
- Run a disk cleanup and defragmentation (for HDD, though this is SSD). For SSD, ensure TRIM is enabled (usually automatic).
- Scan for malware or viruses.
Specifications
Detailed technical specifications for the Lenovo ThinkCentre Tiny M70q G5 (Model: M70q Gen 5).
| Component | Specification |
|---|---|
| Processor | Intel Core i5-14400T (10 Cores, 16 Threads, P-core 1.5 / 4.5GHz, E-core 1.1 / 3.2GHz, 20MB Cache) |
| Graphics | Integrated Intel UHD Graphics 730 |
| RAM | 16GB DDR5 (4600 MHz) |
| Storage | 512GB NVMe SSD |
| Operating System | Windows 11 Pro |
| Wireless Connectivity | Wi-Fi 6E, Bluetooth 5.1 |
| Ports (Front) | 3.5mm Audio Jack, USB-A (10Gbps), USB-A (10Gbps, Always On & Fast Charge), USB-C (5Gbps) |
| Ports (Rear) | Power connector, DisplayPort 1.4a, USB-A (5Gbps), HDMI 2.1 TMDS, USB-A (Smart Power On), 2x USB-A (10Gbps), Ethernet (RJ-45) |
| Dimensions (LxWxH) | 7.05 x 7.2 x 1.36 inches |
| Weight | 2.76 pounds |

Figure 4: Intel i5-14400T Processor Details. This image provides a visual summary of the processor's core specifications, including core count, frequencies, cache, and integrated graphics.
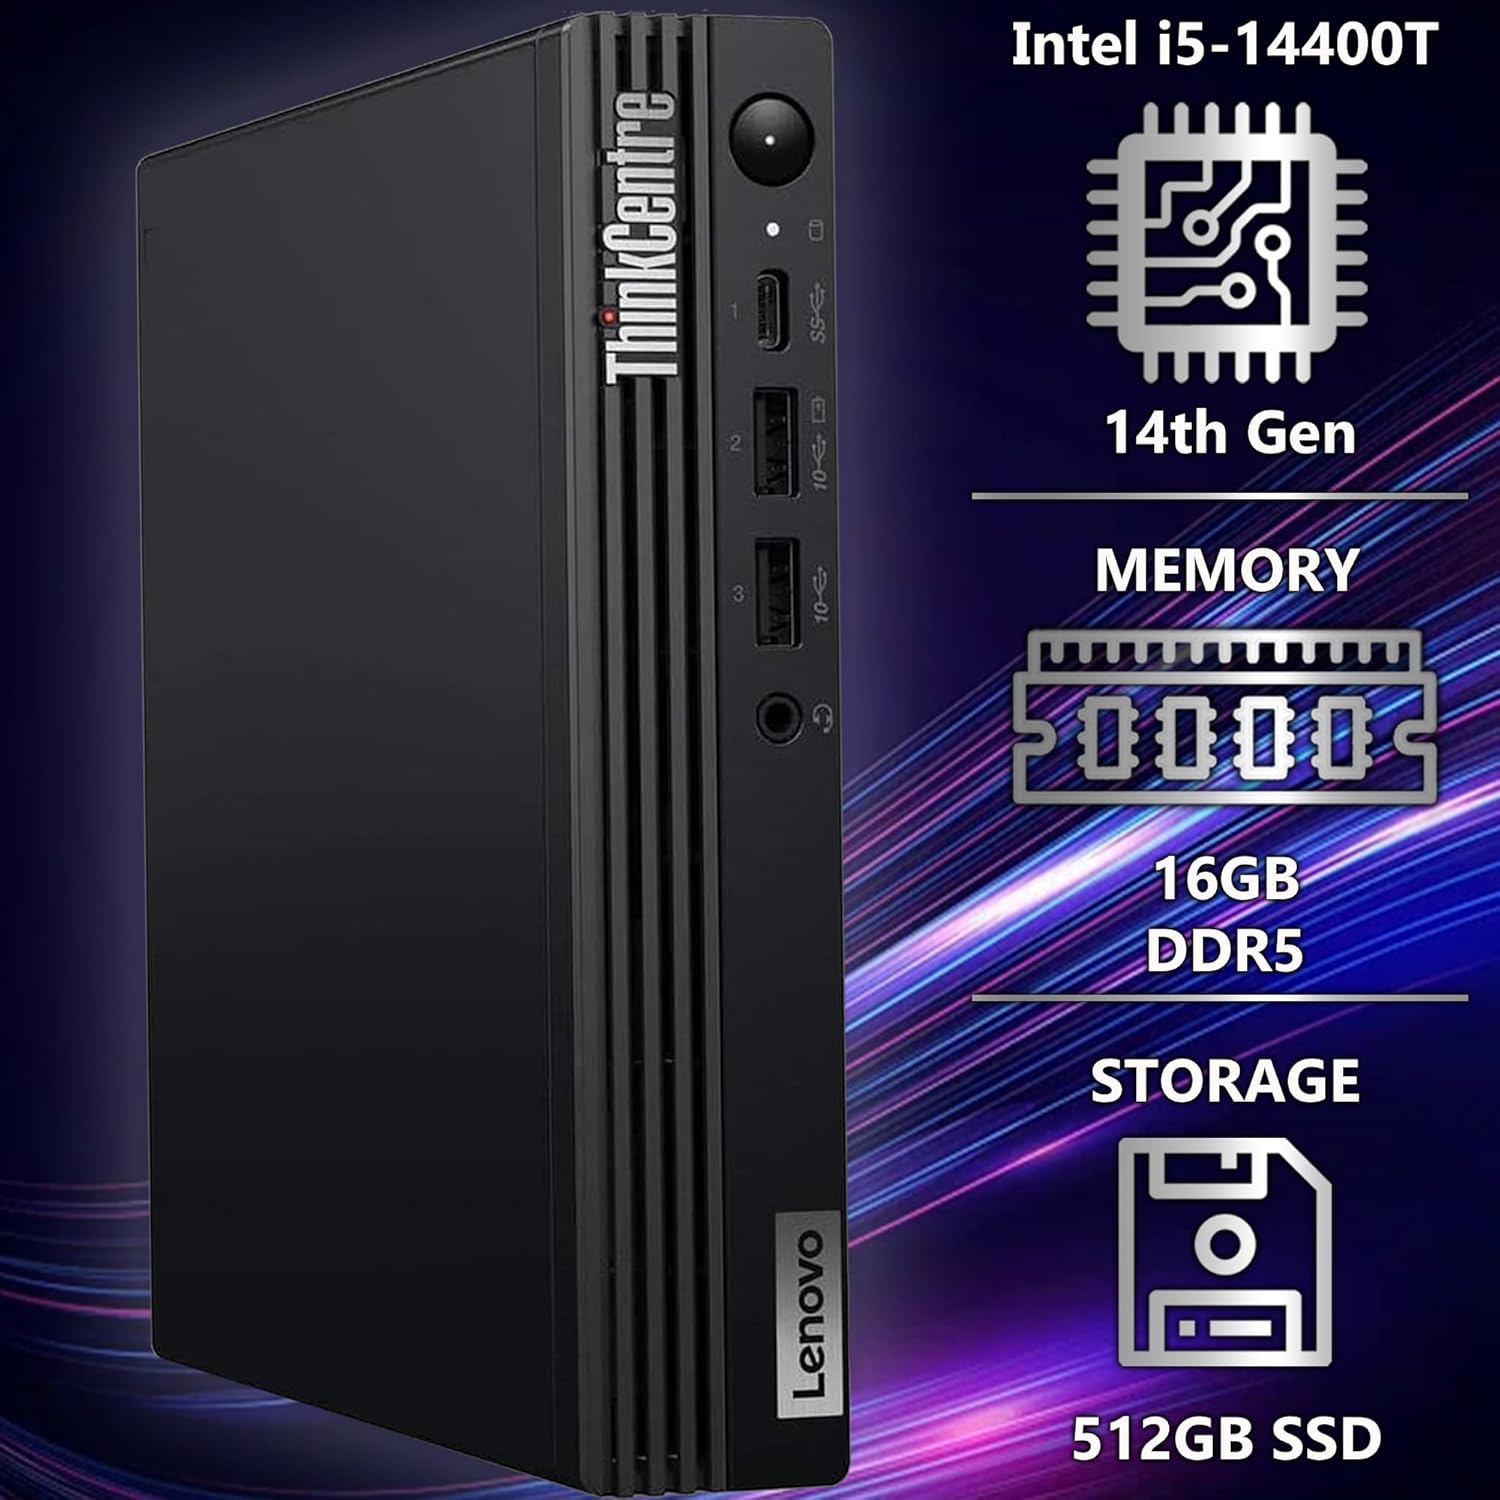
Figure 5: Memory and Storage Configuration. This image highlights the 16GB DDR5 RAM and 512GB NVMe SSD, key components for system performance.
Warranty and Support
Warranty Information
Your Lenovo ThinkCentre Tiny M70q G5 is covered by a 3-Year Lenovo Warranty and a 3-Year OEMGenuine Limited Warranty. This warranty covers defects in materials and workmanship under normal use. For specific terms and conditions, please refer to the warranty documentation included with your product or visit the respective manufacturer's and seller's official websites.
Technical Support
For technical assistance, troubleshooting beyond this manual, or warranty claims, please contact:
- OEMGenuine Support: Refer to the contact information provided at the time of purchase or on their official website.
- Lenovo Support: Visit the official Lenovo support website for your region. You will need your product's serial number, typically found on a label on the device.
When contacting support, please have your product model number (M70q Gen 5) and serial number ready to expedite the process.