
Introduction
This user manual provides essential information for the installation, configuration, and daily use of your REOLINK RLN8-410 8-Channel 4K PoE Network Video Recorder (NVR). Please read this manual thoroughly before operating the device to ensure proper functionality and safety. Keep this manual for future reference.
Setup
1. Package Contents
Verify that all items are present in the package:
- REOLINK RLN8-410 PoE NVR (with 2TB HDD)
- Power Adapter
- HDMI Cable
- USB Mouse
- 1m Network Cable
- User Manual

Image: Contents of the REOLINK RLN8-410 NVR package, including the NVR unit, power adapter, HDMI cable, USB mouse, network cable, and user manual.
2. NVR Overview and Connections
Familiarize yourself with the NVR's ports and controls.
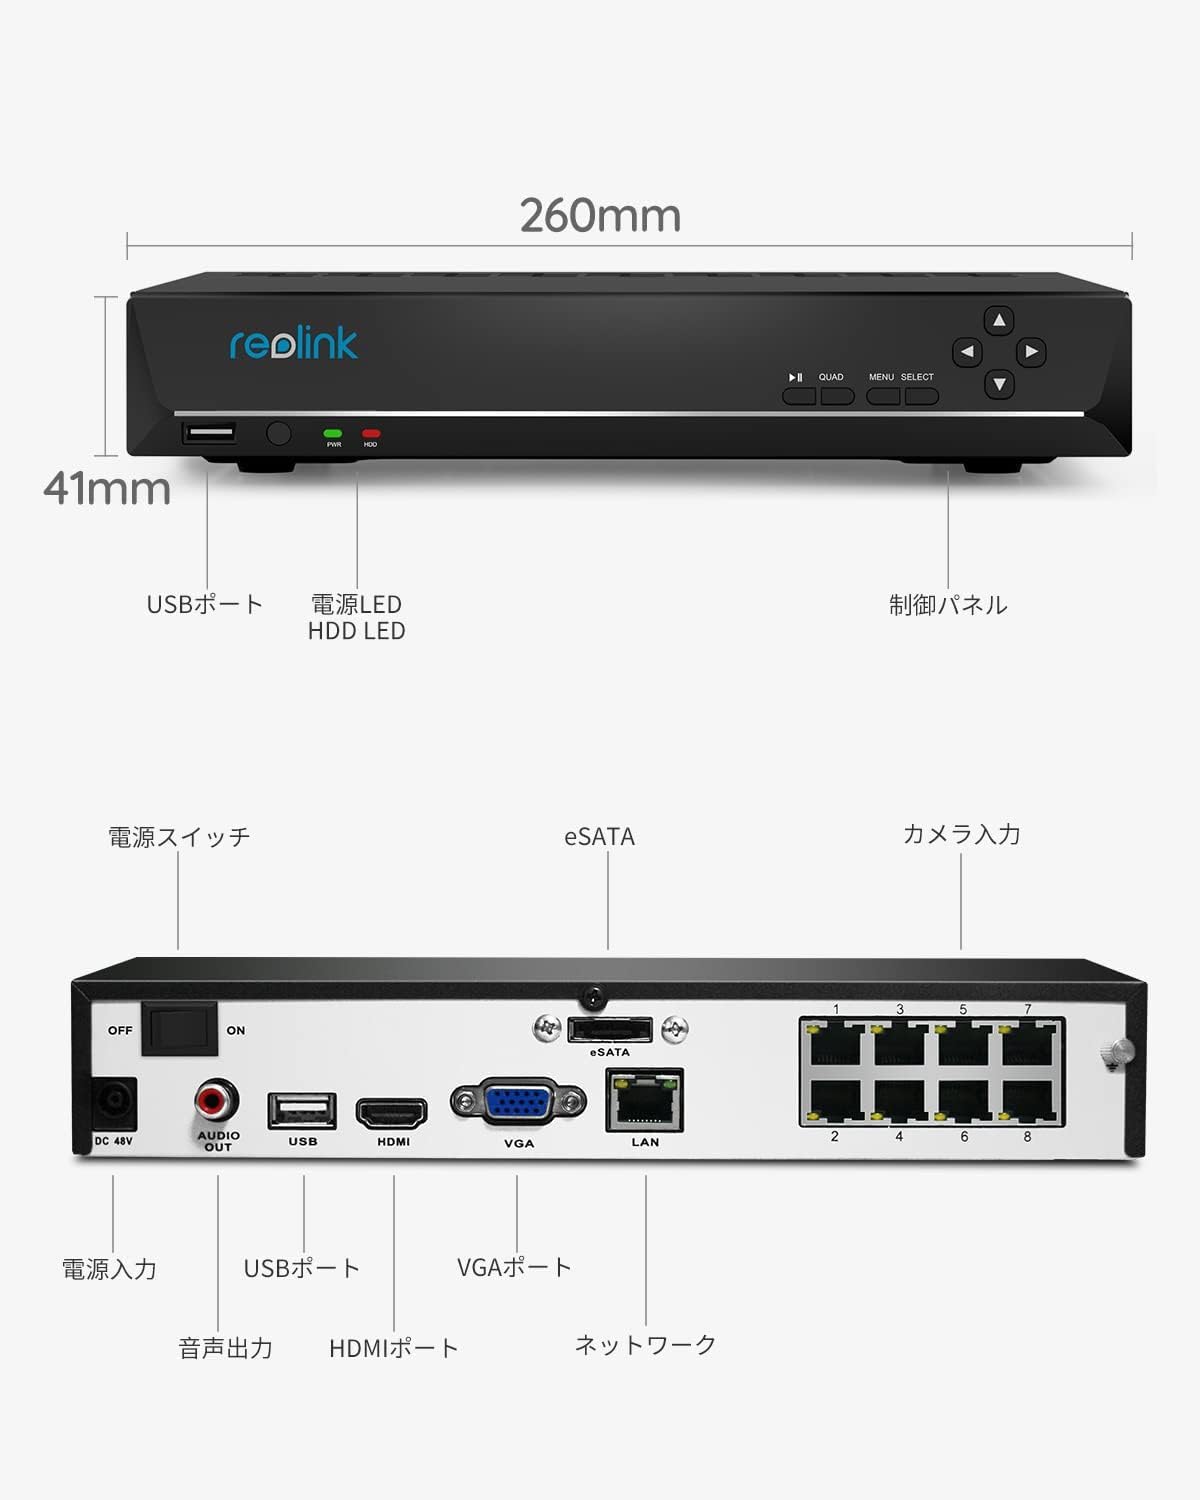
Image: Front and rear views of the REOLINK RLN8-410 NVR, showing dimensions (260mm width, 41mm height) and port labels including USB ports, power LED, HDD LED, control panel, power switch, eSATA, camera inputs (PoE ports 1-8), power input, audio output, HDMI port, VGA port, and LAN port.
The RLN8-410 NVR features Power over Ethernet (PoE) functionality, allowing a single network cable to provide both power and video transmission to compatible IP cameras. This simplifies wiring and installation.
3. Connecting Cameras
The RLN8-410 NVR is designed for use exclusively with Reolink PoE and adapter-powered WiFi cameras. It supports up to 8 cameras simultaneously.
- Connect Reolink PoE cameras directly to the NVR's PoE ports using Ethernet cables.
- Connect Reolink adapter-powered WiFi cameras to your network, and then add them to the NVR system.
Note: Non-Reolink cameras are not compatible with this NVR due to differing communication protocols.

Image: Diagram illustrating the compatibility of the REOLINK NVR with Reolink PoE cameras, Reolink WiFi cameras (adapter type), and some Reolink battery cameras.
4. Initial Setup and Network Connection
- Connect the NVR to a monitor or TV via the HDMI or VGA port.
- Connect the USB mouse to a USB port on the NVR.
- Connect the NVR to your router using the provided network cable for internet access.
- Power on the NVR using the power adapter.
- Follow the on-screen instructions to complete the initial setup wizard, including setting a password and configuring network settings.

Image: A diagram showing the REOLINK NVR connected to the internet, indicating both internet access and local network functionality.
Operation
1. Live View and Recording
The NVR supports 24/7 continuous recording with its pre-installed 2TB HDD. You can view live feeds from all connected cameras on a monitor or remotely via the Reolink App/Client.

Image: A REOLINK NVR connected to a monitor, displaying live feeds from multiple security cameras in a grid layout, indicating 24/7 recording capability.
2. Remote Access
Access your NVR and camera feeds remotely using the free Reolink App on your smartphone or the Reolink Client software on your computer. This allows for real-time monitoring and playback from anywhere with an internet connection.
- Download the Reolink App from the App Store (iOS) or Google Play (Android).
- Download the Reolink Client from the official Reolink website for Windows or macOS.
- Add your NVR to the app/client using its UID or IP address.

Image: A person viewing camera feeds on a smartphone, with a laptop and desktop computer also showing the Reolink interface, demonstrating remote access capabilities. App Store and Google Play icons are visible.
3. Motion Detection and Alerts
The NVR supports advanced AI detection for humans, vehicles, and animals (depending on camera model). Configure motion detection zones and sensitivity settings to receive instant alerts when an event occurs.
- Access the NVR's menu via the connected monitor or Reolink Client.
- Navigate to the 'Alarm' or 'Detection' settings for each camera.
- Set up push notifications to your smartphone or email alerts.
4. Playback and Backup
Review recorded footage by accessing the playback function. Motion events are typically marked for easier navigation. You can also back up recorded data to a USB drive.
- Use the NVR interface or Reolink Client to select a date and time for playback.
- Connect a USB drive to the NVR's USB port for local data backup.
Maintenance
1. Hard Drive Management
The NVR comes with a 2TB HDD for continuous recording. The recording duration depends on the number of cameras and their resolution/bitrate. The NVR supports external hard drives up to 8TB for expanded storage.

Image: An exploded view of the REOLINK NVR highlighting the internal 2TB HDD and indicating support for up to 6TB external HDD. A table shows estimated recording days for 1, 4, and 8 cameras with a 2TB HDD.
To manage the HDD:
- Access the NVR's storage settings to view HDD status and format the drive if necessary.
- Connect an external HDD to the eSATA port for additional storage capacity.
2. Firmware Updates
Regularly check for and install firmware updates to ensure optimal performance, new features, and security enhancements. Firmware updates can be performed via the NVR's system menu or through the Reolink Client.
3. Cleaning
Keep the NVR unit clean and free from dust to prevent overheating. Use a soft, dry cloth for cleaning. Do not use liquid cleaners or aerosols.
Troubleshooting
1. No Video Output on Monitor
- Ensure the HDMI/VGA cable is securely connected to both the NVR and the monitor.
- Verify the monitor input source is correctly selected (HDMI/VGA).
- Try a different HDMI/VGA cable or monitor.
2. Cameras Not Connecting
- Confirm that the Ethernet cables are properly connected to the NVR's PoE ports and the cameras.
- Ensure the cameras are Reolink brand and compatible models.
- Check if the cameras are receiving power (LED indicators on cameras).
- Restart the NVR and the cameras.
3. Remote Access Issues
- Ensure the NVR is connected to the internet and has a stable network connection.
- Verify that the Reolink App/Client is updated to the latest version.
- Check your router's firewall settings; ensure necessary ports are open if manual port forwarding is configured.
- Some mobile carriers (e.g., Rakuten Mobile in Japan) may have network restrictions that prevent remote access. Consider using a different carrier or network if issues persist.
4. Power Plug Compatibility
Important: The NVR's power plug is a 3-pin (grounded) type for safety. If your outlet is 2-pin, you will need a 3-pin to 2-pin conversion adapter (not included) to ensure proper connection and grounding.
Specifications
| Feature | Detail |
|---|---|
| Model | RLN8-410 |
| Brand | REOLINK |
| Connectivity Technology | Wired (PoE) |
| Compatible Devices | Reolink PoE Cameras, Reolink Adapter-powered WiFi Cameras |
| Memory Storage Capacity | 2 TB (Internal HDD) |
| Hard Disk Capacity | 2 TB (Expandable up to 8TB with external HDD) |
| Communication Interface | Wired |
| Max Memory Capacity | 2 TB |
| Wattage | 25 W |
| Number of Channels | 8 |
| Video Compression Format | H.265 |
| USB Ports | 2 |
| Video Input | Reolink PoE Cameras, Reolink Adapter-powered WiFi Cameras |
| Item Weight | 2.4 Kilograms |
| GTIN (Global Trade Identification Number) | 00725423889284 |
| UPC | 725423889284 |
Warranty & Support
1. Product Warranty
REOLINK provides a 2-year free quality warranty for the RLN8-410 NVR. This warranty covers manufacturing defects and ensures the product meets quality standards.
2. Return Policy
Enjoy a 30-day full refund and free return guarantee from the date of purchase. Please refer to the retailer's return policy for specific procedures.
3. Customer Support
REOLINK offers 24/7 one-on-one online support to assist you with any questions or issues regarding your NVR. You can reach support through the official Reolink website or the Reolink App.
For further assistance, please visit the official Reolink website: reolink.com/support/


