1. Introduction
This manual provides detailed instructions for the assembly, safe operation, and maintenance of your Bellemave Twin Over Twin House Bunk Bed. Please read all instructions carefully before assembly and use to ensure safety and proper function. Retain this manual for future reference.
2. Important Safety Information
Failure to follow these warnings could result in serious injury.
- Maximum Weight Capacity: The upper bunk is designed to support a maximum weight of 250 lbs. The lower bunk is designed to support a maximum weight of 250 lbs.
- Age Restriction: The upper bunk is not suitable for children under 6 years of age.
- Mattress Requirements:
- Upper and Lower Bunk: Use only a Twin size mattress.
- Recommended Mattress Thickness: 6-10 inches for both upper and lower bunks.
- Guard Rails: Always use the guard rails on the upper bunk. Ensure they are properly installed and secured.
- Ladder Safety: Always use the ladder for entering and exiting the upper bunk. Do not use the bed as a climbing structure.
- Assembly: Assembly should be performed by at least two adults. Ensure all hardware is securely tightened before use. Periodically check and re-tighten hardware.
- Ventilation: Ensure adequate ventilation around the bed.
- Prohibited Activities: Do not allow jumping on the bed. Do not attach or hang items from any part of the bunk bed that are not designed for use with the bed.
- Location: Place the bunk bed on a level surface. Avoid placing the bed near windows where cords or blinds could pose a strangulation hazard.
3. Package Contents
Before beginning assembly, verify that all parts and hardware are present and undamaged. If any parts are missing or damaged, do not proceed with assembly. Contact customer support for assistance.
The Bellemave Twin Over Twin House Bunk Bed is shipped in two packages. All necessary tools for assembly are included.
3.1 Components Overview
Refer to the following image for a visual representation of the assembled product and its key features.

Figure 3.1: Assembled Bellemave Twin Over Twin House Bunk Bed, showcasing the roof, windows, and integrated ladder.
3.2 Dimensions
Review the dimensions to ensure the bed fits your intended space.
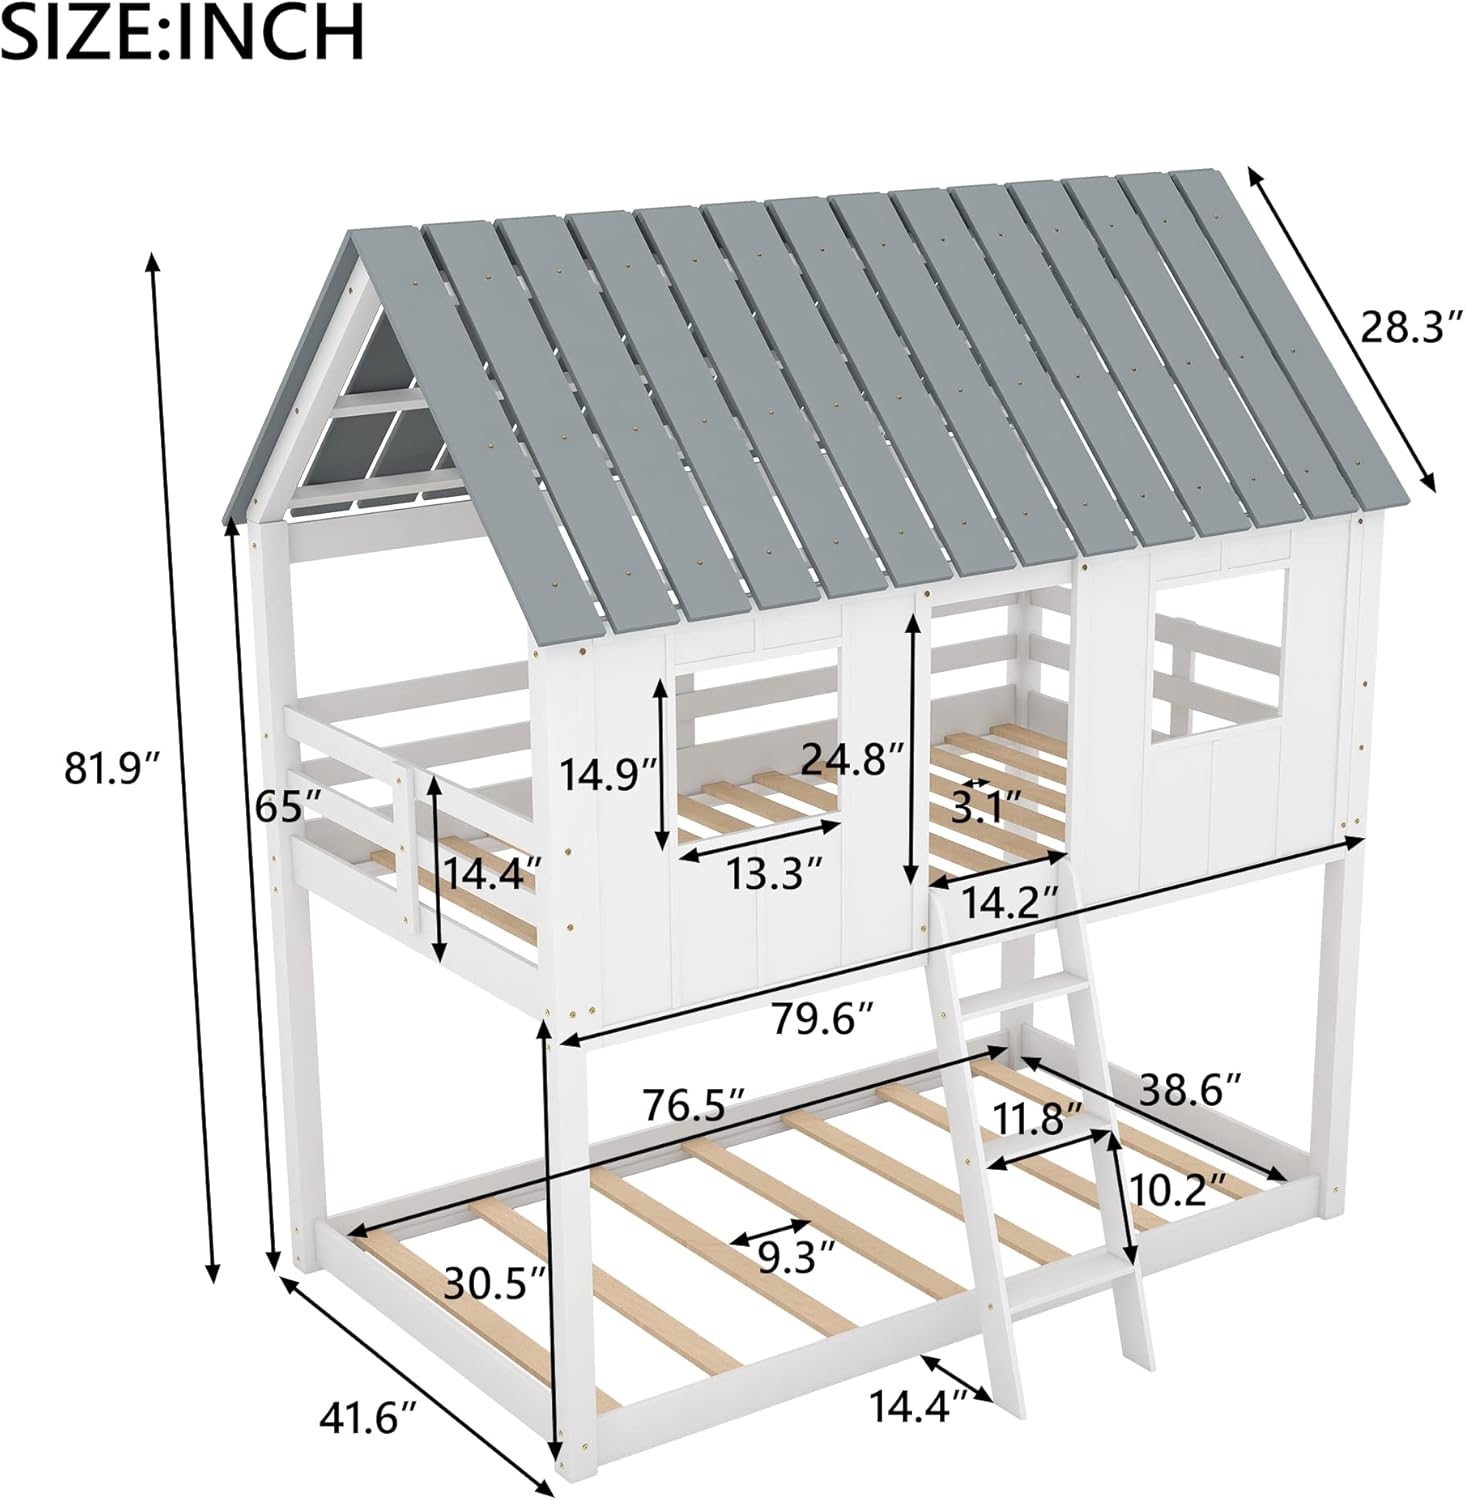
Figure 3.2: Detailed dimensions of the bunk bed, including overall height, length, width, and internal measurements for mattress placement.
3.3 Detailed Features

Figure 3.3: Visual breakdown of key features: reliable safety design with full-length guardrails, creative house bunk design with pitched roof and windows, built-in 3-step ladder, and a low floor bunk design.
4. Assembly Instructions
Assembly requires two adults and approximately 2-4 hours. All necessary tools are included. Follow these steps carefully.
- Unpack and Identify Parts: Carefully unpack all components from both packages. Lay them out on a clean, soft surface (e.g., a carpet or blanket) to prevent scratches. Identify each part using the provided labels. Note: Some painted components may be stuck together due to packaging. Separate them gently to avoid paint damage. If significant paint damage occurs, contact customer support.
- Assemble the Lower Bed Frame: Begin by assembling the base frame for the lower bunk. Connect the side rails and end panels using the specified hardware. Ensure all connections are snug but do not overtighten until the frame is fully aligned.
- Install Lower Bed Slats: Once the lower frame is stable, insert the wooden slats into the designated slots or attach them with screws as indicated in the detailed diagram. These slats provide mattress support.
- Assemble the Upper Bed Frame: Construct the frame for the upper bunk, similar to the lower bunk. Pay close attention to the orientation of the panels that will form the "house" structure.
- Attach Upper Bed Guard Rails: Securely attach the full-length guard rails to the upper bunk frame. These are critical safety components.
- Install Upper Bed Slats: Place the wooden slats for the upper bunk into position, ensuring they are evenly spaced and securely fastened.
- Mount Upper Bunk onto Lower Bunk: With assistance, carefully lift the assembled upper bunk and align it over the lower bunk. Securely fasten the upper bunk to the lower bunk's support posts using the provided long bolts and connectors.
- Assemble and Attach the Ladder: Assemble the ladder components. The ladder can typically be positioned on either the side or the head/foot of the bed. Securely attach the ladder to the upper bunk frame. Ensure it is stable and does not wobble.
- Install Roof and Window Panels: Attach the decorative roof panels and window panels to the upper bunk structure. Ensure all connections are firm.
- Final Inspection: After completing all steps, perform a thorough inspection. Check all bolts, screws, and connections to ensure they are fully tightened. Confirm the stability of the entire structure.

Figure 4.1: Front view of the bunk bed frame, illustrating the structure before mattress placement.

Figure 4.2: Detail of the built-in ladder, showing its secure attachment points and steps.
5. Operating Instructions
This section outlines the proper and safe use of your Bellemave Twin Over Twin House Bunk Bed.
- Mattress Placement: Place a standard Twin size mattress on both the upper and lower bunk slat foundations. Ensure the mattress thickness is within the recommended 6-10 inches for safety, especially for the upper bunk's guard rail height.
- Using the Ladder: Always use the integrated ladder to access and exit the upper bunk. Ensure the ladder is free of obstructions and stable before use.
- Guard Rail Functionality: The guard rails on the upper bunk are designed to prevent falls. Do not attempt to climb over them or remove them.
- Supervision: Children using the upper bunk should be supervised, especially younger children within the recommended age range (6 years and older).
- Weight Distribution: Avoid concentrating excessive weight on any single point of the bed. Distribute weight evenly.
6. Maintenance and Care
Regular maintenance will prolong the life and ensure the safety of your bunk bed.
- Cleaning: Wipe surfaces with a soft, damp cloth. Avoid harsh chemicals or abrasive cleaners that could damage the finish.
- Hardware Check: Periodically (e.g., monthly) inspect all bolts, screws, and connections. Re-tighten any loose hardware to maintain structural integrity.
- Structural Inspection: Check for any signs of wear, damage, or instability in the wood components. Address any issues promptly.
- Ventilation: Ensure good air circulation around the mattress to prevent moisture buildup.
7. Troubleshooting
This section addresses common issues you might encounter.
| Problem | Possible Cause | Solution |
|---|---|---|
| Bed feels wobbly or unstable. | Loose hardware connections. Uneven floor surface. | Check and re-tighten all bolts and screws. Ensure the bed is placed on a level surface. |
| Missing parts or damaged components upon unboxing. | Manufacturing defect or shipping damage. | Do not proceed with assembly. Contact Bellemave customer support immediately with your purchase details. |
| Paint peeling during unpacking/assembly. | Components stuck together during packaging. | Handle components gently. If significant damage occurs, contact customer support for advice or replacement parts. |
| Difficulty aligning parts during assembly. | Incorrect orientation of parts. Hardware not fully loosened. | Double-check the assembly diagrams for correct part orientation. Loosen hardware slightly to allow for adjustment, then re-tighten. Ensure two people are assisting. |
8. Specifications
| Product Type | House Bunk Beds |
| Size | Twin Over Twin |
| Material | Engineered Wood, Pine Wood, Wood |
| Color | White |
| Finish Type | Natural Wood Finish |
| Product Dimensions (L x W x H) | 79.6"L x 41.6"W x 81.9"H |
| Overall Weight | 158.5 LBS |
| Weight Capacity (Each Bunk) | 250 LBS |
| Recommended Mattress Thickness | 6-10 inches (upper/down bed) |
| Number of Slats (Upper/Down) | 14 pieces / 7 pieces |
| Box Spring Required | No |
| Assembly Required | Yes |
| Additional Tools Required | All Tools Included |
| Included Components | Guardrails |
| UPC | 733805237196 |
| ASIN | B098SYLSBH |
9. Warranty and Customer Support
For warranty information, missing parts, or any questions regarding your Bellemave Twin Over Twin House Bunk Bed, please contact Bellemave customer support directly. Refer to your purchase documentation for specific contact details or visit the official Bellemave website.
When contacting support, please have your model number (B098SYLSBH) and purchase date available.


