
1. Safety Instructions
Please read these safety instructions carefully before using the product to ensure safe and proper operation.
- Do not insert fingers or any objects into the fan grille when the fan is operating.
- Keep the fan away from water and moisture. Do not use in wet environments.
- Do not disassemble, repair, or modify the fan yourself. Contact customer support if service is required.
- Use only the provided USB charging cable or a certified equivalent.
- Keep out of reach of children. The narrow curved design protects fingers, but supervision is recommended.
- Avoid exposing the battery to extreme temperatures or direct sunlight.
2. Product Overview
The Minthouz MT-L007F-WI is a versatile 2-in-1 rechargeable fan designed for both desk and clip-on use. It features a powerful 4000mAh battery, 4 adjustable speeds, and quiet operation.
Key Features:
- 2-in-1 Design: Functions as a desktop fan or a clip-on fan.
- Adjustable Airflow: 360° horizontal and 360° vertical rotation.
- Long Battery Life: Built-in 4000mAh rechargeable battery.
- 4 Speed Settings: From gentle sleep wind to strong wind.
- Quiet Operation: Low noise level, suitable for various environments.
- Easy to Clean: Detachable front grille for convenient cleaning.
- Stable Design: Anti-skid rubber mats on base and clip.
Package Contents:
- Minthouz Clip Fan (MT-L007F-WI)
- USB Charging Cable
- User Manual (Quick Start Guide)

Image: The Minthouz Clip Fan, its packaging, USB charging cable, and quick start guide.
3. Setup
3.1 Charging the Fan
Before first use, fully charge the fan. The integrated 4000mAh battery takes approximately 6 hours to fully charge.
- Locate the USB charging port on the back of the fan.
- Connect the provided USB charging cable to the fan's charging port.
- Connect the other end of the USB cable to a compatible power source such as a computer's USB port, a power bank, a USB wall charger, or a USB power strip.
- The LED indicators will show charging status. Once fully charged, the indicators will typically show a steady light or turn off.

Image: The fan's USB charging port and examples of compatible charging sources.
3.2 Placement Options
The fan offers flexible placement options:
- Desktop Use: Place the fan on any flat surface. The anti-skid rubber mats on the base ensure stability.
- Clip-on Use: Use the robust clip to attach the fan to various objects such as desks, strollers, car seats, bicycles, camping tents, or shelves. The anti-skid rubber mats on the clip provide a secure grip.

Image: Examples of the fan being used in various scenarios, including clipped to a treadmill, a baby stroller, and a weeding machine.
4. Operating Instructions
4.1 Power On/Off and Speed Adjustment
The fan features a single power button to control its functions.
- To Power On: Press the power button once. The fan will start at the lowest speed (Sleep Wind).
- To Adjust Speed: Repeatedly press the power button to cycle through the 4 speed settings: Sleep Wind (1200 RPM), Natural Wind (1500 RPM), Normal Wind (1900 RPM), and Strong Wind (2200 RPM).
- To Power Off: After the highest speed setting, pressing the button again will turn the fan off.
4.2 Adjusting Airflow Direction
The fan head can be manually adjusted to direct airflow as needed.
- Gently rotate the fan head to achieve a 360° horizontal adjustment.
- Tilt the fan head up or down for a 360° vertical adjustment.

Image: Illustration of the fan's 360° horizontal and vertical rotation.
4.3 Battery Life
The fan's operating time varies depending on the selected speed setting:
- Sleep Wind (1200 RPM): Up to 27 hours
- Natural Wind (1500 RPM): Up to 13 hours
- Normal Wind (1900 RPM): Up to 6.5 hours
- Strong Wind (2200 RPM): Up to 4 hours

Image: Visual representation of battery life at different fan speeds.
4.4 Quiet Operation
The fan is designed with 5 bionic fan blades and a brushless motor to ensure strong airflow with minimal noise, making it suitable for quiet environments like bedrooms or offices.
- Running Sound: Approximately 25-40 dB.

Image: Comparison of the fan's running sound level to other common sounds, highlighting its quiet operation.
5. Maintenance
5.1 Cleaning the Fan Blades
Regular cleaning helps maintain optimal performance and airflow.
- Ensure the fan is powered off and disconnected from any power source before cleaning.
- To remove the front grille, gently twist it counter-clockwise until it detaches.
- Use a dry cloth or soft brush to clean dust from the fan blades and the inside of the grille. Do not use water or liquid cleaners on the fan blades or motor.
- Once clean, align the grille and twist it clockwise to secure it back in place.
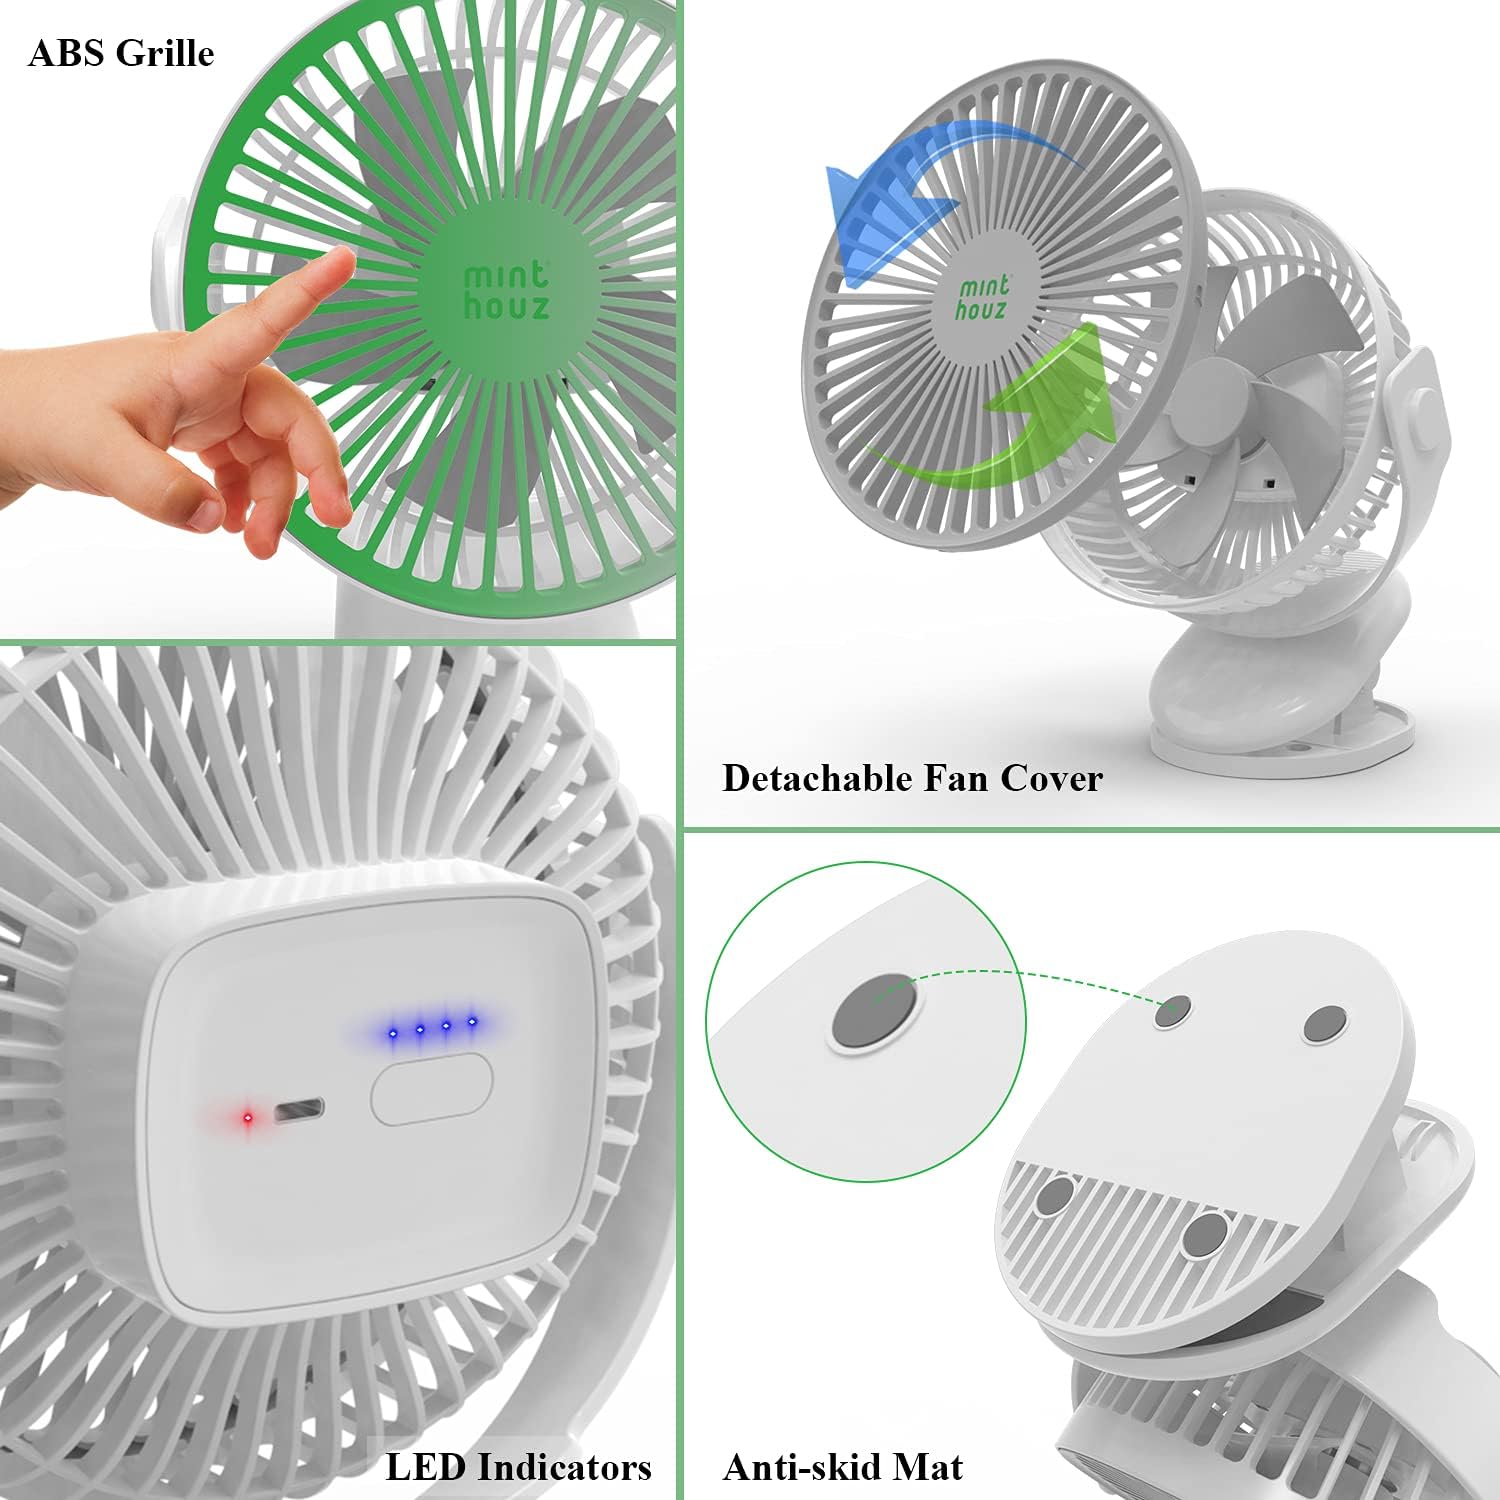
Image: Close-up view of the fan's detachable cover and anti-skid mat.
6. Troubleshooting
If you encounter issues with your Minthouz fan, refer to the following common problems and solutions:
| Problem | Possible Cause | Solution |
|---|---|---|
| Fan does not turn on. | Battery is depleted. | Charge the fan for at least 6 hours. |
| Power button not pressed correctly. | Ensure the power button is pressed firmly. | |
| Weak airflow. | Fan blades are dirty. | Clean the fan blades as described in the Maintenance section. |
| Fan is on a low speed setting. | Increase the fan speed by pressing the power button. | |
| Unusual noise during operation. | Obstruction in fan blades. | Turn off the fan and check for any foreign objects. Clean if necessary. |
| Fan not placed on a stable surface. | Ensure the fan is on a flat, stable surface or securely clipped. |
7. Specifications
| Model Number | MT-L007F-WI |
| Brand | Minthouz |
| Battery Type | 1 Lithium-polymer (4000 mAh) |
| Charging Time | Approximately 6 hours |
| Operating Time | 4 to 27 hours (depending on speed) |
| Dimensions (L x W x H) | 20.07 x 14.99 x 27.69 cm (7.9" x 5.9" x 10.9") |
| Weight | 770 Grams |
| Material | Acrylonitrile Butadiene Styrene (ABS) |
| Number of Speeds | 4 |
| Noise Level | Up to 40 Decibels |
| Power | 4.2 Watts |
| Number of Blades | 5 |
| Voltage | 4.2 Volts |
| Special Features | USB Power, 360° Horizontal & Vertical Rotation |
8. Warranty and Support
For warranty information or technical support, please refer to the documentation included with your purchase or contact Minthouz customer service directly. Contact details can typically be found on the product packaging or the official Minthouz website.