1. Introduction
Thank you for choosing the WSDCAM Smart Bike Tail Light. This device integrates multiple safety and security features for your bicycle, including a tail light, turn signals, brake light, horn, and anti-theft alarm. This manual provides detailed instructions for installation, operation, and maintenance to ensure optimal performance and safety.
For your safety, please read this manual thoroughly before using the product.
2. Product Features
- 5-in-1 Functionality: Combines ultra-bright tail light, turn signals, auto brake light, 110dB bike horn, and anti-theft vibration alarm.
- Ultra-Bright Rear Light: 160 lumens with 31 high-end LED lights, offering 6 light modes (Slow Flashing, Breathing, Fast Blinking, Steady Light, Emergency Light, OFF).
- Bike Turn Signals: Remote-controlled left/right turn signals with an audible clicking sound for clear indication.
- Smart Auto Brake Light: Automatically highlights for 2 seconds upon braking to alert following traffic.
- Anti-Theft Vibration Alarm: 110dB alarm with 7 adjustable sensitivity levels to deter theft.
- Loud Bike Horn: 110dB horn with 3 selectable tones (electric car sound, horn sound, birdcall sound).
- Smart Auto ON/OFF: Built-in light and motion sensors for automatic operation in dark environments and power saving in bright conditions.
- Wireless Remote Control: Easy handlebar mounting with button lock function and strong wireless range (up to 98-196ft).
- USB-C Rechargeable: Built-in 3.7V 2000mAh lithium battery with charging level indicator, offering long battery life (up to 70 hours on fast flash mode).
- Durable Design: IP54 waterproof rating, high and low temperature resistance.
3. Package Contents
- WSDCAM Smart Bike Tail Light (Main Unit)
- Wireless Remote Control (Square Remote)
- Tail Light Mounting Clamp
- Upgraded Universal Silicone Remote Holder
- USB-C Charging Cable
- User Manual (This Document)
4. Specifications
| Parameter | Value |
|---|---|
| Max Light Output | 160 Lumens |
| Number of LEDs | 31 |
| Alarm/Horn Noise Level | 110dB |
| Waterproof Rating | IP54 (Tail Light & Remote) |
| Remote Range | Up to 98ft (up to 196ft in open air) |
| Tail Light Battery | 3.7V 2000mAh Lithium (included) |
| Remote Battery | 3V CR2032 (included) |
| Charging Time | Approx. 7 hours (with original USB cable and 3A charger) |
| Tail Light Battery Life (Fast Flash) | Up to 70 hours |
| Tail Light Battery Life (Steady Mode) | Up to 30 hours |
| Remote Battery Life | Up to 3 years (30 times/day) |
| Working Temperature | -40 ~ +60°C |
| Storage Temperature | -40 ~ +70°C |
| Working Humidity | <80% |
5. Setup and Installation
5.1 Initial Charging
Before first use, fully charge the alarm taillight using the original USB-C cable and a 3A adapter. This activates the device and enables remote functionality. The charging level indicator will show progress.

Image: The WSDCAM Smart Bike Tail Light connected to a USB-C charger, with an illustration of the charging level indicator showing 25%, 50%, 75%, and 100% charge levels. This image demonstrates the charging process and battery status indicators.
5.2 Tail Light Installation
- Attach the tail light mounting clamp to your bike's seat post. Ensure it is securely fastened.
- Insert the alarm taillight into the mounting clamp. Push firmly until you hear a "KA" sound, indicating it is locked in place. This prevents the taillight from detaching easily during rides.

Image: The WSDCAM Smart Bike Tail Light mounted on a bicycle seat post, with the square remote control attached to the handlebar. This image illustrates the primary components installed on a bicycle.

Image: A diagram showing the tail light holder and the upgraded universal silicone remote holder, emphasizing easy and secure installation with no-slip features. This image highlights the mounting accessories.
5.3 Remote Control Installation
Use the upgraded universal silicone remote holder to attach the remote control to your bike's handlebar. The silicone holder is durable and adjustable to fit various handlebar sizes without tools.
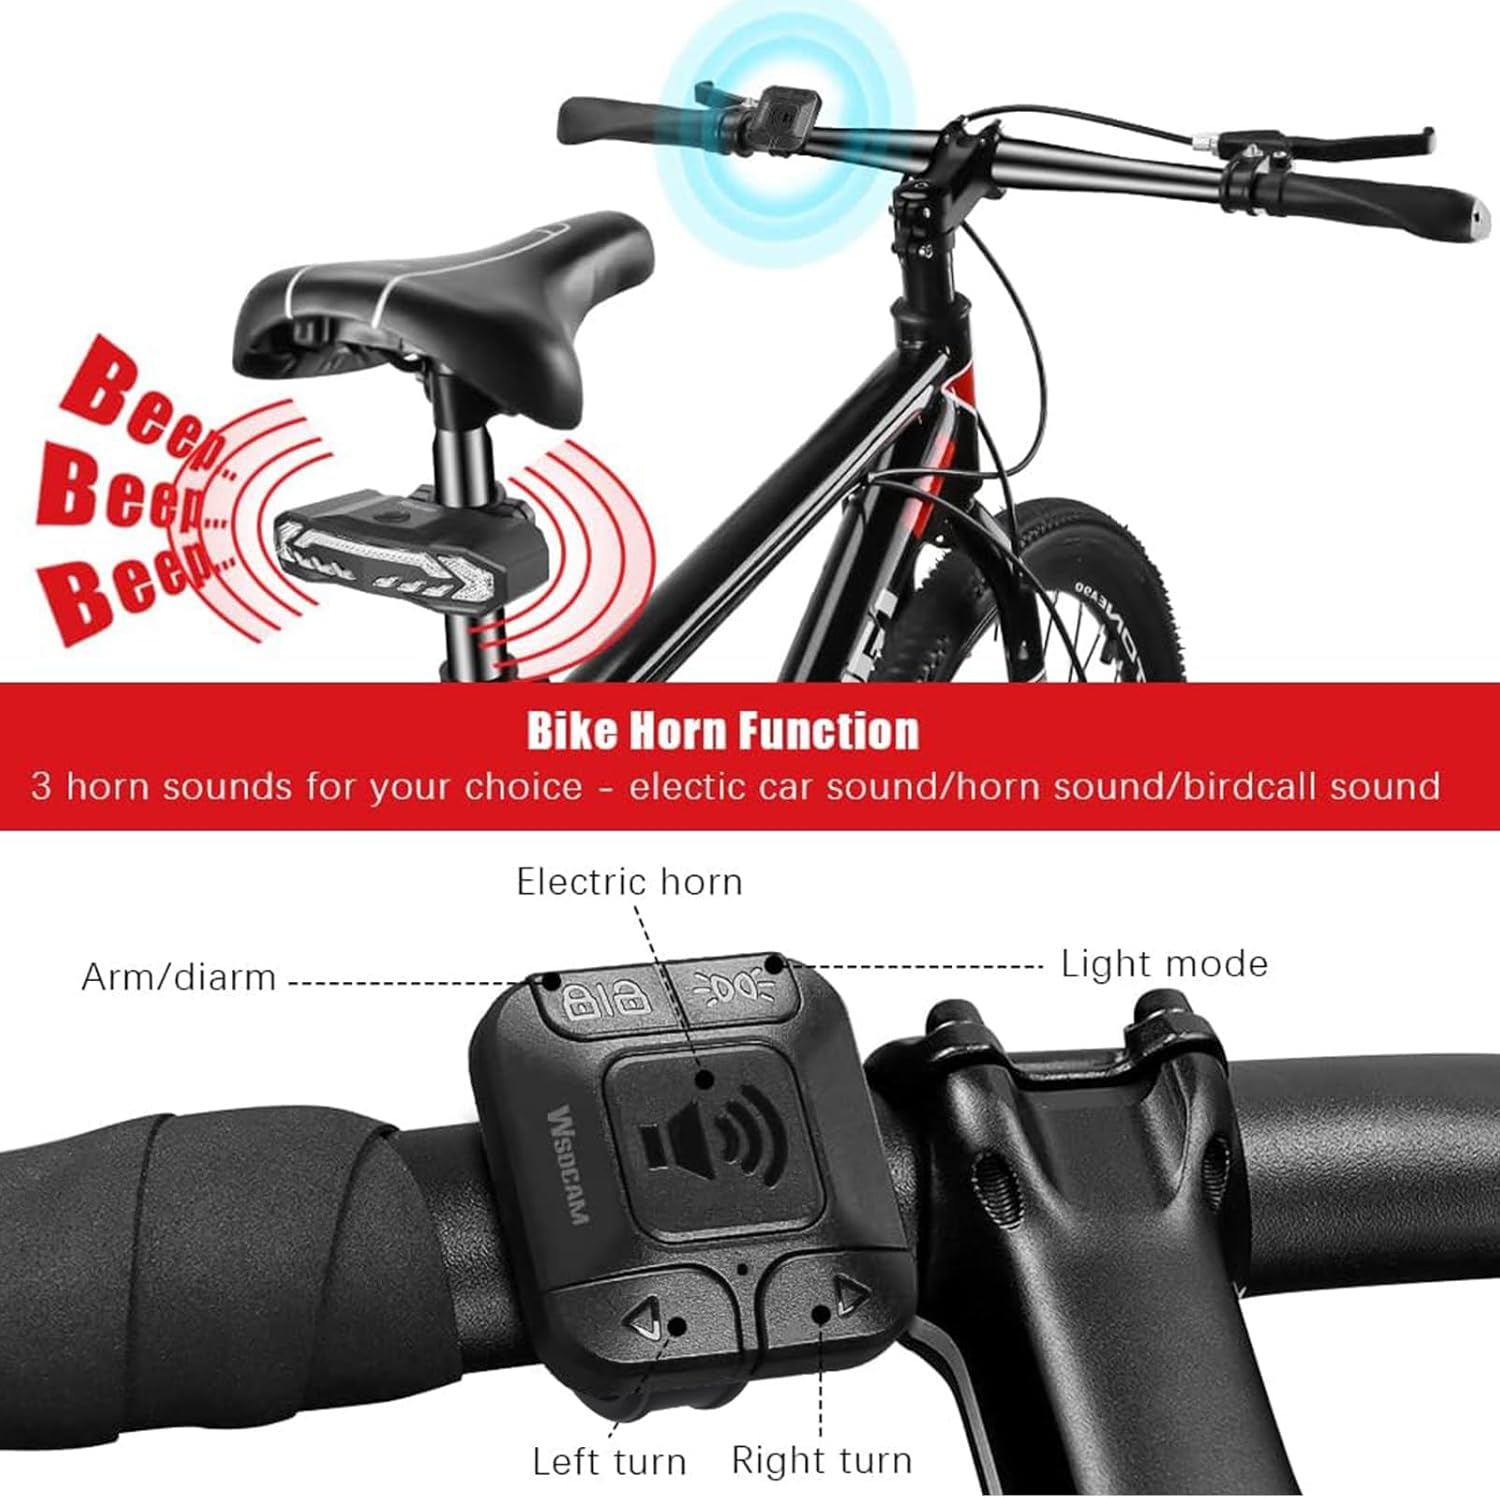
Image: A close-up view of the remote control mounted on a bicycle handlebar, with labels pointing to the Arm/Disarm, Light Mode, Electric Horn, Left Turn, and Right Turn buttons. This image details the remote control's layout and functions.
6. Operating Instructions
6.1 Power On/Off
The tail light automatically turns on when motion is detected in dark environments (in Slow Flashing & Breathing modes). To manually turn off, cycle through all light modes using the remote until OFF is selected.
6.2 Light Modes
Press the Light Mode button on the remote control to cycle through the 6 available light modes:
- Slow Flashing
- Breathing
- Fast Blinking
- Steady Light
- Emergency Light (Yellow Flashing)
- OFF

Image: A visual representation of the six tail light modes: Slow Flashing, Breathing, Fast Blinking, Steady Light, and Emergency Light, shown on the tail light and a cyclist. This image demonstrates the various illumination patterns.
6.3 Turn Signals
To activate turn signals, press the R (Right) or L (Left) button on the remote control. The corresponding signal lights will flash, accompanied by an audible clicking sound. Press the button again to deactivate the signal.

Image: Illustrations showing the tail light activating for smart brake, right turn signal, and left turn signal, with a cyclist demonstrating the brake light function. This image clarifies the visual cues for braking and turning.
6.4 Auto Brake Light
The built-in G-sensor detects when you brake. The rear light will automatically highlight for 2 seconds to alert drivers behind you. This feature is active in Slow Flashing, Breathing, Fast Blinking, and Steady Light modes.
6.5 Bike Horn Function
Press the Horn button on the remote control to activate the 110dB horn. You can cycle through 3 different horn tones by pressing the horn button repeatedly:
- Electric car sound
- Standard horn sound
- Birdcall sound

Image: A bicycle with the remote control on the handlebar and the tail light on the seat post, illustrating the 110dB bike horn function with sound waves emanating from the remote and tail light. This image highlights the horn's loudness and remote activation.
6.6 Anti-Theft Vibration Alarm
To arm the alarm, press the Arm/Disarm button (lock icon) on the remote control. The alarm will emit a confirmation sound. If vibration is detected, the 110dB alarm will sound to deter thieves.
To disarm the alarm, press the Arm/Disarm button again.
Adjusting Sensitivity: The alarm has 7 adjustable sensitivity levels. Refer to the manufacturer's instructions for specific steps to adjust sensitivity, typically involving a combination of button presses on the remote or main unit while in arming mode.

Image: A close-up of the WSDCAM Smart Bike Tail Light, emphasizing its 110dB alarm function with visual cues of sound waves and illustrations of a person attempting to steal a bike. This image highlights the anti-theft feature.

Image: A bicycle parked outdoors at night with a person attempting to tamper with it, illustrating the anti-theft alarm function and its 110dB sound. This image shows the alarm in action, providing peace of mind when parking.
6.7 Smart Auto ON/OFF
The tail light features intelligent light and motion sensors:
- In Slow Flashing and Breathing modes, the tail light automatically turns off after 30 seconds of inactivity in dark environments. It will turn on again when motion is detected.
- In bright environments, the tail light automatically turns off to conserve power.
- If you require the tail light to be on during daytime, select Fast Blinking or Steady Light modes, as these modes do not have the smart auto ON/OFF function.

Image: A sequence of three images demonstrating the smart auto ON/OFF function: the light turning off after inactivity in dark environments, turning on with motion in dark environments, and turning off in bright environments. This image visually explains the intelligent sensor behavior.
7. Maintenance
- Cleaning: Wipe the tail light and remote with a soft, damp cloth. Do not use abrasive cleaners or solvents.
- Charging: Recharge the tail light regularly, especially if not used for extended periods, to maintain battery health.
- Storage: Store the device in a cool, dry place when not in use. If storing for a long time, ensure the battery is partially charged (around 50%) to prevent deep discharge.
- Water Resistance: The device is IP54 waterproof, meaning it is protected from splashing water from any direction. Avoid submerging the device in water.

Image: The WSDCAM Smart Bike Tail Light with water droplets on its surface, illustrating its IP65 waterproof rating. This image emphasizes the device's durability against water exposure.
8. Troubleshooting
| Problem | Possible Cause | Solution |
|---|---|---|
| Tail light not turning on/responding to remote. | Low battery; Not activated after initial charge; Remote battery low; Remote not paired. | Fully charge the tail light. Ensure initial activation by charging with a 3A adapter. Replace remote CR2032 battery. Re-pair remote if necessary (refer to manufacturer's pairing instructions, usually involves holding buttons on both devices). |
| Tail light pops off mounting clamp. | Not inserted correctly. | Ensure you hear a "KA" sound when inserting the tail light into the clamp, indicating it's securely locked. |
| Alarm sensitivity too high/low. | Incorrect sensitivity setting. | Adjust the alarm sensitivity (7 levels available). Refer to specific instructions for sensitivity adjustment, usually found in the full product manual or manufacturer's website. |
| Smart Auto ON/OFF not working as expected. | Operating in non-smart modes; Bright environment. | Ensure the tail light is in Slow Flashing or Breathing mode for smart functionality. In bright environments, the light will automatically turn off to save power. |
9. Warranty and Support
WSDCAM products are designed for reliability and performance. For warranty information, technical support, or service inquiries, please contact WSDCAM customer service through the retailer where you purchased the product or visit the official WSDCAM website. Please retain your proof of purchase for warranty claims.
Note: Please refer to the official WSDCAM website or product packaging for the most up-to-date warranty terms and contact information.


