1. Product Overview
The Kiprim DS1202 is a dual-channel digital oscilloscope designed for precise waveform analysis. It features a 7-inch TFT LCD display and offers a range of functions suitable for various electronic testing and measurement applications.

Figure 1: Front view of the Kiprim DS1202 Digital Oscilloscope, showcasing its 7-inch display and control panel.
Key Features:
- Bandwidth: 120 MHz, dual channels.
- Sampling Rate: 1 GSa/s.
- Time Base Range: 2 ns/div to 1000 s/div.
- Storage Depth: Over 10K sampling points.
- Display: Large 7-inch TFT LCD (true color), 65535 colors, 800 x 480 pixel resolution.
- Measurement Functions: Cursor measurement, 4 automatic cursor modes, 30 automatic measurement functions.
- Trigger Types: Edge trigger, Video trigger.
- Connectivity: USB device and host interface for U-disk storage and computer connection.
- Mathematical Operations: Addition, subtraction, multiplication, division, FFT.

Figure 2: Illustrates the diverse applications of the DS1202 oscilloscope, including industrial, automotive, medical, and educational settings.
2. Package Contents
Verify that all items listed below are included in your package. If any items are missing or damaged, please contact Kiprim customer support.

Figure 3: Contents of the Kiprim DS1202 package, including the oscilloscope, probes, power cord, USB cable, user instructions, and software CD.
- Kiprim DS1202 Digital Oscilloscope Unit
- Oscilloscope Probes (2)
- Power Cord
- USB Cable
- User Instructions Manual
- Software CD
3. Product Layout and Controls
Familiarize yourself with the various components and controls of the DS1202 oscilloscope for effective operation.
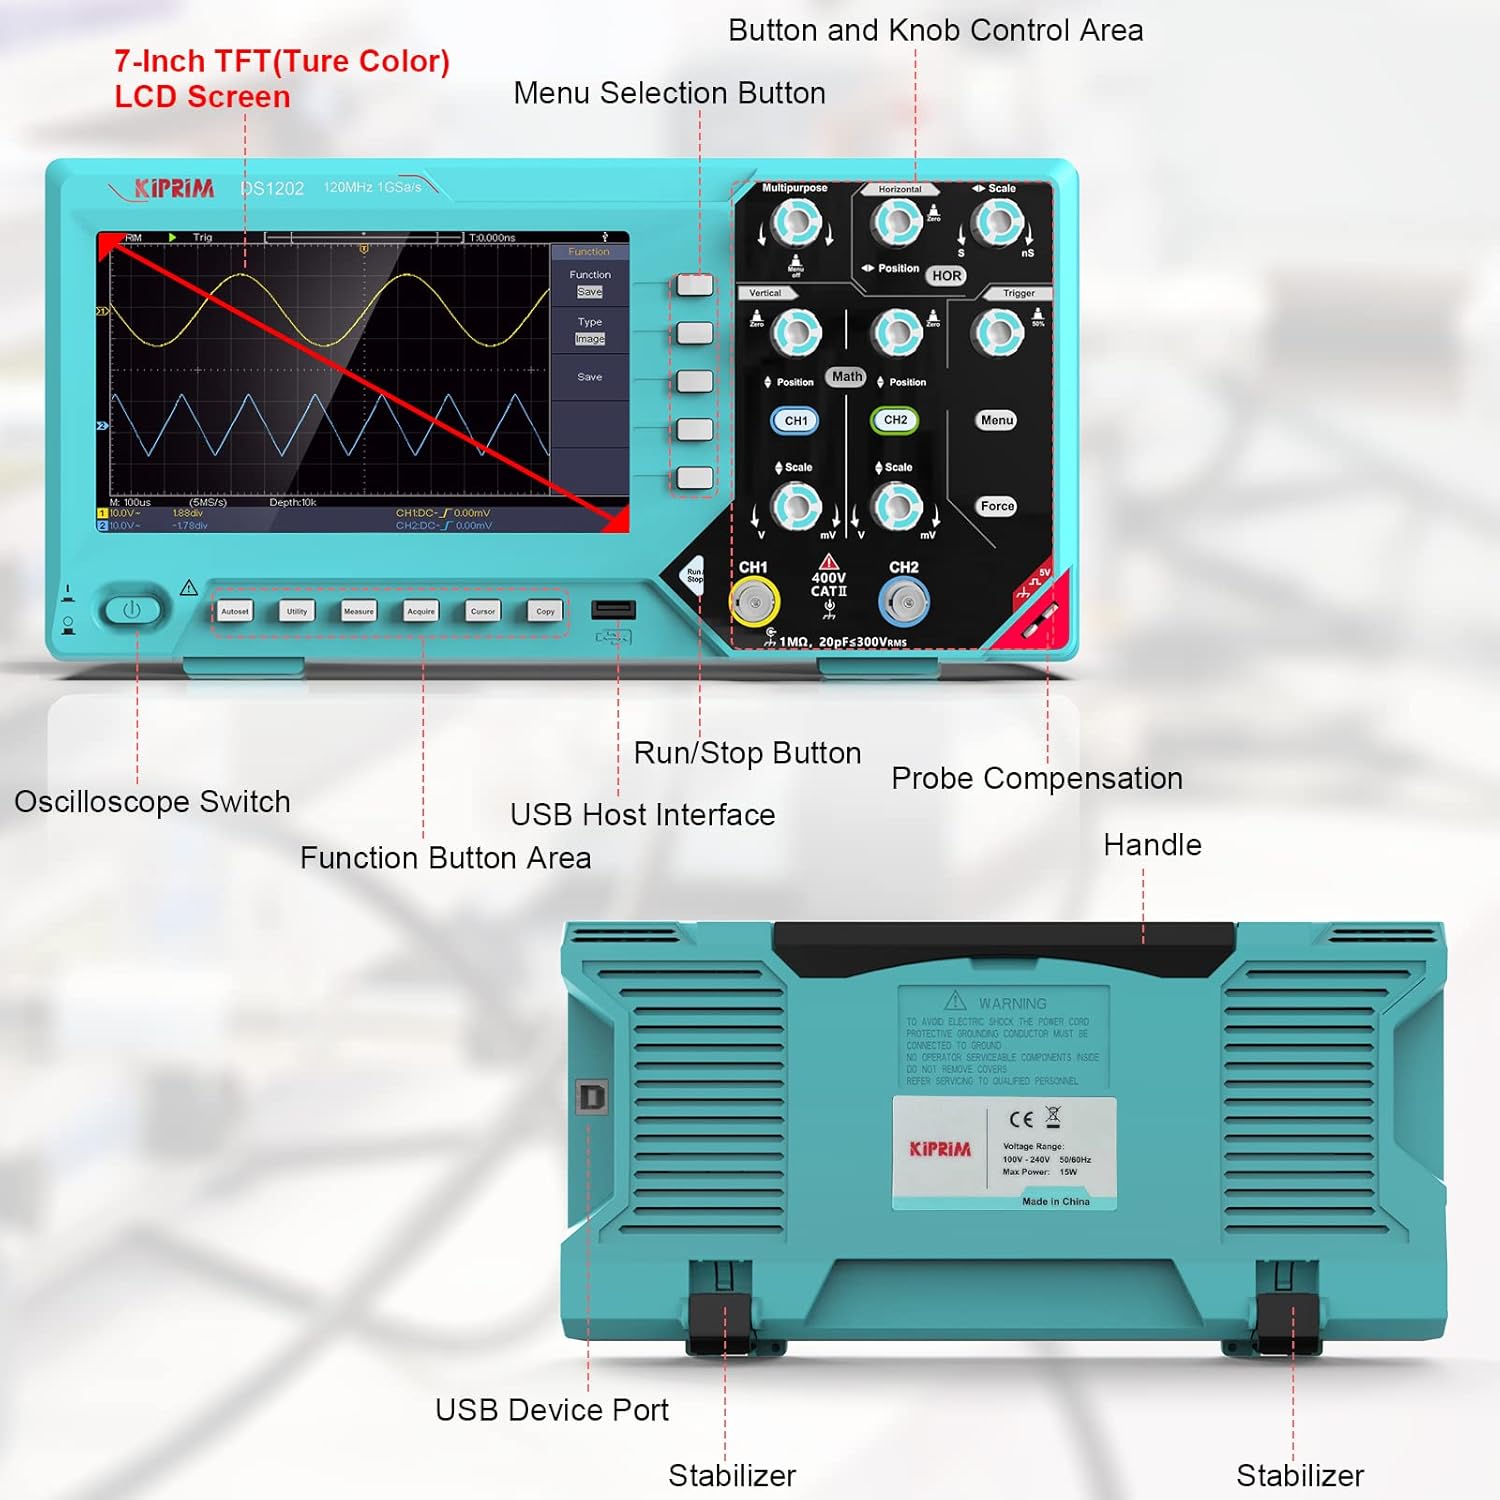
Figure 4: Detailed diagram labeling the key components of the Kiprim DS1202, including the 7-inch TFT LCD screen, menu selection buttons, function button area, oscilloscope switch, USB host interface, probe compensation, handle, USB device port, and stabilizers.
- 7-inch TFT LCD Screen: Main display for waveforms and menu options.
- Button and Knob Control Area: Contains various knobs and buttons for adjusting settings (e.g., Vertical, Horizontal, Trigger, Position, Scale).
- Function Button Area: Dedicated buttons for common functions like AutoSet, Utility, Measure, Acquire, Cursor, Copy.
- Oscilloscope Switch: Power on/off button.
- USB Host Interface: For connecting USB storage devices.
- USB Device Port: For connecting to a computer.
- Probe Compensation: Terminal for probe calibration.
4. Setup
4.1 Initial Power-On
- Connect the power cord to the oscilloscope and a suitable power outlet.
- Press the Oscilloscope Switch (power button) to turn on the device.
- Allow the device to complete its startup sequence.
4.2 Probe Connection and Compensation
Before taking measurements, ensure your probes are correctly connected and compensated for accurate readings.
- Connect the oscilloscope probe to the desired input channel (CH1 or CH2).
- Connect the probe tip to the Probe Compensation terminal and the ground clip to the ground terminal.
- Press the AutoSet button. The oscilloscope will automatically adjust settings to display a stable square wave.
- Adjust the compensation screw on the probe until the square wave displayed on the screen has flat top and bottom edges without overshoot or undershoot.
5. Operating Instructions
This section details the primary functions and operations of the Kiprim DS1202 oscilloscope.
Video 1: An operational demonstration of the Kiprim DS1202 dual-channel oscilloscope, showing various functions and waveform displays.
5.1 Basic Waveform Display
After probe compensation, connect the probe to the circuit you wish to test. The oscilloscope will display the waveform. Use the Vertical Scale and Horizontal Scale knobs to adjust the waveform's amplitude and time base, respectively. The Position knobs allow you to move the waveform vertically or horizontally on the screen.
5.2 Trigger Settings
The trigger system stabilizes repetitive waveforms and captures single-shot events. Press the Trigger button to access trigger settings.
- Type: Select Edge or Video trigger.
- Source: Choose the input channel (CH1, CH2, EXT).
- Mode: Select Auto, Normal, or Single.
- Adjust the trigger level using the dedicated knob to set the voltage point at which the trigger occurs.
5.3 Automatic Measurements
The DS1202 offers 30 automatic measurement functions for quick analysis of waveform parameters.

Figure 5: The oscilloscope display showing a comprehensive list of automatic measurement results for a waveform, including Period, Frequency, Peak-to-Peak voltage, Mean, RMS, and more.
- Press the Measure button.
- Use the menu options to select the desired measurement parameters (e.g., Frequency, Period, Vpp, Vmax, Vmin).
- The selected measurements will be displayed on the screen.
5.4 Mathematical Operations (FFT)
The oscilloscope can perform mathematical operations on waveforms, including FFT (Fast Fourier Transform) for frequency domain analysis.
- Press the Math button.
- Select the desired operation (Add, Subtract, Multiply, Divide, FFT).
- Configure the source channels and other parameters as needed.
5.5 Waveform Storage and Recall
The DS1202 can store up to 16 groups of waveforms and supports U-disk storage for extended data logging.

Figure 6: The Kiprim DS1202 oscilloscope connected to a signal generator, demonstrating its ability to display different waveform types such as sine, ramp, arbitrary, square, and pulse waves.
- To save a waveform, press the Copy button or navigate to the save option in the menu.
- To save to a U-disk, insert the U-disk into the USB host interface and select the appropriate save option.
- Stored waveforms can be recalled for later analysis.
6. Connectivity and Software
The Kiprim DS1202 supports connection to a computer for data transfer and further analysis.

Figure 7: The Kiprim DS1202 oscilloscope connected to a laptop, illustrating its data storage, waveform setting storage, U-disk functionality, and software upgrade capabilities.
6.1 Computer Connection
Connect the oscilloscope to your computer using the provided USB cable via the USB device port.
6.2 Software and Drivers
For computer connectivity and advanced features, specific software and drivers may be required. These can typically be found on the manufacturer's support page or via the provided software CD.
- Software and driver download link: dropbox.com/s/8g8yzy6kd3myedb/DS1202.rar?dl=0
- The oscilloscope supports LABVIEW communication and secondary development.
7. Maintenance
Proper maintenance ensures the longevity and accuracy of your Kiprim DS1202 oscilloscope.
- Cleaning: Use a soft, dry cloth to clean the exterior of the oscilloscope. For stubborn dirt, a lightly dampened cloth with mild detergent can be used. Avoid abrasive cleaners or solvents.
- Storage: Store the oscilloscope in a clean, dry environment away from direct sunlight, extreme temperatures, and high humidity.
- Probe Care: Handle probes carefully. Avoid bending or twisting the cables excessively. Store them properly to prevent damage to the tips.
- Safety: Always disconnect the power before cleaning or performing any maintenance. Do not attempt to open the device casing, as this may void the warranty and expose you to electrical hazards.
8. Troubleshooting
This section addresses common issues you might encounter with your Kiprim DS1202 oscilloscope.
8.1 No Display After Power On
- Ensure the power cord is securely connected to both the oscilloscope and the power outlet.
- Verify that the power outlet is functional.
- Check the power switch is in the 'ON' position.
8.2 Unstable Waveform
- Adjust the Trigger Level to a suitable point on the waveform.
- Check the Trigger Mode (Auto, Normal, Single) and select the appropriate one for your signal.
- Ensure the probe compensation is correctly adjusted (refer to Section 4.2).
- Verify that the probe is securely connected to the input channel and the ground clip is attached to the circuit's ground.
8.3 No Signal Detected
- Confirm the probe is properly connected to the signal source.
- Check the Vertical Scale setting; the signal might be too small to be visible.
- Press the AutoSet button to allow the oscilloscope to automatically find and display the signal.
- Ensure the input coupling (AC/DC/GND) is set correctly for your signal.
9. Specifications
Technical specifications for the Kiprim DS1202 Digital Oscilloscope.
| Specification | Value |
|---|---|
| Product Dimensions | 11.85 x 2.76 x 5.98 inches |
| Item Model Number | DS1202 |
| Weight | 3.66 Pounds |
| Manufacturer | Kiprim |
| ASIN | B098LBV339 |
| Bandwidth | 120 MHz |
| Channels | 2 |
| Sampling Rate | 1 GSa/s |
| Display Type | 7-inch TFT LCD |
| Display Resolution | 800 x 480 pixels |
10. Support
For additional assistance, software downloads, or to report issues, please contact Kiprim customer support.
- Software and Driver Downloads: Access the latest software and drivers for your DS1202 oscilloscope via this link: dropbox.com/s/8g8yzy6kd3myedb/DS1202.rar?dl=0
- Customer Service: For further instructions or support regarding computer connectivity and other functions, please contact Kiprim through Amazon.
- Brand Store: Explore other Kiprim products and resources at the official Kiprim Store: Kiprim Store on Amazon

