Product Overview
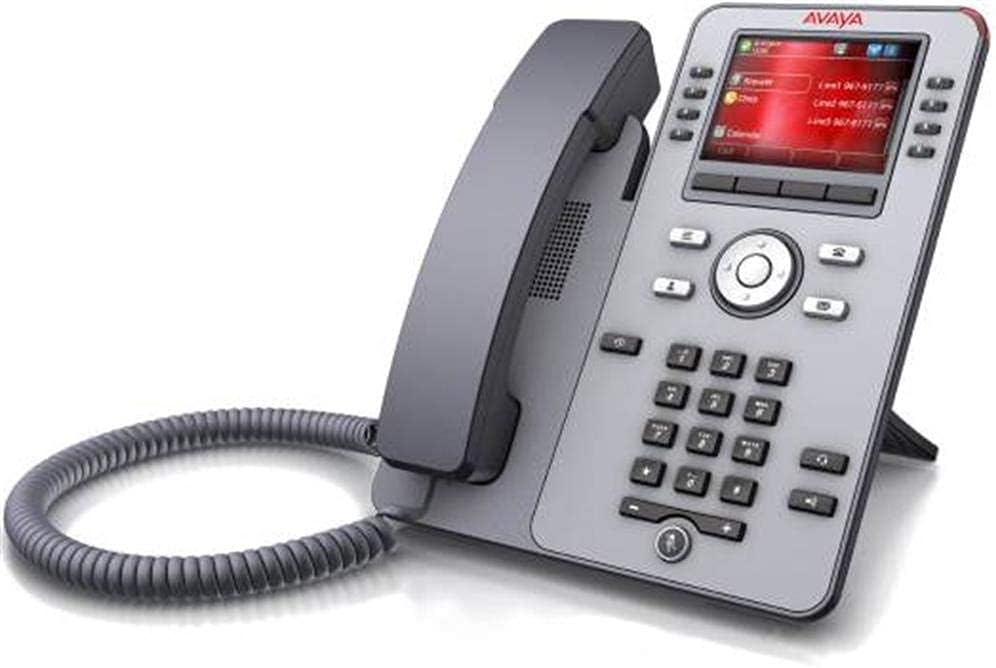
Image: The Avaya J179 700513569 VoIP Telephone, featuring a gray body, a color display, a numeric keypad, and function buttons. The handset is cradled on the left side, connected by a coiled cord.
The Avaya J179 700513569 is a 24-key self-labeling color Gigabit VoIP telephone designed for professional communication environments. This device integrates advanced features for efficient call handling and network connectivity. As a renewed product, it has undergone professional inspection and testing to ensure it functions and appears like new, adhering to high quality standards.
Key Features
- 24 Key Self-Labeling: Customizable keys for quick access to contacts and features.
- Color Display: Provides a clear and intuitive user interface.
- Gigabit Ethernet: Ensures high-speed network connectivity for voice and data.
- VoIP Technology: Utilizes Voice over Internet Protocol for cost-effective and flexible communication.
- Corded Electric Power: Reliable power source for continuous operation.
- 3-Way Conference Call Capability: Facilitates multi-party conversations.
Setup Guide
- Unpack the Device: Carefully remove the telephone, handset, coiled cord, and Ethernet cable from the packaging. Inspect all components for any visible damage.
- Connect the Handset: Plug one end of the coiled handset cord into the handset and the other end into the designated handset port on the telephone base.
- Connect to Network: Connect one end of the Ethernet cable to the LAN port on the back of the telephone and the other end to an active network port (e.g., a network switch or router). Ensure the network port supports Gigabit Ethernet for optimal performance.
- Connect Power: If your network does not provide Power over Ethernet (PoE), connect the included power adapter to the power port on the telephone and then plug it into a standard electrical outlet. The phone will power on automatically.
- Initial Boot-up: Allow the telephone to complete its boot-up sequence. This may take a few minutes as it connects to the network and registers with your VoIP system. Follow any on-screen prompts for initial configuration if necessary.
Operating Instructions
Making a Call
- Lift Handset: Lift the handset or press the Speaker button to activate the dial tone.
- Dial Number: Use the numeric keypad to enter the desired phone number.
- Initiate Call: The call will typically connect automatically after dialing, or you may need to press a 'Dial' or 'Send' button if available on the screen.
Answering a Call
- Lift Handset: When the phone rings, lift the handset to answer the call.
- Speaker/Headset: Alternatively, press the Speaker button or the Headset button (if a headset is connected) to answer the call without lifting the handset.
Using Self-Labeling Keys
The Avaya J179 features self-labeling keys, which display their current function directly on the color screen next to the physical button. These keys can be programmed for various functions such as speed dial, line appearances, or feature access codes. Consult your system administrator for specific programming and usage of these keys.
Conference Calls (3-Way)
- Establish First Call: Make or answer a call with the first party.
- Initiate Conference: Press the 'Conference' or 'Conf' button (often a soft key on the display). The first party will be put on hold.
- Dial Second Party: Dial the number of the second party you wish to add to the conference.
- Join Calls: Once the second party answers, press the 'Conference' or 'Conf' button again to join all three parties into a single conversation.
Maintenance
- Cleaning: Use a soft, dry, lint-free cloth to clean the exterior surfaces of the telephone and display. For stubborn marks, a slightly damp cloth with mild, non-abrasive cleaner can be used, ensuring no liquid enters openings.
- Avoid Liquids: Do not spray cleaners directly onto the phone. Avoid using harsh chemicals, solvents, or abrasive materials, as these can damage the finish and internal components.
- Cable Management: Ensure all cables (handset, network, power) are securely connected and not kinked or strained.
- Environmental Conditions: Keep the telephone in a dry environment, away from direct sunlight, excessive heat, and extreme cold.
Troubleshooting
| Problem | Possible Cause | Solution |
|---|---|---|
| No dial tone or phone not powering on. | Power cable loose or disconnected; network cable disconnected; no PoE from network. | Check power adapter connection to phone and outlet. Ensure Ethernet cable is securely plugged into both the phone's LAN port and the network port. If not using PoE, confirm power adapter is in use. |
| Cannot make or receive calls. | Network connectivity issue; VoIP service not registered; incorrect configuration. | Verify network cable connection. Restart the phone by unplugging and re-plugging the power/Ethernet cable. Contact your IT department or VoIP service provider to check service registration and configuration. |
| Display is blank or frozen. | Temporary software glitch; power issue. | Perform a power cycle: Disconnect the power/Ethernet cable for 10 seconds, then reconnect. If the issue persists, contact support. |
| Poor call quality (e.g., static, echo). | Network congestion; faulty handset cord; environmental interference. | Check network performance. Ensure handset cord is fully inserted and not damaged. Try moving the phone away from other electronic devices. |
Technical Specifications
| Attribute | Value |
|---|---|
| Product Dimensions | 15 x 12 x 6 inches |
| Item Weight | 2.1 pounds |
| Telephone Type | Corded VoIP Telephone |
| Power Source | Corded Electric (or Power over Ethernet) |
| Dialer Type | Single Keypad |
| Answering System Type | Digital (requires compatible VoIP service) |
| Conference Call Capability | 3-way |
| Multiline Operation | Single-Line Operation (per configured line) |
| Compatible Devices | Computer systems, VoIP services, PSTN/ISDN networks (with appropriate adapters/services), answering machines, fax machines |
| Manufacturer | Avaya Inc. |
Warranty and Support
This Avaya J179 telephone is sold as an Amazon Renewed product. Amazon Renewed products are backed by the Amazon Renewed Guarantee. This guarantee provides for a replacement or refund within 90 days of receipt if you are not satisfied with your purchase.
For technical support, configuration assistance, or issues related to your VoIP service, please contact your organization's IT department or your VoIP service provider. For product-specific issues or warranty claims related to the renewed condition, please refer to your Amazon order details to contact the seller (Tellia) or Amazon customer support directly.
Please retain your purchase receipt for any warranty or support inquiries.


