
1. Introduction
Thank you for choosing the Recordio GAX-HM80 Professional DJ Flight Mixer. This integrated audio system is designed for high-power performance, ideal for outdoor stages and professional DJ setups. It combines an 8-channel mixer with a powerful amplifier, all housed in a durable flight case for portability and protection. This manual provides essential information for setting up, operating, and maintaining your GAX-HM80 mixer to ensure optimal performance and longevity.

Figure 1: The GAX-HM80 Professional DJ Flight Mixer in its robust hard case.
2. Key Features
- 8-Channel Mixer: Provides versatile input options for microphones, instruments, and other audio sources.
- Integrated High-Power Amplifier: Delivers 650W*2 output, suitable for driving speakers directly.
- Durable Flight Case Design: Offers superior protection and portability for mobile use.
- Built-in Bluetooth Connectivity: Allows for wireless audio streaming from compatible devices.
- 48V Phantom Power: Supports condenser microphones for studio-quality sound.
- USB Interface: For direct connection to computers or USB storage devices.
- Comprehensive EQ Controls: Gain, Treble, Alto, and Bass knobs for each channel, plus a seven-segment equalizer for master output.
- Effect Processor: Integrated effects for enhancing vocals and instruments.

Figure 2: Detail showing the robust construction and integrated amplifier design.
3. Product Components and Controls
3.1 Front Panel Controls
The front panel provides access to all mixing controls for individual channels and master output.

Figure 3: Left side of the mixer panel, detailing Audio/Microphone Interface, Gain, Treble, Alto, Bass, Effect, Pan Balance knobs, Channel Switch, Solo button, and Volume Adjustment faders.
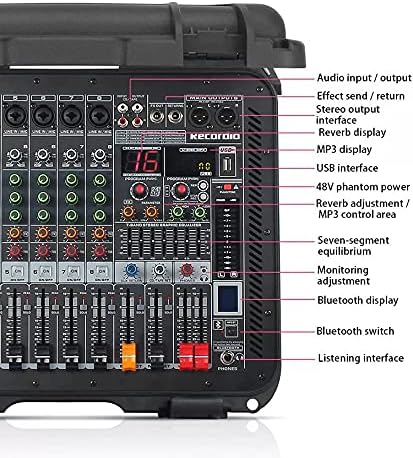
Figure 4: Right side of the mixer panel, detailing Audio Input/Output, Effect Send/Return, Stereo Output Interface, Reverb Display, MP3 Display, USB Interface, 48V Phantom Power, Reverb Adjustment/MP3 Control Area, Seven-Segment Equalizer, Monitoring Adjustment, Bluetooth Display, Bluetooth Switch, and Listening Interface (Headphones).
3.2 Rear Panel Connections
The rear panel houses the main power input and speaker outputs.

Figure 5: Rear panel connections, including Power Interface, Power Switch, Left Channel Power Output (Speakers Right A/B), and Right Channel Power Output (Speakers Left A/B).
4. Setup
- Unpacking: Carefully remove the mixer from its packaging. Inspect for any signs of damage during transit.
- Placement: Place the mixer on a stable, flat surface. Ensure adequate ventilation around the unit.
- Power Connection: Connect the provided power cable to the Power Interface on the rear panel (Figure 5). Plug the other end into a suitable AC power outlet (220-240V). Ensure the Power Switch is in the OFF position before connecting.
- Speaker Connection: Connect your passive speakers to the Left Channel Power Output (RIGHT A/B) and Right Channel Power Output (LEFT A/B) terminals on the rear panel (Figure 5). Ensure correct polarity.
- Input Connections: Connect microphones, instruments, or other audio sources to the Audio/Microphone Interface (XLR or 1/4" TRS) on the front panel (Figure 3).
- Headphones: Connect headphones to the Listening Interface (PHONES) for monitoring.
- Power On: Once all connections are secure, switch the Power Switch on the rear panel to the ON position.
5. Operation
5.1 Basic Mixing
- Gain Adjustment: For each channel, adjust the Gain knob (Figure 3) to achieve an optimal input level without clipping.
- EQ Adjustment: Use the Treble, Alto, and Bass knobs (Figure 3) to shape the tone of each individual channel.
- Pan Balance: Adjust the Pan Balance knob (Figure 3) to position the sound of each channel in the stereo field (left to right).
- Volume Adjustment: Use the Volume Adjustment faders (Figure 3) for each channel to control its output level.
- Master Volume: Adjust the main master volume fader to control the overall output level to your speakers.
- Effects: Use the Effect knob (Figure 3) on each channel to send signal to the built-in effect processor. Adjust the Reverb Adjustment/MP3 Control Area (Figure 4) for overall effect parameters.
5.2 Using Bluetooth
The GAX-HM80 features built-in Bluetooth for wireless audio streaming.
- Activate Bluetooth: Press the Bluetooth Switch (Figure 4) to enable Bluetooth mode. The Bluetooth Display will indicate readiness for pairing.
- Pairing: On your mobile device (smartphone, tablet, etc.), search for available Bluetooth devices. Select 'GAX-HM80' from the list to pair.
- Streaming: Once paired, audio played on your device will be streamed wirelessly to the mixer. Control playback and volume from your device or the mixer's master volume.

Figure 6: Example of wireless Bluetooth audio playback from a smartphone.
5.3 Phantom Power
The 48V Phantom Power (Figure 4) is essential for operating condenser microphones. Ensure phantom power is only activated when a condenser microphone is connected to avoid damage to other microphone types or equipment.
6. Maintenance
- Cleaning: Regularly wipe the mixer's surface with a soft, dry cloth. For stubborn dirt, use a slightly damp cloth and then dry thoroughly. Avoid abrasive cleaners or solvents.
- Ventilation: Ensure the cooling fan on the rear panel (Figure 5) is free from dust and obstructions to prevent overheating.
- Storage: When not in use, store the mixer in its protective flight case in a cool, dry place away from direct sunlight and extreme temperatures.
- Cable Management: Always disconnect cables properly by pulling the connector, not the cable itself, to prevent damage.
7. Troubleshooting
- No Power:
- Check if the power cable is securely connected to both the mixer and the power outlet.
- Verify that the power outlet is functional.
- Ensure the Power Switch on the rear panel is in the ON position.
- No Sound Output:
- Check all speaker connections on the rear panel.
- Ensure master volume and individual channel faders are raised.
- Verify input sources are connected correctly and producing sound.
- Check if any 'Solo' buttons are accidentally engaged, muting other channels.
- Distorted Sound:
- Reduce input Gain levels if the signal is clipping (indicated by peak LEDs).
- Check speaker impedance compatibility with the amplifier.
- Ensure cables are not damaged or faulty.
- Bluetooth Pairing Issues:
- Ensure the Bluetooth Switch is ON.
- Make sure the mixer is not already paired with another device.
- Move your device closer to the mixer.
- Try restarting both the mixer and your Bluetooth device.
8. Technical Specifications
| Specification | Value |
|---|---|
| Model Number | GAX-HM80 |
| Power Output | 650W*2 |
| Frequency Range | 20Hz~20KHz (±3dB) |
| Dimensions (L x W x H) | 495 x 340 x 38mm (mixer unit) / 55 x 45 x 29 cm (packaged) |
| Phantom Power | +48V |
| Total Harmonic Distortion + Noise | ≤0.003% (1KHz) |
| Signal to Noise Ratio | ≤80dB |
| Gain Control (Mono) | -60dB to -40dB |
| Output Level | 19dBm |
| Number of Channels | 8 |
| Connectivity Technology | Auxiliary, Bluetooth, USB |
| Audio Input | XLR, 1/4" TRS |
| Output Connector Type | XLR, Speaker Terminals |
| Item Weight | 12.8 kg |
9. Warranty and Support
For information regarding warranty coverage, technical support, or service, please refer to the warranty card included with your product or contact Recordio customer service directly. Please retain your proof of purchase for any warranty claims.
Manufacturer: ENPING RECORDIO ELECTRONICS MANUFACTURER