
1. Introduction
This manual provides detailed instructions for replacing the LCD LED display screen on your HP 14-DQ1089WM (192M7UA) laptop using the SCREENARAMA replacement screen. Please read all instructions carefully before beginning the installation process.
2. Product Overview and Specifications
The SCREENARAMA replacement screen is designed for specific laptop models. Ensure your laptop's original screen matches the specifications below for proper compatibility.
- Screen Size: 14.0 inches
- Resolution: HD 1366x768 pixels
- Surface Type: Matte
- Bezel Type: Narrow bezel
- Connector Type: 30-pin (Non-touch)
- Compatibility: Specifically for HP 14-DQ1089WM (192M7UA) and other models requiring identical specifications.

Figure 2.1: SCREENARAMA replacement screen and included installation tools.

Figure 2.2: This screen is compatible only with 1366x768 resolution. It is not compatible with higher resolutions like 1600x900, 1920x1080, or 3840x2160.

Figure 2.3: This product is an LCD screen only and does not include touchscreen functionality. It is not compatible with touchscreen laptops.
3. Safety Precautions
- Always disconnect the laptop's power adapter and remove the battery before starting any repair.
- Work in a clean, well-lit area.
- Use anti-static precautions (e.g., an anti-static wrist strap) to prevent damage to electronic components.
- Handle the new screen by its edges to avoid touching the display surface or internal components.
- Be gentle when disconnecting and reconnecting cables to prevent damage to connectors.
4. Installation Guide
This section outlines the general steps for replacing a laptop screen. Specific disassembly procedures may vary slightly by laptop model. Refer to your laptop's service manual for precise disassembly instructions if available.
4.1. Tools Required
The SCREENARAMA replacement screen comes with a complimentary set of tools and adhesive tape for installation. These typically include:
- Small Phillips head screwdriver
- Plastic prying tools (spudgers)
- Tweezers
- Precision knife (for adhesive removal)
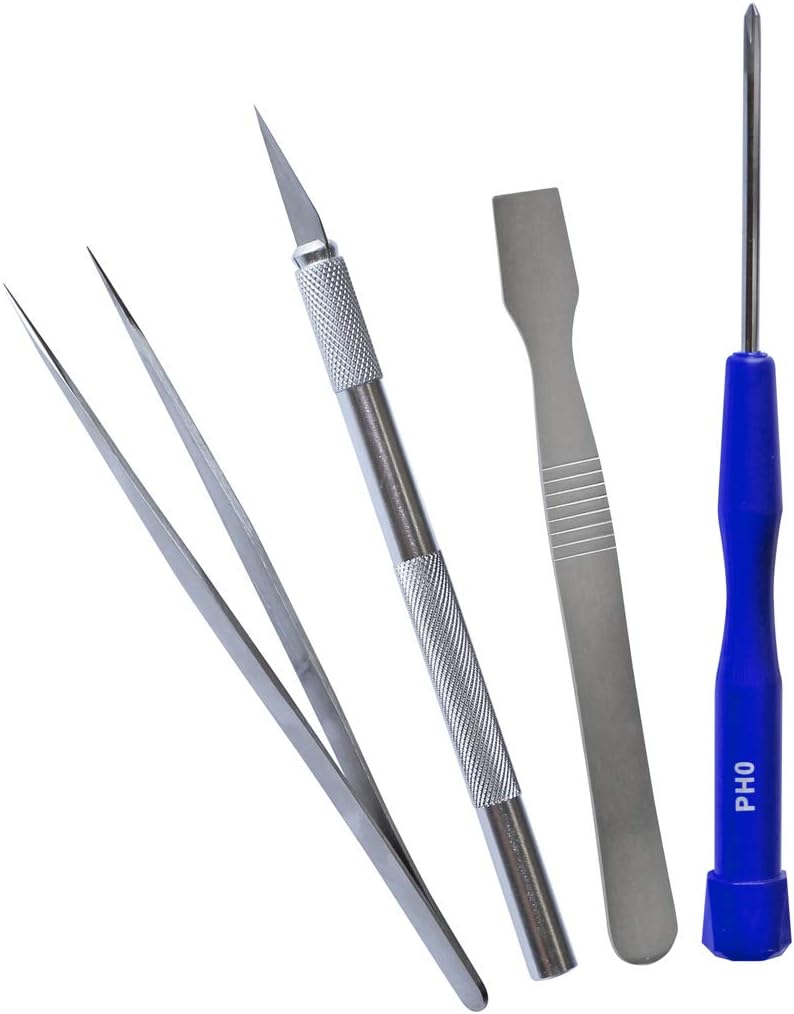
Figure 4.1: The set of tools provided with your SCREENARAMA replacement screen.
4.2. Pre-Installation Checks
- Verify Compatibility: Double-check that the resolution (1366x768) and connector type (30-pin) of the new screen match your original screen.
- Inspect the New Screen: Carefully unbox the new screen and inspect it for any physical damage before installation.

Figure 4.2: The back of the SCREENARAMA 14.0" HD screen, highlighting the 30-pin video connector.

Figure 4.3: Ensure your laptop's video connector is 30-pin. This screen is not compatible with 40-pin connectors.
4.3. Step-by-Step Installation
- Power Off and Disconnect: Shut down your laptop completely, disconnect the power adapter, and remove the battery.
- Remove Bezel Screws: Carefully inspect the screen bezel for any hidden screws, often covered by rubber caps. Remove these screws.
- Pry Off Bezel: Using a plastic prying tool, gently work your way around the edges of the screen bezel to unclip it from the display assembly.
- Access Screen Mounting Screws: Once the bezel is removed, you will see the metal brackets holding the LCD panel in place. Remove the screws securing the old screen.
- Lay Screen Down: Carefully lay the old screen face-down on the keyboard.
- Disconnect Video Cable: Gently peel back any adhesive tape securing the video cable connector. Carefully unlatch the connector and pull the video cable straight out.
- Connect New Screen: Connect the video cable to the new SCREENARAMA display. Ensure it is fully seated and secure it with the provided adhesive tape.
- Mount New Screen: Position the new screen into the display assembly and secure it with the mounting screws.
- Test Display (Optional but Recommended): Before reattaching the bezel, temporarily reconnect the battery and power adapter (do not fully assemble yet). Power on the laptop to ensure the new screen functions correctly. Power off and disconnect again if testing is successful.
- Reattach Bezel: Carefully snap the screen bezel back into place around the new screen.
- Replace Bezel Screws: Reinstall any screws that secured the bezel.
- Reinstall Battery and Power On: Reinstall the laptop battery, connect the power adapter, and power on your laptop.
5. Operating and Testing
After successful installation, power on your laptop. The new SCREENARAMA display should show the operating system's boot sequence. Verify the display quality, brightness, and ensure there are no dead pixels or lines. If any issues arise, refer to the Troubleshooting section.
6. Maintenance
To maintain the clarity and longevity of your SCREENARAMA display:
- Cleaning: Use a soft, lint-free microfiber cloth specifically designed for electronics. Lightly dampen the cloth with water or a screen-cleaning solution (avoid harsh chemicals like ammonia or alcohol). Gently wipe the screen in one direction.
- Protection: Avoid pressing on the screen with sharp objects. Close the laptop lid gently.
7. Troubleshooting
If you encounter issues after installing your new screen, follow these steps:

Figure 7.1: Visual guide for troubleshooting common screen replacement issues.
- Connect External Monitor: Connect an external monitor to your laptop to confirm if the laptop itself is still operational. If the external monitor works, the issue is likely with the new screen or its connection.
- Verify Pin Count: Ensure the number of pins on the original LCD connector and the new screen's connector are identical (30-pin for this model).
- Blank Image: If the screen remains blank, carefully disconnect and reconnect the video cable from both the screen and the motherboard side (if accessible). Ensure the connector is fully seated and secured with tape. Check for any visible damage to the cable or connector pins.
- Persistent Issue: If the issue persists and is identical to the problem with the old LCD, the problem may lie in another part of the laptop (e.g., motherboard, video card).
- Dim Image: If the image is dim, try reconnecting the old LCD (if it still displays anything). If both LCDs do not light up, check the backlight fuse, which is usually located near the video connector on the motherboard.
8. Warranty and Support
Your SCREENARAMA replacement screen comes with a 2-year warranty. For technical support or warranty claims, please contact SCREENARAMA customer service through the retailer where the product was purchased or visit the official SCREENARAMA website.
For additional resources and product information, you may visit the SCREENARAMA Store on Amazon.