1. Introduction
This manual provides detailed instructions for the safe and effective operation, setup, and maintenance of your TOAUTO DS90 Soldering Station. Please read this manual thoroughly before using the device to ensure proper function and to prevent damage or injury. The TOAUTO DS90 is a 90W soldering station designed for various electronic soldering tasks, featuring a dual digital display, anti-static protection, and intelligent temperature control.
2. Safety Information
Always observe the following safety precautions when operating the soldering station:
- High Temperatures: The soldering iron tip reaches very high temperatures. Avoid direct contact with skin or flammable materials.
- Ventilation: Use the soldering station in a well-ventilated area to avoid inhaling solder fumes.
- Eye Protection: Always wear safety glasses to protect your eyes from solder splashes.
- Grounding: Ensure the unit is properly grounded to prevent electrostatic discharge (ESD) damage to sensitive components and for user safety. Utilize the provided grounding wire.
- Power Off: Always turn off and unplug the soldering station when not in use or before performing maintenance.
- Children and Pets: Keep the soldering station out of reach of children and pets. The auto standby and sleep functions are designed to enhance safety, but direct supervision is always recommended.
- Proper Use: Only use the soldering station for its intended purpose. Do not modify the unit.
3. Package Contents
Verify that all items listed below are included in your package:
- TOAUTO DS90 Soldering Station Unit
- Soldering Iron with Cord
- 5 x Additional Soldering Tips
- 1 x Bracket for Solder Wire (Tin Wire Bracket)
- 1 x Roll of Lead-free Solder Wire (30g)
- 1 x Solder Sucker
- 1 x Anti-static Tweezers
- 1 x Brass Tip Cleaner
- 1 x Cleaning Sponge
- 1 x Grounding Wire
- 1 x User Manual (This document)

Figure 3.1: The TOAUTO DS90 Soldering Station with all included accessories, such as the soldering iron, various tips, solder wire, solder sucker, tweezers, and cleaning tools.
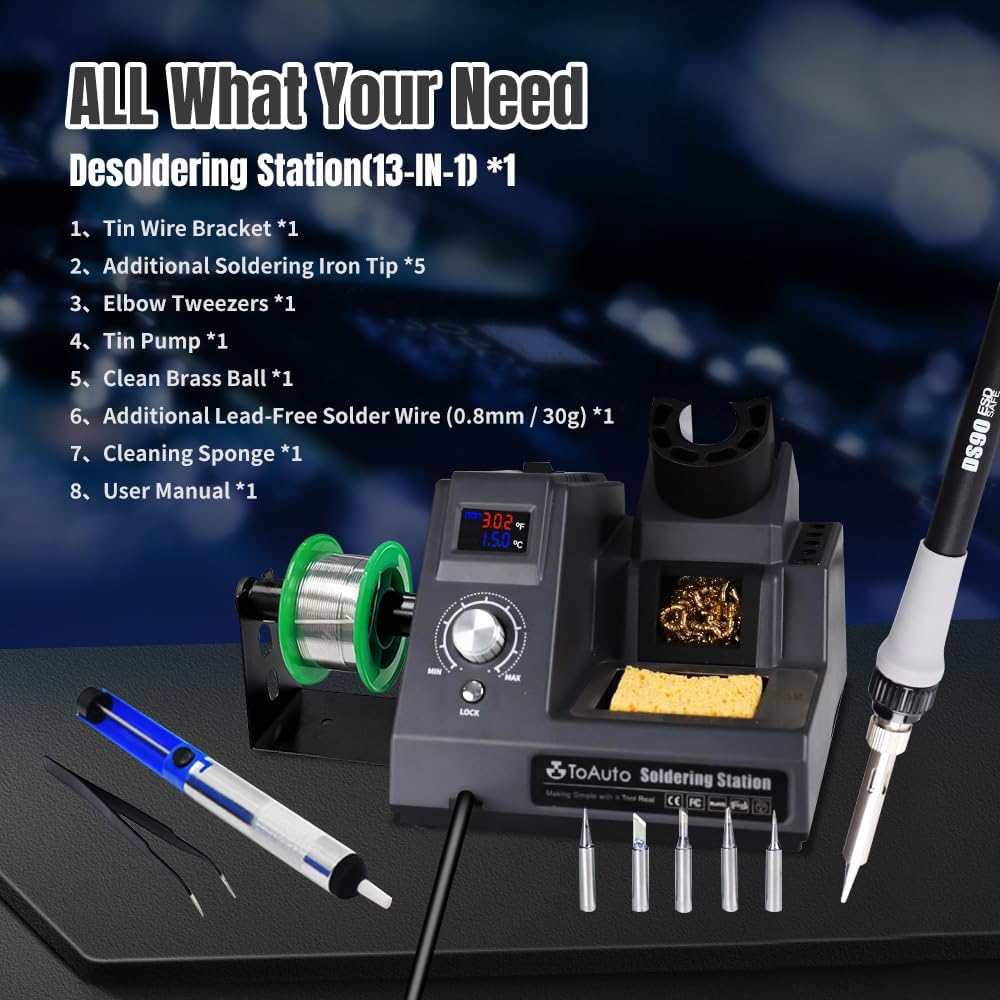
Figure 3.2: A close-up view illustrating the comprehensive 13-in-1 kit, highlighting the soldering station, soldering iron, multiple tips, solder wire, solder sucker, and anti-static tweezers.
4. Product Overview and Features
The TOAUTO DS90 Soldering Station is equipped with advanced features for precision soldering.
4.1. Dual Digital Display
The station features a dual digital display, showing both Fahrenheit (°F) and Celsius (°C) temperatures simultaneously. This allows for intuitive monitoring and selection of the desired temperature unit.

Figure 4.1: The dual digital display on the TOAUTO DS90 Soldering Station, indicating both Fahrenheit and Celsius temperature readings.

Figure 4.2: A detailed view of the LED dual-color, dual-row display, clearly showing temperature values in both °F and °C.
4.2. Anti-Static Design and Grounding Wire
The DS90 incorporates an anti-static design with a dedicated grounding wire and a static removal sheet. This feature protects sensitive electronic components from electrostatic discharge damage during soldering operations. Connect the grounding clip to any grounding sheet or conductive fabric and lightly rub the static elimination sheet on the right side of the unit to discharge static.

Figure 4.3: Visual representation of the unique anti-static design, showing the grounding connection and static removal process.

Figure 4.4: A detailed image showing the external ground wire connection point on the soldering station, emphasizing its anti-static design.
4.3. Fast Heating and PID Intelligent Temperature Control
The 90W ceramic heating core ensures rapid heating, reaching 590°F in approximately 5 seconds. The station utilizes a high-end precision PID program to monitor and correct actual temperatures at high speed, providing accurate and stable temperature control. The temperature lock mode guarantees constant temperature operation for consistent results.

Figure 4.5: Illustration of the soldering iron's rapid heating capability and the PID intelligent temperature control system.

Figure 4.6: A visual representation of the 90-watt heating element, highlighting its rapid heating and temperature adjustment capabilities.
4.4. Auto Standby and Auto Sleep Functions
For safety and energy conservation, the soldering station automatically enters standby mode after 10 minutes of inactivity and sleep mode after 20 minutes. Moving the soldering iron will reactivate the unit. This feature helps protect the user, extends the life of the soldering tip, and reduces power consumption.
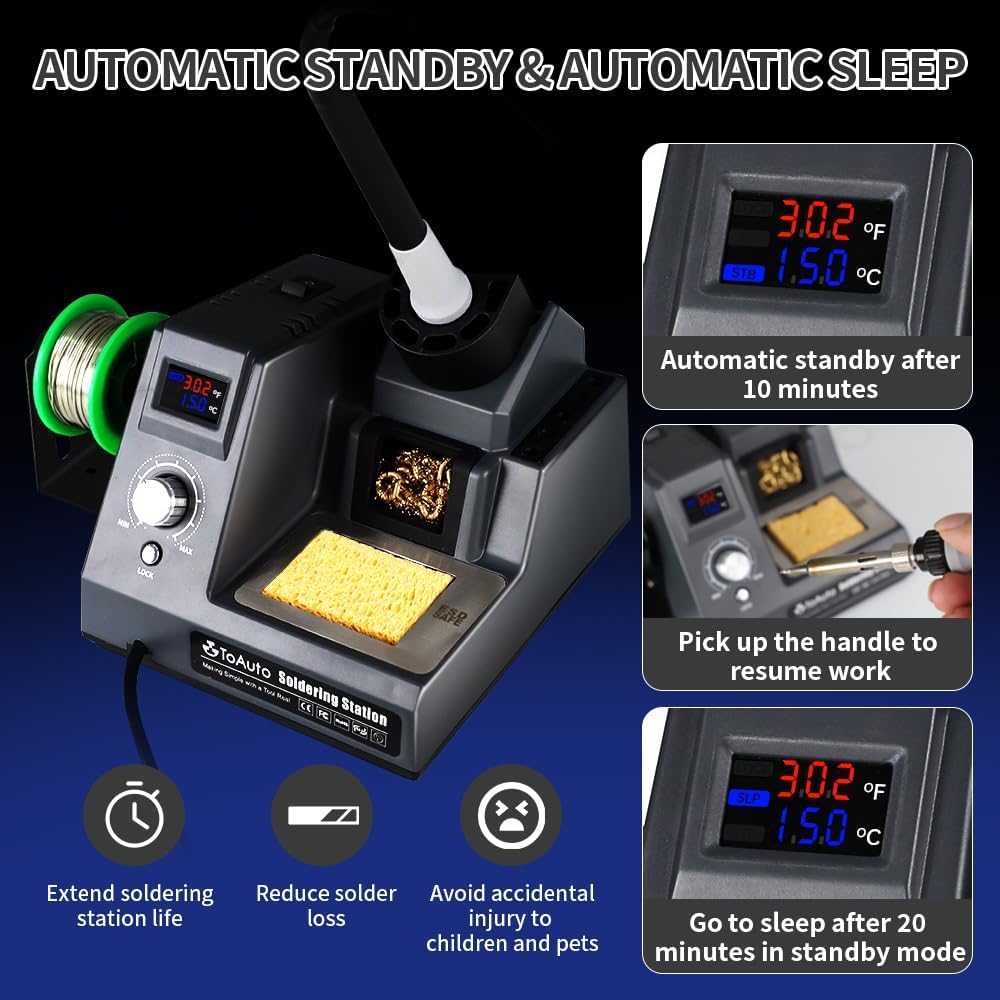
Figure 4.7: Visual sequence showing the soldering station entering automatic standby after 10 minutes, resuming work when the iron is picked up, and entering sleep mode after 20 minutes.

Figure 4.8: A close-up of the display indicating the "STB" (standby) and "SLP" (sleep) modes, along with the time settings for activation.
5. Setup Instructions
- Unpacking: Carefully remove all components from the packaging and verify against the "Package Contents" section.
- Placement: Place the soldering station on a stable, heat-resistant surface in a well-ventilated area.
- Solder Wire Bracket: Attach the solder wire bracket to the side of the station if desired.
- Soldering Iron Connection: Connect the soldering iron cable securely to the designated port on the soldering station.
- Grounding Wire: Connect the grounding wire to the station and to a suitable ground point in your workspace.
- Power Connection: Plug the power cord into a standard 110V AC outlet.
- Tip Installation: Ensure a soldering tip is securely installed in the soldering iron.
6. Operating Instructions
- Power On: Flip the power switch located on the front or side of the unit to the "ON" position. The digital display will illuminate.
- Temperature Adjustment:
- Use the rotary knob to adjust the desired temperature. The display will show the set temperature in both °F and °C.
- The temperature range is 302°F to 842°F (150°C to 450°C).
- Temperature Lock: Press the "LOCK" button to engage the temperature lock function. This prevents accidental temperature changes during operation, ensuring a constant working temperature.
- Initial Tinning: Before first use or after changing a tip, tin the tip by applying a small amount of solder to the heated tip. This protects the tip from oxidation and improves heat transfer.
- Soldering:
- Clean the tip using the brass tip cleaner or damp sponge.
- Apply the heated tip to the joint to be soldered, ensuring both components are heated simultaneously.
- Apply solder to the heated joint, not directly to the iron tip. Allow the solder to flow smoothly and evenly.
- Remove the solder and then the iron. Allow the joint to cool naturally.
- Auto Standby/Sleep: If the iron is not used for 10 minutes, it will enter standby mode. After 20 minutes, it will enter sleep mode. Simply pick up the iron to resume operation.
- Power Off: When finished, place the soldering iron securely in its holder, allow it to cool, and then turn off the power switch. Unplug the unit from the power outlet.

Figure 6.1: An individual utilizing the TOAUTO DS90 Soldering Station for a multi-scene application, demonstrating its versatility in electronic work.

Figure 6.2: Essential soldering accessories such as anti-static wiring, lead-free solder wire, elbow tweezers, and a solder sucker, shown in use with a circuit board.

Figure 6.3: Examples of wide applications for the soldering station, including electronics, wire connections, general maintenance, watch and cellphone repair, appliance repair, and mainboard work.
7. Maintenance
- Tip Cleaning: Regularly clean the soldering tip using the brass tip cleaner or a damp sponge. This removes oxidized solder and ensures efficient heat transfer.
- Tip Tinning: Always tin the tip with a fresh layer of solder before storing the iron or when it will be idle for a period. This prevents oxidation and extends tip life.
- Tip Replacement: Replace worn or damaged soldering tips. Ensure the station is off and cooled before changing tips.
- Station Cleaning: Keep the soldering station unit clean and free of dust and debris. Use a soft, dry cloth for cleaning. Do not use abrasive cleaners or solvents.
- Solder Holder: Keep the solder holder and sponge area clean. Replace the sponge when it becomes heavily soiled or damaged.
8. Troubleshooting
| Problem | Possible Cause | Solution |
|---|---|---|
| Station does not power on. | No power supply; power switch off; faulty power cord. | Check power outlet; ensure power switch is ON; inspect power cord for damage. |
| Soldering iron not heating up. | Iron not connected properly; faulty heating element; incorrect temperature setting. | Ensure iron cable is securely connected; check display for error codes (e.g., "HE" for heating element); adjust temperature setting. |
| Temperature display shows "SE" or "HE". | Sensor error ("SE") or heating element error ("HE"). | Turn off the station, unplug, and re-plug the soldering iron. If the error persists, contact customer support. |
| Solder does not melt or flow well. | Temperature too low; oxidized tip; dirty tip. | Increase temperature; clean and re-tin the soldering tip. |
| Station enters standby/sleep unexpectedly. | Inactivity timer triggered. | This is normal operation. Pick up the iron to resume. Ensure the iron is placed correctly in the holder when not in use. |

Figure 8.1: The display indicating "SE" for sensor error and "HE" for heating element error, which are useful for troubleshooting.
9. Specifications
| Model | DS90 |
| Brand | TOAUTO |
| Power Consumption | 90 Watts (Max 130 Watts) |
| Input Voltage | 110 Volts AC |
| Temperature Range | 302°F - 842°F (150°C - 450°C) |
| Temperature Stability | 390°C (Note: This value is provided as a single temperature point, not a deviation range.) |
| Display Type | LED Dual Digital Display |
| Special Features | Dual Digital Display, Anti-Static & Grounding Wire, PID Temperature Control, Temperature Locking, Auto Standby & Auto Sleep, Warning Notice |
| Item Weight | 2.12 pounds |
| Package Dimensions | 8.03 x 7.2 x 5.59 inches |
| Cord Length | 1 Meter |
| Material | ABS (Housing), Heat-resistant and soft rubbery handle |
| Usage | SMD / DIP / SOIC Soldering & Welding & Repairing |
10. Warranty and Support
The TOAUTO DS90 Soldering Station comes with a 1-year warranty for after-sales support. Additionally, TOAUTO provides lifetime technical support for this product. For any issues, questions, or technical assistance, please refer to the contact information provided with your purchase or visit the official TOAUTO website. A 30-day return policy is also applicable.


