1. Introduction
Thank you for choosing the Hatteker Professional Hair Clipper & Trimmer Grooming Kit. This versatile kit is designed to provide a comprehensive solution for all your grooming needs, including haircuts, beard and mustache trimming, touch-ups, body grooming, and detailing. With its high-performance features and durable design, you can achieve professional results from the comfort of your home.

Figure 1.1: Hatteker Hair Clipper and Trimmer Grooming Kit with accessories.
Key Features:
- Professional Hair Clipper & Trimmer Set: Includes a professional hair clipper, a nose trimmer, and a T-blade for various grooming tasks.
- High Carbon Steel Blade: Precision-ground blades designed to stay sharp longer, ensuring high performance and durability without snagging or pulling.
- Adjustable Taper Lever & Precision Dial: Easily adjust cutting closeness from 0.8 mm to 2.0 mm with the taper lever. The T-blade trimmer features a precision dial for nineteen length settings in 0.5 mm step sizes.
- IPX7 Waterproof: Both the trimmer and all attachments are fully washable for easy cleaning under running water.
- Designed for Hair ART: The T-blade trimmer allows for close-to-zero-distance cutting (0.1~0.2 mm) for precise detailing of hair, beard, face, sideburns, and body hair.
- Digital Display: Features a clear digital display showing battery indicator, oil reminder, and travel lock status.
2. Package Contents
Ensure all items listed below are present in your package:
- 1 x Professional Hair Clipper
- 1 x T-Blade Trimmer
- 1 x Nose Trimmer
- 10 x Reinforced Guide Combs (1.5, 3, 4.5, 6, 10, 13, 16, 19, 22, 25 mm)
- 2 x Hair Combs
- 2 x USB Cables (for charging clipper and trimmer)
- 1 x Cleaning Brush
- 1 x Lubricating Oil Bottle
- 1 x Hairdressing Cape
- 1 x Storage Bag
- User Manuals

Figure 2.1: Overview of all included components.
3. Safety Information
Please read and understand all safety instructions before using the product to prevent injury or damage.
- Use with caution near the face and eyes.
- Keep small parts and accessories away from children.
- Ensure the product is properly cleaned after each use to maintain hygiene and performance.
- Do not immerse the charging cables or power adapter in water.
- Store the device in a dry place when not in use.
- Do not attempt to disassemble or repair the device yourself. Contact customer support for assistance.
4. Setup
4.1 Charging the Device
Before first use, fully charge the hair clipper and trimmer. A full charge takes approximately 3 hours and provides up to 5 hours of runtime.
- Connect the appropriate USB cable to the charging port at the bottom of the hair clipper or trimmer.
- Plug the other end of the USB cable into a compatible USB power adapter (not included) or a computer's USB port.
- The digital display on the hair clipper will show the charging progress. For the trimmer, a light indicator will show charging status.
- Once fully charged, disconnect the device from the power source.
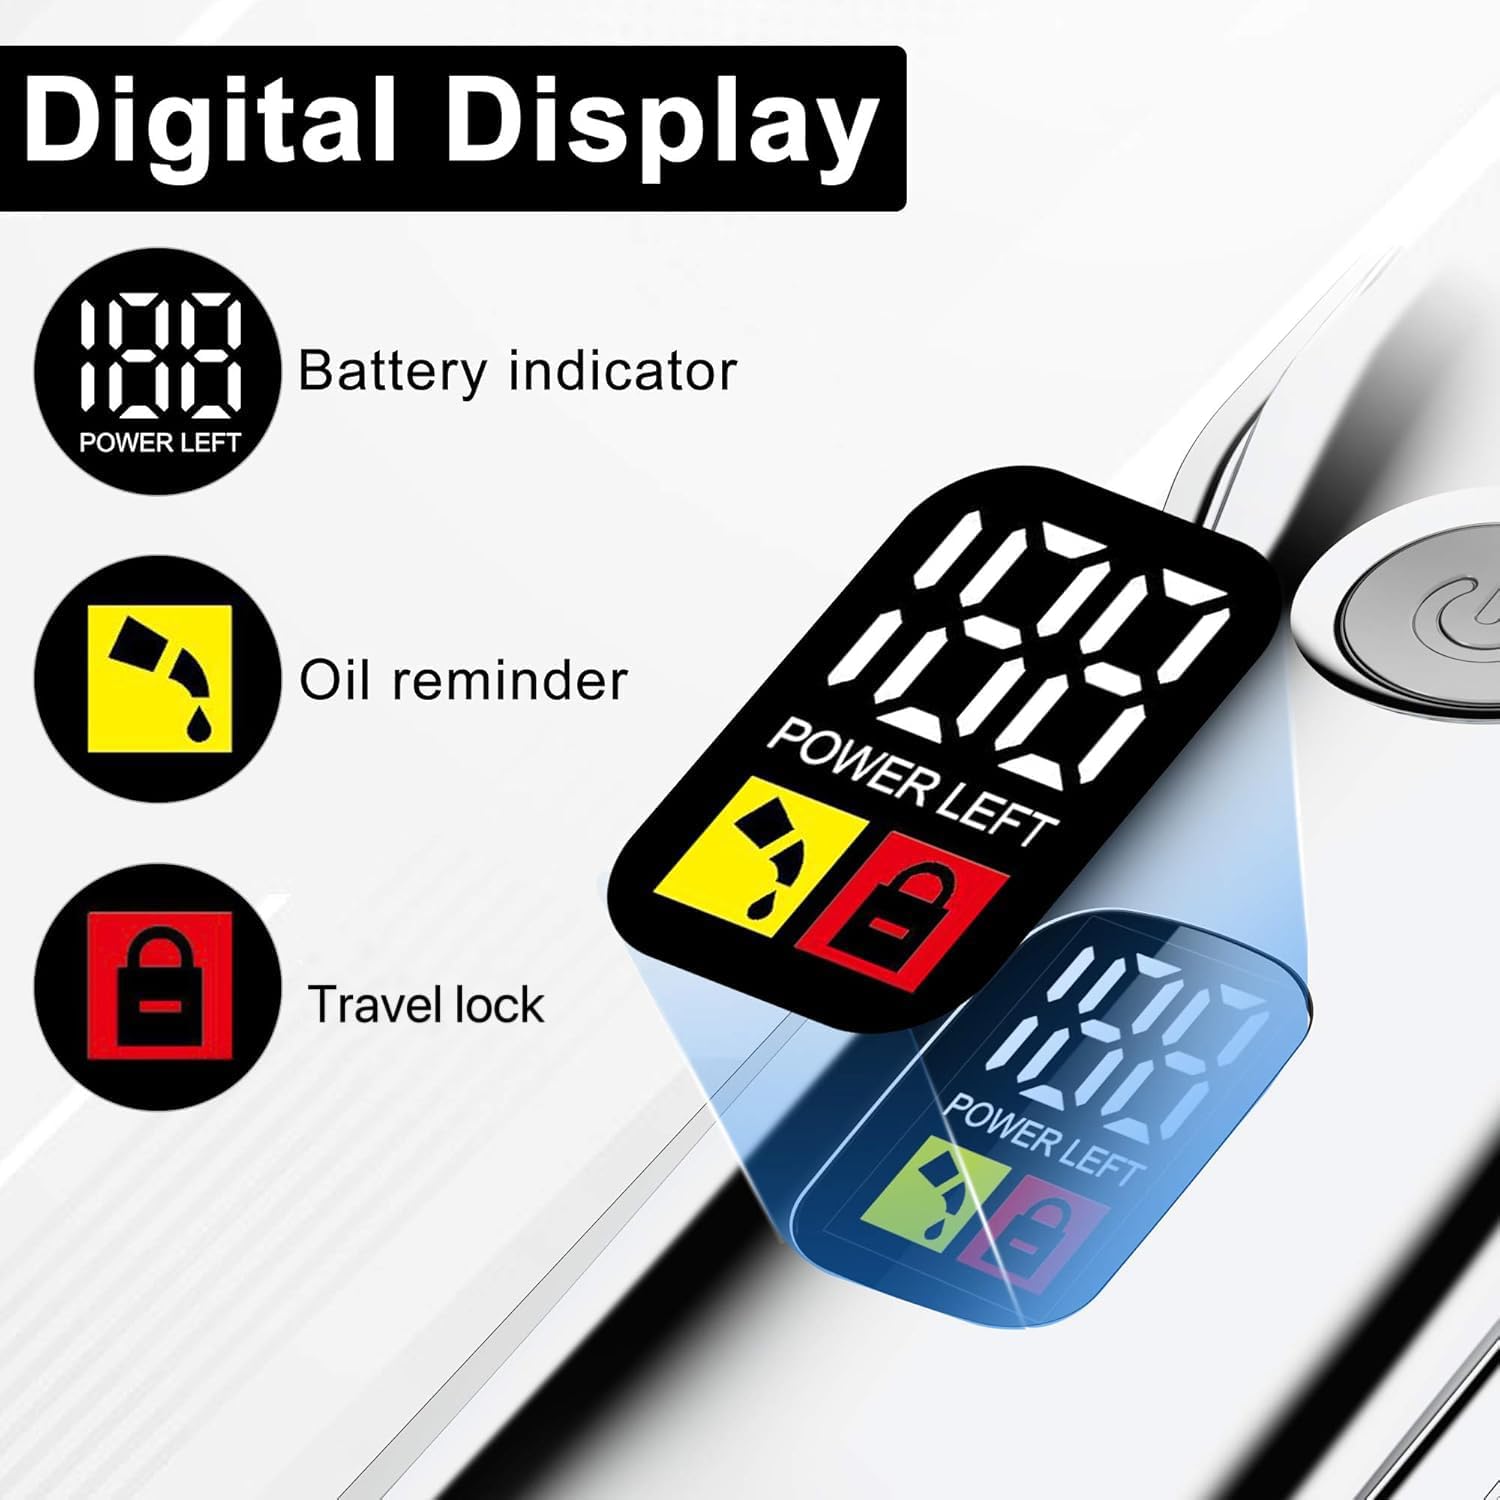
Figure 4.1: Digital display on the hair clipper indicating battery level.
4.2 Attaching/Detaching Heads and Comb Guides
The grooming kit comes with interchangeable heads for different functions.
- To change heads on the trimmer: Gently twist the current head counter-clockwise and lift it off. Align the desired head (T-blade or Nose Trimmer) with the base and twist clockwise until it clicks into place.
- To attach comb guides to the hair clipper: Select the desired guide comb. Align the comb with the clipper blade and slide it on until it securely snaps into place.
- To attach comb guides to the T-blade trimmer: The T-blade trimmer uses a precision dial comb guide. Slide the comb guide onto the T-blade. Rotate the dial to select your desired length setting.

Figure 4.2: Hair clipper, T-blade trimmer, and nose trimmer with labeled parts.

Figure 4.3: Hair clipper showing the taper lever and various guide comb sizes.

Figure 4.4: T-blade trimmer with its precision dial for length adjustments.
5. Operating Instructions
5.1 Using the Hair Clipper
- Ensure the clipper is charged.
- Select the appropriate guide comb for your desired hair length and attach it securely.
- Adjust the taper lever on the side of the clipper to fine-tune the cutting length (0.8 mm to 2.0 mm).
- Press the power button to turn on the clipper. The digital display will illuminate.
- Begin cutting hair against the direction of hair growth, using smooth, even strokes.
- Turn off the clipper after use by pressing the power button.
5.2 Using the T-Blade Trimmer
- Ensure the trimmer is charged and the T-blade head is attached.
- For precise detailing or zero-distance cutting (0.1-0.2 mm), use the T-blade without a comb guide.
- For specific lengths, attach the precision dial comb guide and rotate the dial to select one of the nineteen settings.
- Press the power button to turn on the trimmer.
- Carefully trim beard, mustache, sideburns, or create hair designs.
- Turn off the trimmer after use.

Figure 5.1: Examples of using the grooming kit for different styles and areas.
5.3 Using the Nose Trimmer
- Ensure the trimmer is charged and the nose trimmer head is attached.
- Press the power button to turn on the trimmer.
- Gently insert the nose trimmer into your nostril or ear canal.
- Move the trimmer in a circular motion to remove unwanted hair.
- Turn off the trimmer after use.
5.4 Official Product Video
Video 5.1: Official Hatteker Grooming Kit demonstration video, showcasing various features and uses.
6. Maintenance
6.1 Cleaning
The Hatteker grooming kit is IPX7 waterproof, allowing for easy cleaning.
- After each use, remove any attached comb guides or heads.
- Rinse the blades and the device body under running water to remove hair clippings.
- Use the provided cleaning brush to remove stubborn hair from the blades.
- Ensure the device is completely dry before reattaching heads or storing.

Figure 6.1: The hair clipper and trimmer are fully washable for easy cleaning.
6.2 Oiling the Blades
Regular oiling ensures optimal performance and extends the life of the blades.
- Apply a few drops of the provided lubricating oil onto the blades of the hair clipper and T-blade trimmer.
- Turn on the device for a few seconds to distribute the oil evenly.
- Wipe off any excess oil with a clean cloth.

Figure 6.2: High carbon steel blades are self-sharpening for long-lasting sharpness.
6.3 Storage
Store the grooming kit and all its accessories in the provided storage bag in a cool, dry place, away from direct sunlight and moisture.
7. Troubleshooting
| Problem | Possible Cause | Solution |
|---|---|---|
| Device does not turn on. | Low battery or not charged. | Charge the device fully (approx. 3 hours). |
| Blades pulling or snagging hair. | Blades are dull or not oiled. Hair buildup. | Clean and oil the blades. Ensure blades are free of hair. |
| Reduced cutting performance. | Blades need cleaning or oiling. | Clean the blades thoroughly and apply lubricating oil. |
| Digital display not working. | Device is off or battery is completely drained. | Turn on the device. Charge the device if battery is low. |
8. Specifications
- Model Number: 003
- Product Dimensions: 5.91 x 3.46 x 9.06 inches
- Weight: 1.94 Pounds
- Battery Type: Lithium-Ion
- Charging Time: 3 Hours
- Runtime: 5 hours
- Waterproof Rating: IPX7
- Manufacturer: Hatteker
- Country of Origin: China
9. Warranty and Support
Hatteker products are manufactured with quality and durability in mind. For any questions, concerns, or support regarding your Hatteker Hair Clipper & Trimmer Grooming Kit, please contact Hatteker customer service. Information regarding available protection plans can be found on the product's purchase page.
Please retain your proof of purchase for any warranty claims.


