
Recordio GAX-960E
Recordio GAX-960E DJ Mixer Instruction Manual
Model: GAX-960E | Brand: Recordio
1. Introduction
Thank you for purchasing the Recordio GAX-960E DJ Mixer. This 8-channel mixing console is designed for professional audio applications, featuring USB and Bluetooth connectivity, 48V phantom power, and integrated DSP digital effects. This manual provides essential information for safe operation, setup, and maintenance of your mixer. Please read it thoroughly before use to ensure optimal performance and longevity of the product.
2. Safety Instructions
- Power Supply: Use only the specified power adapter. Ensure the voltage matches your local power supply. Disconnect power during thunderstorms or when unused for long periods.
- Ventilation: Do not block ventilation openings. Ensure adequate airflow around the unit to prevent overheating.
- Water and Moisture: Do not expose the unit to rain, moisture, or liquids. Do not place objects filled with liquids on the unit.
- Heat Sources: Keep the unit away from radiators, heat registers, stoves, or other heat-producing apparatus.
- Cleaning: Clean only with a dry cloth. Avoid using liquid cleaners or aerosols.
- Servicing: Do not attempt to service this product yourself. Refer all servicing to qualified service personnel.
- Phantom Power (+48V): When using phantom power for condenser microphones, ensure microphones are connected before activating phantom power to prevent damage. Disconnect microphones only after deactivating phantom power.
3. Product Overview
The Recordio GAX-960E is an 8-channel professional audio mixer integrated into a durable hard case, designed for portability and protection. It features multiple input options, comprehensive EQ controls, built-in digital effects, and versatile output capabilities, making it suitable for various live sound and recording applications.
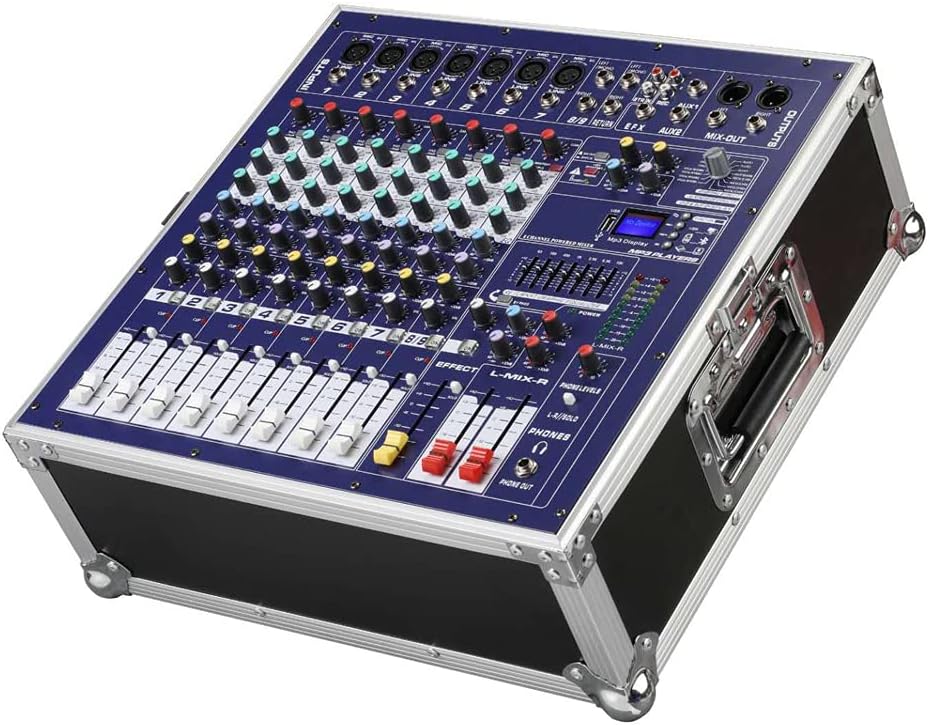
Figure 3.1: Angled view of the Recordio GAX-960E DJ Mixer, highlighting its control panel and robust integrated case.

Figure 3.2: Top-down view of the mixer's control surface, showing the layout of input channels, equalization, effects, and master section.

Figure 3.3: Rear panel of the mixer, displaying the power input, speaker output terminals, and cooling fan vents.
4. Setup
4.1 Unpacking
Carefully remove the mixer from its packaging. Inspect the unit for any signs of damage during transit. Retain the original packaging for future transport or storage.
4.2 Power Connection
- Ensure the mixer's power switch is in the OFF position.
- Connect the provided power cable to the AC input on the rear panel of the mixer.
- Plug the other end of the power cable into a suitable AC power outlet (AC 220V 50Hz/60Hz).
4.3 Connecting Audio Sources
The GAX-960E offers various input options:
- Microphones: Connect microphones to the XLR inputs (1) on channels 1-8. For condenser microphones requiring power, activate the +48V Phantom Power switch.
- Line-Level Devices: Connect instruments (keyboards, guitars with preamps), CD players, or other line-level devices to the 1/4" Line inputs (2) on channels 1-8.
- USB Audio: Connect a USB cable from your computer to the mixer's USB port for digital audio input/output.
- Bluetooth: Activate Bluetooth on the mixer and pair with your mobile device for wireless audio streaming.
4.4 Connecting Outputs
- Main Mix Output: Connect your main speakers or power amplifier to the MIX-OUT (16) XLR or 1/4" outputs.
- Headphones: Connect headphones to the PHONES (20) 1/4" jack for monitoring.
- Recording Output: Use the REC output for connecting to a recording device.
5. Operating Instructions
This section details the functions of the various controls on your GAX-960E mixer. Refer to Figure 5.1 for a visual guide to the numbered controls.

Figure 5.1: Introduction to Function Keys on the GAX-960E Mixer.
5.1 Input Channel Controls (Channels 1-8)
- XLR Input: Balanced input for microphones.
- Line Input: Balanced/unbalanced 1/4" input for line-level devices.
- Signal Attenuation: Adjusts the input gain for the channel.
- EQ Controls (Treble, Midrange, Bass):
- Treble: Adjusts high frequencies (±15dB / 12KHz).
- Midrange: Adjusts mid frequencies (±15dB / 2.5KHz).
- Bass: Adjusts low frequencies (±15dB / 80KHz).
- Reverberation (Effect Send): Controls the amount of signal sent to the internal DSP effects processor.
- PFL (Pre-Fader Listen): Activates pre-fader monitoring of the channel through headphones.
- Mute: Mutes the channel output.
- Channel Volume Control: Fader to adjust the individual channel's volume in the main mix.
5.2 Master Section Controls
- Channel Volume Control: (Repeated from above, likely refers to the main channel faders).
- AUX 1/2: Auxiliary sends for external effects or monitor mixes.
- EFX Return: Controls the return level of the internal effects processor.
- REC Output: Output for connecting to a recording device.
- Signal Output: Main output level indicator.
- Reverb Depth: Adjusts the intensity of the selected reverberation effect.
- Reverb Time: Adjusts the decay time of the selected reverberation effect.
- Reverberation Mode (DSP Digital Effects): Selects from 16 different DSP effects programs.
- MP3 Player: Controls for the integrated USB/Bluetooth MP3 player.
- 7-Segment Audio Adjustment: Visual display for audio levels.
- Level Signal Lamp: LED indicators for signal presence and clipping.
- Monitor Volume Control: Adjusts the volume for the monitor output.
- Reverberation Control: Master control for the overall reverberation effect level.
- Bluetooth/USB Channel: Controls for the integrated Bluetooth and USB audio input.
5.3 USB/Bluetooth Operation
The integrated MP3 player (17) supports USB 2.0 and features a 1.4-inch screen. It can play audio up to 192KHz 24bit. Use the dedicated controls to navigate tracks, play/pause, and adjust volume for USB or Bluetooth audio sources.
6. Maintenance
6.1 Cleaning
Regularly clean the mixer's surface with a soft, dry, lint-free cloth. Do not use abrasive cleaners, waxes, or solvents as they may damage the finish and controls. For stubborn dirt, a slightly damp cloth can be used, followed by a dry cloth.
6.2 Storage
When not in use for extended periods, store the mixer in a cool, dry place, away from direct sunlight and extreme temperatures. It is recommended to store it in its original packaging or a protective case to prevent dust accumulation and physical damage.
6.3 General Care
Avoid spilling liquids on the mixer. Protect it from excessive dust and vibrations. Do not place heavy objects on top of the unit.
7. Troubleshooting
7.1 No Sound Output
- Check if the mixer is powered on and the power indicator light is illuminated.
- Ensure all channel faders and the main mix fader are raised.
- Verify that input sources are properly connected and active.
- Check all cable connections (inputs, outputs, speakers).
- Ensure the Mute button (7) on active channels is not engaged.
- Confirm that the connected amplifier/speakers are powered on and functioning correctly.
7.2 Distorted Sound
- Reduce the input gain (Signal Attenuation) for the affected channel.
- Lower the channel volume fader or the main mix fader.
- Check for damaged cables or faulty connectors.
- Ensure the connected speakers/amplifier are not overdriven.
7.3 Phantom Power Not Working
- Ensure the +48V phantom power switch is activated.
- Verify that the condenser microphone is properly connected.
- Check the microphone cable for damage.
7.4 USB/Bluetooth Connection Issues
- For USB, ensure the cable is securely connected to both the mixer and the computer. Check computer's audio settings.
- For Bluetooth, ensure the mixer's Bluetooth is enabled and in pairing mode. Unpair and re-pair the device if necessary.
- Ensure no other devices are interfering with the Bluetooth signal.
8. Specifications
| Model | GAX-960E |
| Channels | 8 |
| Frequency Response | 10Hz ~ 60KHz ±3dB |
| Harmonic Distortion | 0.01% + 4dBu 1KHz |
| Signal to Noise Ratio (SNR) | >112dB |
| EQ (High) | ±15dB / 12KHz |
| EQ (Midrange) | ±15dB / 2.5KHz |
| EQ (Low) | ±15dB / 80KHz |
| Phantom Power | +48V |
| Digital Effects | SPX 16 group programming |
| MP3 Player | USB2.0, 1.4 inch Screen, Max: 192KHz 24bit |
| Power Supply | AC 220V 50Hz/60Hz |
| Power Amplifier | 500W*2 |
| Dimensions (L x W x H) | 450 x 460 x 240 mm |
| Material | Aluminum Iron |
9. Warranty and Support
For warranty information and technical support, please refer to the documentation provided at the time of purchase or contact your retailer. Keep your proof of purchase for any warranty claims. For further assistance, you may also visit the official Recordio website or contact their customer service department.
Ask a question about this manual
Ask about setup, troubleshooting, compatibility, parts, safety, or missing instructions. Manuals+ will review the question and use this page’s manual context to help answer it.