1. Introduction
This manual provides detailed instructions for the installation, operation, and maintenance of your efergy Elite-Max Display Kit 7.9 Inch Color Energy Monitor. This device is designed to help you track your home's electricity consumption in real-time, providing data on energy usage and associated costs. Understanding your energy patterns can assist in managing electricity expenses.
2. Package Contents
Please verify that all components are present in your package:
- efergy Elite-Max Display Unit (7.9 inch color screen)
- Wireless Transmitter
- Current Sensors (quantity may vary based on kit configuration)
- Power Adapter for Display Unit
- User Manual (this document)

Image 2.1: Overview of the efergy Elite-Max Display Kit components, including the display unit, wireless transmitter, and two current sensors.
3. Safety Information
Read all safety instructions before installation and operation. Failure to follow these instructions may result in electric shock, fire, or other hazards.
- Electrical Installation: Installation of current sensors involves working with live electrical circuits. It is strongly recommended that installation be performed by a qualified electrician.
- Power Source: Use only the provided power adapter for the display unit.
- Environment: Do not expose the device to moisture, extreme temperatures, or direct sunlight.
- Maintenance: Do not attempt to open or repair the device yourself. Refer all servicing to qualified personnel.
4. Setup
4.1 Transmitter and Sensor Installation
- Install Batteries in Transmitter: Open the battery compartment on the wireless transmitter and insert the required batteries (typically AA or AAA, refer to the transmitter itself for exact type and polarity).
- Connect Current Sensors: Connect the current sensors to the wireless transmitter.
- Attach Current Sensors to Mains Cables: This step requires caution. The current sensors (CT clamps) must be clipped around the live mains electricity cables within your fuse box or consumer unit. Ensure the arrow on the sensor points towards the load (away from the meter). This procedure should only be performed by a qualified electrician.
4.2 Display Unit Setup
- Power On: Connect the power adapter to the efergy Elite-Max Display Unit and plug it into a wall outlet. The display should power on.
- Pairing: The display unit and transmitter should automatically pair. If pairing does not occur, refer to the troubleshooting section.
- Placement: The display unit can be placed on a desktop using its integrated stand or mounted on a wall.

Image 4.1: The efergy Elite-Max display unit can be used with a desktop stand or mounted on a wall for flexible placement.
5. Operating Instructions
The efergy Elite-Max display provides real-time energy consumption data. The 7.9-inch color screen is designed for clear readability.
5.1 Understanding the Display
The main screen typically shows:
- ENERGY NOW (kW): Your current electricity consumption in kilowatts.
- TODAY (Currency): The estimated cost of electricity consumed so far today.
- BUDGET: A visual indicator of your energy usage against a set budget, often color-coded (e.g., green for within budget, yellow for approaching, red for exceeding).
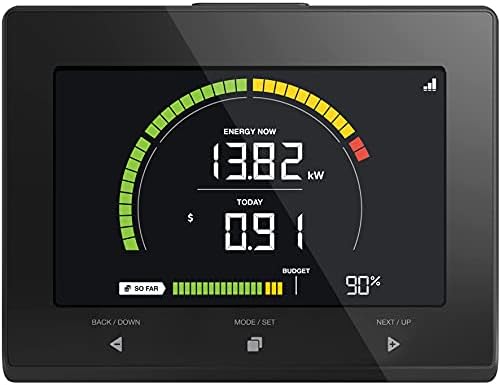
Image 5.1: A close-up of the efergy Elite-Max display showing current energy usage in kW, daily cost, and budget status.

Image 5.2: The efergy Elite-Max display unit being held, demonstrating its portable size and clear interface.
5.2 Navigation Buttons
The display unit features three primary buttons for navigation:
- BACK / DOWN: Used to navigate backward through menus or decrease values.
- MODE / SET: Used to switch between display modes (e.g., real-time, historical) or confirm settings.
- NEXT / UP: Used to navigate forward through menus or increase values.
5.3 Viewing Historical Data
Press the MODE / SET button to cycle through different display screens, which may include:
- Daily, weekly, or monthly energy consumption totals.
- Cost history for various periods.
- Peak usage statistics.

Image 5.3: Display showing current and previous period's energy cost data.

Image 5.4: Display showing 'Always ON' and 'Peak Usage' in kilowatts.
5.4 Setting a Budget
The Elite-Max allows you to set a monthly energy budget. Navigate to the budget settings using the MODE / SET button and adjust the value using the BACK / DOWN and NEXT / UP buttons. Confirm your setting with MODE / SET.
6. Data Download
The efergy Elite-Max display unit includes a USB port for downloading your energy consumption data. This allows you to store and analyze your data on a computer.
- Locate the USB port on the side or back of the display unit.
- Insert a compatible USB flash drive into the port.
- Follow the on-screen prompts or refer to the display's menu to initiate the data download. Data is typically saved in a CSV format.
- Safely remove the USB drive once the download is complete.
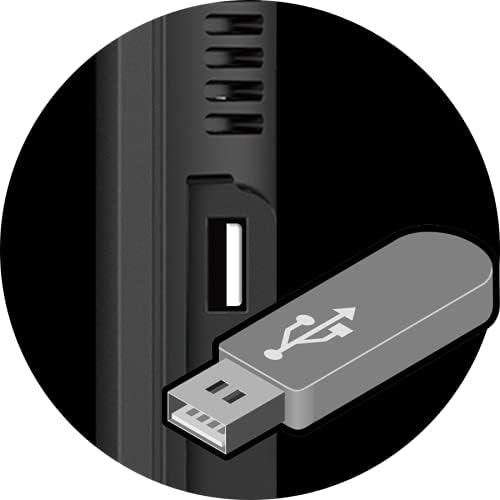
Image 6.1: Detail of the USB port on the efergy Elite-Max display unit, used for data export.

Image 6.2: A user inserting a USB drive into the efergy Elite-Max display for data download.
7. Alerts
The Elite-Max monitor can provide alerts to help you manage your energy consumption effectively.
- Peak Tariff Alerts: Notifies you when your energy usage enters a higher tariff period, if configured.
- High Usage Alerts: Warns you when your current energy consumption exceeds a predefined threshold, helping to identify periods of high demand.

Image 7.1: Display indicators for 'Peak Tariff' and 'High Usage' alerts.
8. Maintenance
- Cleaning: Wipe the display unit with a soft, dry cloth. Do not use abrasive cleaners or solvents.
- Transmitter Batteries: Replace the transmitter batteries when the low battery indicator appears on the display unit.
- Firmware Updates: Check the efergy website for any available firmware updates for your device.
9. Troubleshooting
If you encounter issues with your efergy Elite-Max monitor, please refer to the following common problems and solutions:
- No Display: Ensure the power adapter is securely connected to the display unit and a working power outlet.
- No Readings / Display Shows '---':
- Check if the transmitter batteries are correctly installed and not depleted.
- Verify that the current sensors are properly clipped around the mains cables and securely connected to the transmitter.
- Ensure the transmitter and display unit are within range of each other and not obstructed by large metal objects.
- Attempt to re-pair the display and transmitter. Consult the installation manual for specific pairing instructions.
- Inaccurate Readings:
- Confirm that the current sensors are installed correctly with the arrow pointing towards the load.
- Ensure the monitor settings (e.g., tariff rates) are correctly configured to match your electricity provider's rates.
- Data Download Issues:
- Ensure the USB flash drive is formatted correctly (e.g., FAT32).
- Try a different USB flash drive.
- Verify that the data download process was completed successfully on the display unit.
10. Specifications
| Product Dimensions | 1 x 6.5 x 5 inches |
| Item Weight | 1.94 pounds |
| Item Model Number | E-Max |
| Standing Screen Display Size | 7.9 Inches |
| Aspect Ratio | 16:9 |
| Voltage | 5 Volts |
| Resolution | 640 x 480 (SVGA Wide) |
| Total USB Ports | 1 |
| Brand | efergy |
11. Warranty and Support
For warranty information and technical support, please refer to the official efergy website or contact their customer service. A detailed installation manual is also available for download: