1. Introduction
Thank you for choosing the CREATE THERA RETRO PRO Semi-Automatic Espresso Machine. This machine is designed to provide you with high-quality espresso, cappuccino, and latte beverages using ground coffee. Featuring a 20-bar high-pressure pump, NTC temperature control, and an integrated milk tank, it offers convenience and excellent results. Please read this manual carefully before first use to ensure proper operation and maintenance.

Image 1.1: Front view of the CREATE THERA RETRO PRO Espresso Machine in Cream White.
2. Safety Instructions
Always follow basic safety precautions when using electrical appliances to reduce the risk of fire, electric shock, and/or injury to persons, including the following:
- Read all instructions before using the appliance.
- Do not touch hot surfaces. Use handles or knobs.
- To protect against fire, electric shock, and injury to persons, do not immerse cord, plugs, or appliance in water or other liquid.
- Close supervision is necessary when any appliance is used by or near children.
- Unplug from outlet when not in use and before cleaning. Allow to cool before putting on or taking off parts, and before cleaning the appliance.
- Do not operate any appliance with a damaged cord or plug or after the appliance malfunctions, or has been damaged in any manner.
- The use of accessory attachments not recommended by the appliance manufacturer may result in fire, electric shock, or injury to persons.
- Do not use outdoors.
- Do not let cord hang over edge of table or counter, or touch hot surfaces.
- Do not place on or near a hot gas or electric burner, or in a heated oven.
- Always attach plug to appliance first, then plug cord into the wall outlet. To disconnect, turn any control to “off,” then remove plug from wall outlet.
- Do not use appliance for other than intended use.
3. Product Components
Familiarize yourself with the parts of your CREATE THERA RETRO PRO Espresso Machine.
- Main Unit with Control Panel
- Water Tank (1.5L capacity)
- Milk Tank
- Portafilter
- Filter Baskets (for 1 and 2 cups)
- Measuring Scoop with Tamper
- Adjustable Drip Tray
- Cup Warming Tray

Image 3.1: Included accessories: Portafilter, two filter baskets, and a measuring scoop with integrated tamper.

Image 3.2: Detail of the control panel, showing beverage selection buttons and the temperature gauge.
4. Setup
4.1 Unpacking and Initial Cleaning
- Carefully remove all packaging materials and place the machine on a stable, flat, heat-resistant surface.
- Wash the water tank, milk tank, portafilter, filter baskets, and drip tray with warm, soapy water. Rinse thoroughly and dry.
- Wipe the exterior of the machine with a damp cloth.
4.2 Filling the Water Tank
Remove the water tank from the back of the machine. Fill it with fresh, cold water up to the MAX line. Replace the tank securely.
4.3 Preparing the Milk Tank
If making milk-based drinks, fill the milk tank with desired milk (dairy or plant-based) between the MIN and MAX lines. Ensure the milk frothing tube is properly inserted into the tank.

Image 4.1: Removing the milk tank for filling or cleaning.
4.4 First Use / Priming the Machine
Before first use, or if the machine has not been used for a long time, it needs to be primed:
- Ensure the water tank is filled.
- Place a large container under the coffee spout and milk frothing nozzle.
- Turn on the machine. It will start heating up.
- Once heated, press the Espresso button and let water flow through until the tank is almost empty. Repeat this process with the milk frothing function (if applicable, by selecting a milk-based drink without coffee grounds) to prime the milk system.
5. Operating Instructions
5.1 Preparing Ground Coffee
Use freshly ground coffee for best results. We recommend using naturally roasted ground coffee. Avoid sugar-roasted mixed coffee as it can clog the filters over time.
- Select the appropriate filter basket (single or double shot) and place it into the portafilter.
- Fill the filter basket with ground coffee. Use the measuring scoop provided.
- Tamp the coffee firmly and evenly using the tamper end of the scoop.
- Wipe any excess coffee from the rim of the portafilter.
- Insert the portafilter into the brewing head and turn it to the right until it is securely locked.
5.2 Making Espresso
- Ensure the machine is heated and ready (temperature gauge indicates optimal temperature).
- Place your cup(s) on the drip tray under the portafilter spouts.
- Press the Espresso button. The machine will dispense the programmed amount of espresso.
- To adjust the volume, press and hold the Espresso button until the desired volume is reached, then release. The machine will remember this setting for future use.

Image 5.1: Preparing two cups of espresso simultaneously.
5.3 Making Cappuccino or Latte
The machine features an integrated milk tank for automatic milk frothing.
- Ensure the milk tank is filled with milk and properly attached.
- Place your cup under both the coffee spout and the milk frothing nozzle.
- For Cappuccino, press the Cappuccino button. The machine will first dispense frothed milk, then coffee.
- For Latte, press the Latte button. The machine will dispense frothed milk, then coffee, with a different milk-to-coffee ratio.
- To adjust the volume of milk foam, use the foam adjustment dial on the milk tank.
- To adjust the total volume of the drink, press and hold the respective button until the desired volume is reached, then release.
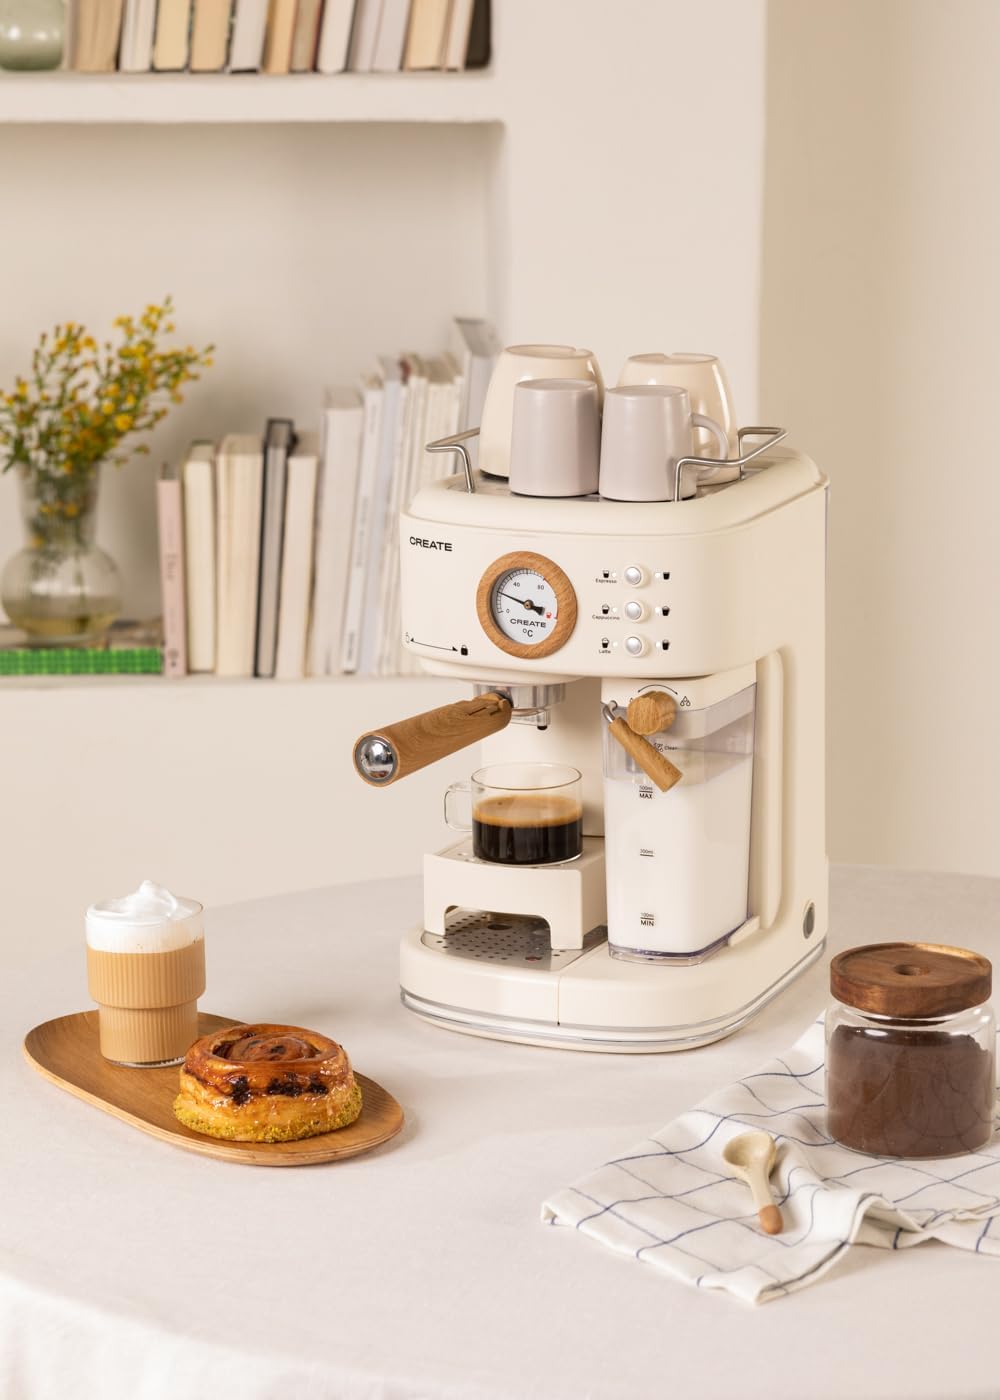
Image 5.2: User interacting with the control panel to select a beverage.
5.4 Adjustable Drip Tray
The drip tray can be adjusted to accommodate different cup sizes. Simply lift or lower the tray as needed to fit your cup comfortably and minimize splashing.

Image 5.3: The adjustable drip tray, designed to fit various cup sizes.
6. Maintenance
6.1 Daily Cleaning
- Drip Tray: Empty and clean the drip tray daily or when the indicator shows it's full. Wash with warm, soapy water and rinse.
- Milk Tank and Frothing Nozzle: After each use, remove the milk tank and clean it thoroughly. Run the "Clean" function (if available, or dispense hot water through the nozzle) to clear any milk residue from the frothing system. This is crucial to prevent blockages and maintain hygiene.
- Portafilter and Filter Baskets: Remove spent coffee grounds. Rinse the portafilter and filter baskets under running water. Use a brush to remove any stubborn coffee residue.
- Exterior: Wipe the exterior of the machine with a soft, damp cloth. Do not use abrasive cleaners or scouring pads.
6.2 Descaling
Regular descaling is essential to maintain machine performance and extend its lifespan, especially in areas with hard water. The frequency depends on water hardness and usage. Refer to the machine's indicator (if any) or descale every 2-3 months.
- Use a descaling solution specifically designed for coffee machines. Follow the instructions on the descaling solution packaging.
- Empty the water tank and fill it with the descaling solution mixed with water according to the solution's instructions.
- Place a large container under the coffee spout and milk frothing nozzle.
- Run the descaling cycle as per your machine's specific instructions (often involves pressing and holding certain buttons, or a dedicated descaling program).
- After the descaling solution has run through, rinse the water tank and fill it with fresh water. Run several cycles of plain water through the machine to thoroughly rinse out any descaling solution.
7. Troubleshooting
| Problem | Possible Cause | Solution |
|---|---|---|
| No coffee dispenses or slow flow. | Water tank empty; machine not primed; coffee too finely ground or over-tamped; brewing head clogged. | Fill water tank; prime the machine; use coarser grind or less coffee; clean brewing head. |
| Milk not frothing properly or no milk dispensed. | Milk tank empty; milk frothing nozzle clogged; milk too cold/warm or type of milk. | Fill milk tank; clean frothing nozzle thoroughly; use cold milk (4-6°C); try different milk types. |
| Coffee is not hot enough. | Machine not fully preheated; cups not preheated. | Allow machine to fully preheat; preheat cups using hot water or the cup warming tray. |
| Machine leaks water. | Water tank not properly seated; drip tray full; seal issues. | Ensure water tank is correctly inserted; empty drip tray; contact support if problem persists. |
| Small coffee portions. | Programmed volume is too low. | Reprogram the desired volume by holding the button until the cup is filled to your preference. |
8. Specifications
| Feature | Detail |
|---|---|
| Brand | CREATE |
| Model | THERA RETRO PRO |
| Color | Cream White |
| Product Dimensions (L x W x H) | 22.8 x 32.5 x 36 cm |
| Item Weight | 5 Kilograms |
| Volume (Water Tank) | 1.5 Liters |
| Voltage | 240 Volt |
| Pressure | 20 bar |
| Coffee Type | Ground Coffee |
| Special Feature | Integrated Milk Frother, Adjustable Drip Tray, NTC Temperature Control, Quick Heating |

Image 8.1: Product dimensions: 36cm height, 22.81cm width, 32.51cm depth.
9. Warranty and Support
Your CREATE THERA RETRO PRO Espresso Machine comes with a standard manufacturer's warranty. For detailed warranty information, please refer to the warranty card included with your product or visit the official CREATE website. For technical support, spare parts, or service inquiries, please contact CREATE customer service directly. Ensure you have your model number (THERA RETRO PRO) and purchase details ready when contacting support.
For further assistance, please visit the official CREATE brand store: CREATE Brand Store


