1. Introduction
The BIQU BIGTREETECH PI TFT70 is a 7-inch capacitive touch screen designed for use with Raspberry Pi models. It features an 800x480 resolution and connects via the DSI interface, offering a responsive 5-point touch experience. This display is particularly suitable for applications requiring a compact and interactive interface, such as 3D printer controllers running KlipperScreen.

Figure 1: The BIGTREETECH PI TFT70 display, along with its mounting hardware (standoffs) and the flexible flat cable (FPC) for connection.
2. Product Features
- Wide Range of Applications: A 7-inch capacitive touch screen specifically designed for Raspberry Pi models. It includes onboard studs and positioning posts for secure Raspberry Pi integration.
- High Resolution: Features an 800x480 resolution with a display area of 165x100mm.
- 5-point Capacitive Touch: Supports Raspberry Pi DSI display interface with a capacitive touch panel, enabling 5-point multi-touch for improved response and faster interaction.
- Easy to Use: Connects to the Pi's DSI interface using an FPC cable, providing a simple and convenient touch display solution.
- KlipperScreen Upgrade: Compatible with a host (such as Raspberry Pi 4B) to run KlipperScreen, offering a seamless touch experience for Klipper-enabled 3D printers.
3. Setup and Installation
Follow these steps to correctly install and connect your BIGTREETECH PI TFT70 display to a Raspberry Pi.
3.1 Component Overview

Figure 2: The PI TFT70 display is designed for seamless compatibility with Raspberry Pi models, connecting directly through the DSI interface.
3.2 Mounting the Raspberry Pi
The display features a specialized hole design and includes standoffs to securely mount your Raspberry Pi directly onto the display unit, ensuring a compact and integrated setup.

Figure 3: The display features a specialized hole design to ensure a secure and robust installation of the Raspberry Pi directly onto the display unit.
3.3 Connecting the FPC Cable
Use the provided Flexible Flat Cable (FPC) to connect the display to the Raspberry Pi's DSI interface. Ensure the metal end of the FPC cable faces up when inserting it into the connectors on both the Raspberry Pi and the display.

Figure 4: A visual guide detailing the proper method for connecting the flexible flat cable (FPC) between the Raspberry Pi and the PI TFT70 display, ensuring the metal end faces up.
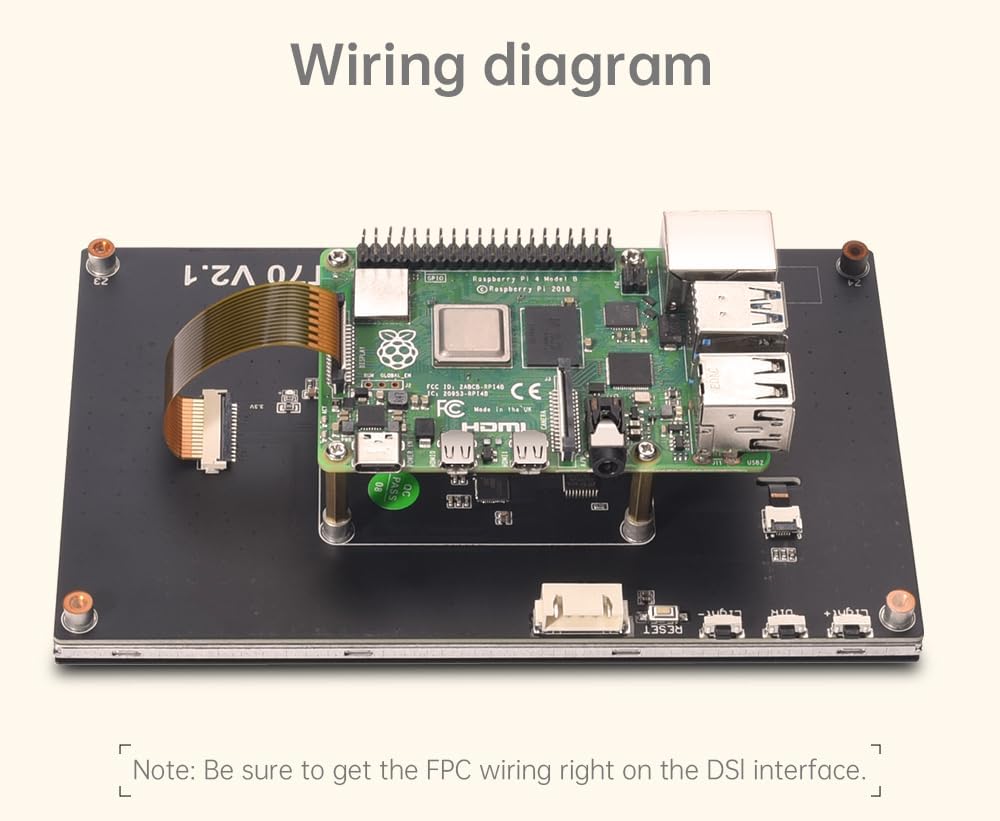
Figure 5: This diagram illustrates the correct connection of a Raspberry Pi to the PI TFT70 display, highlighting the DSI interface connection.
4. Operating Instructions
4.1 Touch Control
The PI TFT70 features a capacitive touch panel that supports 5-point multi-touch. This allows for intuitive interaction with the Raspberry Pi's operating system or applications like KlipperScreen.

Figure 6: The 7-inch capacitive touch screen offers responsive and accurate touch control for navigating the Raspberry Pi's interface.
4.2 Brightness Adjustment
The display's backlight can be adjusted for optimal viewing. Depending on the version (V2.0 or V2.1), brightness is controlled either by a rotary encoder or dedicated buttons on the display board.

Figure 7: The display features an adjustable backlight, allowing users to control brightness for optimal viewing conditions.
5. KlipperScreen Integration
The PI TFT70 display is an ideal companion for 3D printers running Klipper firmware, especially when paired with a Raspberry Pi 4B to host KlipperScreen. This setup provides a dedicated, interactive touch interface for managing your 3D printer operations.

Figure 8: This image demonstrates the PI TFT70 display running KlipperScreen, providing an enhanced touch interface for Klipper-enabled 3D printers.
6. Specifications
The following table details the technical specifications for the BIGTREETECH PI TFT70 display, alongside other models for comparison.

Figure 9: A comprehensive table outlining the technical specifications for various BIGTREETECH PI TFT models, including size, display area, resolution, and touch controller.
| Feature | Specification |
|---|---|
| Size | 7 Inches |
| Display Area | 165mm x 100mm (154mm x 86mm active) |
| Resolution | 800 x 480 |
| Display Type | LCD, LED |
| Touch Type | Capacitive (5-point) |
| Touch Controller | IC-GT911 |
| Working Mode | DSI |
| Power Input | DC 3.3V |
| MCU | STM32G030F6P6 |
| Number of Screen Backlights | 27-LED |
| Brightness Adjustment | Button Control (V2.1) / Rotary Encoder (V2.0) |
| Product Dimensions | 6.5 x 3.94 x 3.39 inches (165 x 100 x 86 mm) |
| Item Weight | 12.3 ounces (0.35 Kilograms) |
| Model Number | ZZB000530 |
7. Troubleshooting
- Wi-Fi Interference: Some users have reported potential Wi-Fi interference when the display is connected to a Raspberry Pi 4. Ensure proper spacing between the display and the Raspberry Pi using the provided standoffs. If issues persist, consider using an external Wi-Fi dongle.
- DSI Cable Length: The included DSI cable is designed for direct mounting of the Raspberry Pi to the display. If your setup requires the Raspberry Pi to be mounted further away, a longer DSI cable may be necessary and can be purchased separately.
- Display Orientation: If the display image is inverted, check for a physical switch on the display board (if applicable to your version) or consult Raspberry Pi documentation for software-based display rotation settings.
- Power Supply Issues: Ensure your Raspberry Pi's power supply is adequate when the display is connected. An insufficient power supply can lead to instability or display issues. A 12V 2-5A power supply is often recommended for setups involving a Raspberry Pi and display.
8. Maintenance
- Cleaning: Use a soft, lint-free cloth to gently clean the screen surface. For stubborn smudges, a small amount of screen cleaner designed for electronics can be applied to the cloth (not directly to the screen).
- Handling: Avoid applying excessive pressure to the screen. When handling the display, hold it by the edges to prevent damage to the screen or internal components.
- Environment: Operate the display in a clean, dry environment, away from direct sunlight, extreme temperatures, and high humidity.
9. Warranty and Support
For warranty information, technical support, or further assistance, please refer to the official BIQU website or contact their customer service directly. Keep your purchase receipt for any warranty claims.


