1. Introduction
This manual provides detailed instructions for the safe and effective operation of your FLIR MR265 Moisture Meter and Thermal Imager with MSX. Please read this manual thoroughly before using the device to ensure proper functionality and to prevent damage.
The FLIR MR265 is a professional tool designed for moisture detection and thermal imaging applications, combining a thermal camera with a pinless moisture sensor and an external pin probe for comprehensive diagnostics.
2. Safety Information
Always observe safety precautions when operating the FLIR MR265. Failure to do so may result in injury or damage to the device.
- Do not expose the device to extreme temperatures or humidity beyond its operating specifications.
- Avoid direct exposure of the laser pointer to eyes.
- Use only the specified charging accessories.
- Do not attempt to open or modify the device. Refer servicing to qualified personnel.
3. Product Features
The FLIR MR265 integrates advanced technologies to provide accurate and efficient moisture and thermal inspections:
- High-Performance Thermal Imaging: Features a 160 × 120 thermal imaging sensor for clear visualization of temperature differences.
- MSX Technology: Multi-Spectral Dynamic Imaging enhances thermal images by embossing visual details onto full thermal images, improving context and issue identification.
- Integrated Pinless Moisture Sensor: Allows for non-invasive moisture scanning.
- External Pin Probe Capability: For invasive moisture measurements when precise depth readings are required.
- Integrated Laser Pointer: Helps target the exact source of problems.
- Rugged Design: Built to withstand demanding environments, including a 2-meter drop test.
- MeterLink App Connectivity: Enables remote monitoring, image capture, and data transfer to a smartphone.
4. Getting Started
4.1. Package Contents
Verify that all items are present in the package:
- FLIR MR265 Moisture Meter and Thermal Imager
- MR02 Standard Moisture Pin Probe
- International USB charger and cable
- Quick start guide (refer to this manual for full details)
- Lanyard
4.2. Charging the Device
The FLIR MR265 is powered by an internal Lithium Polymer battery. Before first use, fully charge the device.
- Connect the provided USB cable to the MR265's charging port.
- Connect the other end of the USB cable to the international USB charger.
- Plug the charger into a suitable power outlet.
- The charging indicator on the device will show charging status. Allow sufficient time for a full charge.
4.3. Powering On/Off
To power on the device, press and hold the power button located at the bottom of the unit until the screen illuminates. To power off, press and hold the power button again until the device shuts down.
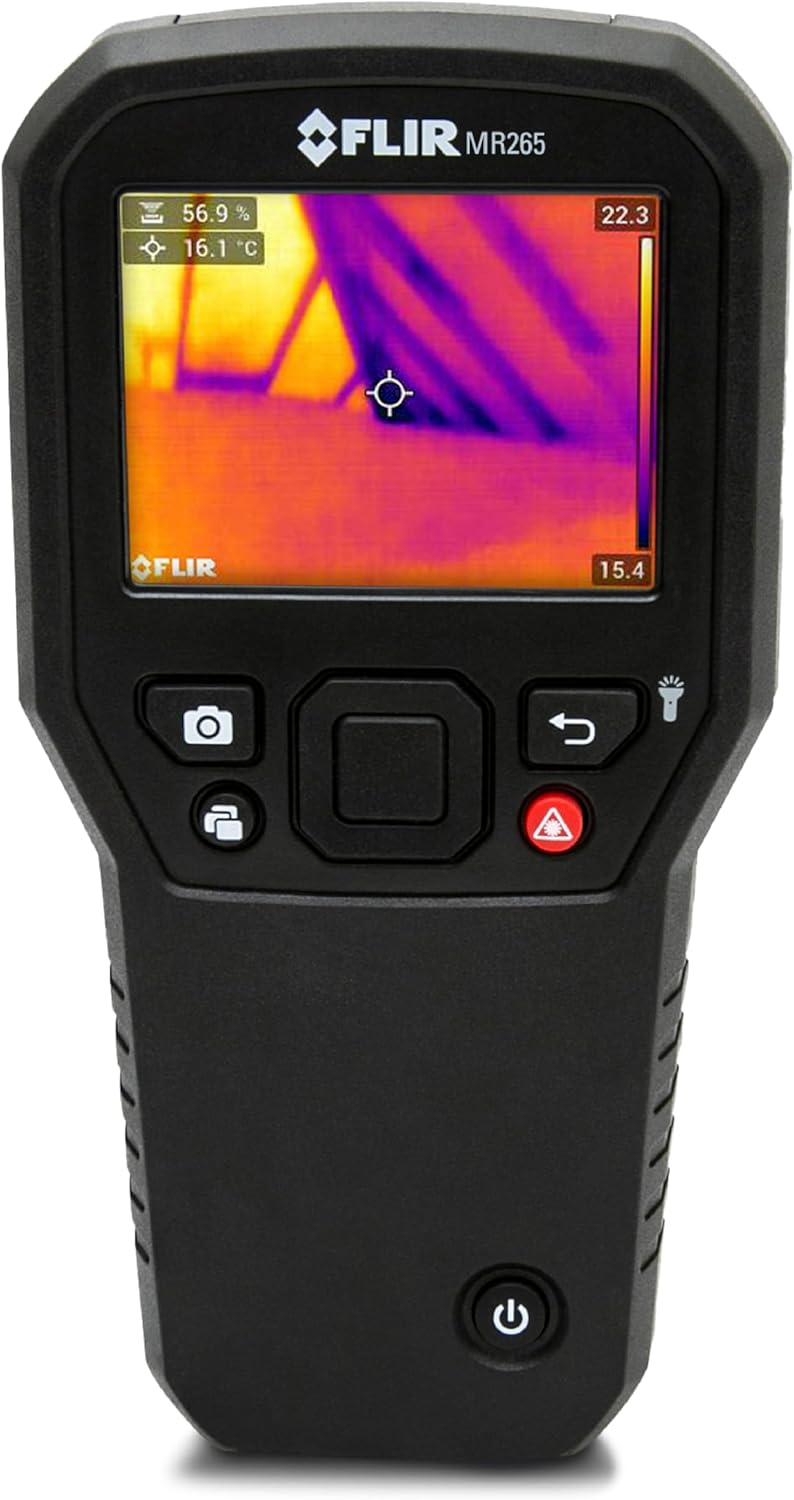
Figure 1: Front view of the FLIR MR265, highlighting the power button at the bottom and the display screen.
5. Operation
5.1. Navigating the Interface
The MR265 features an intuitive interface with dedicated buttons for various functions. The central navigation pad allows for menu selection and adjustment.

Figure 2: The FLIR MR265 display showing both thermal imaging and moisture measurement data, indicating the device's multi-functionality.
5.2. Thermal Imaging (IGM)
The Infrared Guided Measurement (IGM) system uses a thermal sensor to quickly identify areas of concern, such as moisture, air leaks, and insulation voids.
- Point the thermal imager towards the area of interest.
- Observe the thermal image on the display. Hotter areas will appear in warmer colors (e.g., red, orange), while cooler areas will appear in cooler colors (e.g., blue, purple).
- Use the MSX feature to overlay visual details onto the thermal image for better context. This can be toggled in the settings menu.

Figure 3: Comparison of a thermal image without MSX (left) and with MSX (right), demonstrating how MSX adds visual detail to the thermal overlay for clearer identification of objects.

Figure 4: The FLIR MR265 displaying a thermal image along with air temperature, relative humidity, and dew point readings, aiding in comprehensive environmental assessment.
5.3. Moisture Measurement
The MR265 offers both pinless and pin-type moisture measurement methods.
5.3.1. Pinless Mode
The integrated pinless sensor allows for non-invasive scanning of surfaces to detect moisture content up to 0.75 inches (19 mm) deep.
- Select "Pinless Mode" from the measurement menu.
- Place the back of the device flat against the surface to be inspected.
- Move the device across the surface. The display will show the moisture reading.
- The device supports 11 material groups for accurate readings. Select the appropriate material group in the settings.

Figure 5: A user holding the FLIR MR265, displaying a pinless moisture reading on the screen, indicating its ease of use for non-invasive inspections.
5.3.2. Pin Mode
For precise, invasive moisture measurements, attach the MR02 Standard Moisture Pin Probe.
- Connect the MR02 pin probe to the designated port on the MR265.
- Select "Pin Mode" from the measurement menu.
- Carefully insert the pins of the probe into the material being tested.
- The display will show the moisture content reading.

Figure 6: The FLIR MR265 with the external pin probe inserted into a wooden surface, demonstrating its capability for invasive moisture measurements.
5.4. Using the Laser Pointer and Worklight
The integrated laser pointer helps pinpoint the exact location of thermal anomalies or moisture readings. The worklight illuminates dark areas for better visibility.
- Press the laser button to activate the laser pointer.
- Press the worklight button to turn on the LED worklight.

Figure 7: Rear view of the FLIR MR265, showing the activated worklight and laser pointer, useful for illuminating and targeting inspection areas.
5.5. MeterLink App Connectivity
Connect your MR265 to the FLIR MeterLink app on your smartphone for enhanced functionality, including remote viewing, data logging, and report generation.
- Download the FLIR MeterLink app from your device's app store.
- Enable Bluetooth on your smartphone and the MR265.
- Open the MeterLink app and follow the on-screen instructions to pair with your MR265.
- Once connected, you can remotely capture images, monitor readings, and transfer data.

Figure 8: A smartphone displaying the FLIR MeterLink app interface, illustrating its capability to compare data logs and provide detailed graphical representations of measurements.
6. Maintenance
Proper maintenance ensures the longevity and accuracy of your FLIR MR265.
- Cleaning: Wipe the device body with a damp cloth. Do not use abrasive cleaners or solvents. Clean the thermal lens and visible light camera lens with a soft, lint-free cloth.
- Storage: Store the device in a cool, dry place when not in use. Ensure the battery is partially charged for long-term storage.
- Pin Probe Care: Inspect the pins of the MR02 probe for damage or wear. Replace if necessary to maintain measurement accuracy.
7. Troubleshooting
This section addresses common issues you might encounter with your FLIR MR265.
| Problem | Possible Cause | Solution |
|---|---|---|
| Device does not power on. | Low or depleted battery. | Charge the device using the provided USB charger and cable. |
| Inaccurate moisture readings. | Incorrect material group selected; damaged pin probe; surface irregularities. | Ensure the correct material group is selected in settings. Inspect and replace the pin probe if damaged. Ensure good contact with the surface for pinless measurements. |
| Thermal image appears unclear or blurry. | Dirty lens; device not focused (if applicable); extreme temperature differences. | Clean the thermal lens with a soft, lint-free cloth. Ensure the target is within the optimal measurement range. |
| Cannot connect to MeterLink app. | Bluetooth disabled; app not updated; device not in pairing mode. | Ensure Bluetooth is enabled on both devices. Update the MeterLink app. Refer to the app's instructions for pairing. |
8. Specifications
| Feature | Detail |
|---|---|
| Model | MR265 |
| Thermal Imager Resolution | 160 × 120 pixels (19,200 pixels) |
| Thermal Image Modes | Thermal, Visual, MSX® |
| Pinless Measurement Depth | 0.75 inches (19 mm) |
| Pin Moisture Range | 7% to 100% |
| Infrared Temperature Range | 32°F to 212°F (0°C to 100°C) |
| Display Type | QVGA (320 × 240 pixels) 2.8-inch color TFT graphical display |
| Battery Type | Lithium Polymer (included) |
| Operating Humidity | 10-90% relative humidity |
| Dimensions (H x W x D) | 6.97 x 3.5 x 1.43 inches (17.7 x 8.9 x 3.6 cm) |
| Item Weight | 11.2 ounces |
| Included Components | FLIR MR265, MR02 Standard Moisture Pin Probe, international USB charger and cable, lanyard |
9. Warranty Information
The FLIR MR265 comes with a Limited 10-Year Warranty. Please refer to the official FLIR website or contact customer support for full warranty terms and conditions.
10. Customer Support
For technical assistance, service, or warranty claims, please contact FLIR customer support. Visit the official FLIR website for contact information and additional resources.
Online Resources: www.flir.com


