
1. Introduction
The AUDIOTEK AT3500S is a 2-channel stereo car amplifier designed to enhance your vehicle's audio system. This Class A-B amplifier provides powerful, clean, and uninterrupted sound for your speakers and subwoofers. It features 2 Ohm stable operation, a bridgeable MOSFET design, and a heavy-duty aluminum alloy heatsink for efficient heat dissipation.
Key features include:
- 3500 Watts Max Power Output
- 2 Ohm Stable Operation
- Bridgeable MOSFET Amplifier
- Tri-mode Capable
- Class A-B Operation
- Continuously Variable Low Pass Crossover (0 to +18dB)
- Remote Subwoofer Control (Bass Knob Included)
- Nickel Plated RCA and Speaker Level Inputs
- Remote Turn-On/Turn-Off Circuit
- MOSFET Pulse Width Modulated Power Supply
- 2 Ohm Stable Operation & Soft Turn On Circuit
- Thermal and Speaker Short Protection Circuitry
- LED Power and Protection Indicators
This manual provides detailed instructions for the proper installation, operation, and maintenance of your AT3500S amplifier to ensure optimal performance and longevity.
2. Safety Information
Please read all instructions carefully before installing and operating your amplifier. Failure to follow these guidelines may result in injury or damage to the amplifier or vehicle.
- Professional Installation Recommended: Car audio installation can be complex. If you are unsure about any part of the installation process, seek assistance from a qualified professional installer.
- Disconnect Battery: Always disconnect the vehicle's negative battery terminal before starting any electrical work to prevent electrical shorts and damage.
- Proper Wiring: Use appropriate gauge wiring for power, ground, and speaker connections as specified in the installation section. Incorrect wiring can lead to overheating, fire, or damage to components.
- Fuse Protection: Ensure proper fusing is used for the power input. The amplifier includes internal fuses; however, an external fuse near the battery is crucial for vehicle protection.
- Ventilation: Install the amplifier in a location that allows for adequate air circulation to prevent overheating. Do not mount in enclosed spaces without ventilation.
- Avoid Moisture: Do not expose the amplifier to moisture or water. This unit is not waterproof.
- Secure Mounting: Mount the amplifier securely to prevent it from coming loose during vehicle movement, which could cause injury or damage.
- Volume Levels: Prolonged exposure to high volume levels can cause hearing damage. Adjust volume responsibly.
3. Setup & Installation
Proper installation is crucial for the performance and safety of your amplifier. Follow these steps carefully.
3.1 Unpacking and Inspection
Carefully remove the amplifier from its packaging. Inspect the unit for any signs of damage. If damage is found, contact your dealer immediately.

Image: The AUDIOTEK AT3500S amplifier in its retail packaging, showing the model name and key features.
3.2 Mounting Location
Choose a mounting location that provides good ventilation and is protected from moisture. Common locations include under a seat, in the trunk, or behind a panel. Ensure the amplifier is securely fastened to a solid surface using appropriate hardware.

Image: Top view of the AUDIOTEK AT3500S amplifier, showcasing its silver finish and AUDIOTEK branding. This view is typical for mounting considerations.
3.3 Wiring Connections
Before making any connections, ensure the vehicle's negative battery terminal is disconnected.
3.3.1 Power Connections
- BATT+ (12V Power): Connect a heavy-gauge power cable (e.g., 4-gauge as recommended in the product bundle) directly from the positive terminal of the vehicle's battery to the BATT+ terminal on the amplifier. Install an inline fuse holder with an appropriate fuse (not included, typically 60-80A for 3500W max) within 18 inches (45 cm) of the battery.
- GROUND: Connect a heavy-gauge ground cable of the same size as the power cable from the amplifier's GROUND terminal to a clean, unpainted metal surface of the vehicle chassis. Ensure a good electrical connection.
- REMOTE: Connect a remote turn-on wire (typically 18-gauge) from your head unit's remote output to the amplifier's REMOTE terminal. This wire signals the amplifier to turn on and off with your head unit.
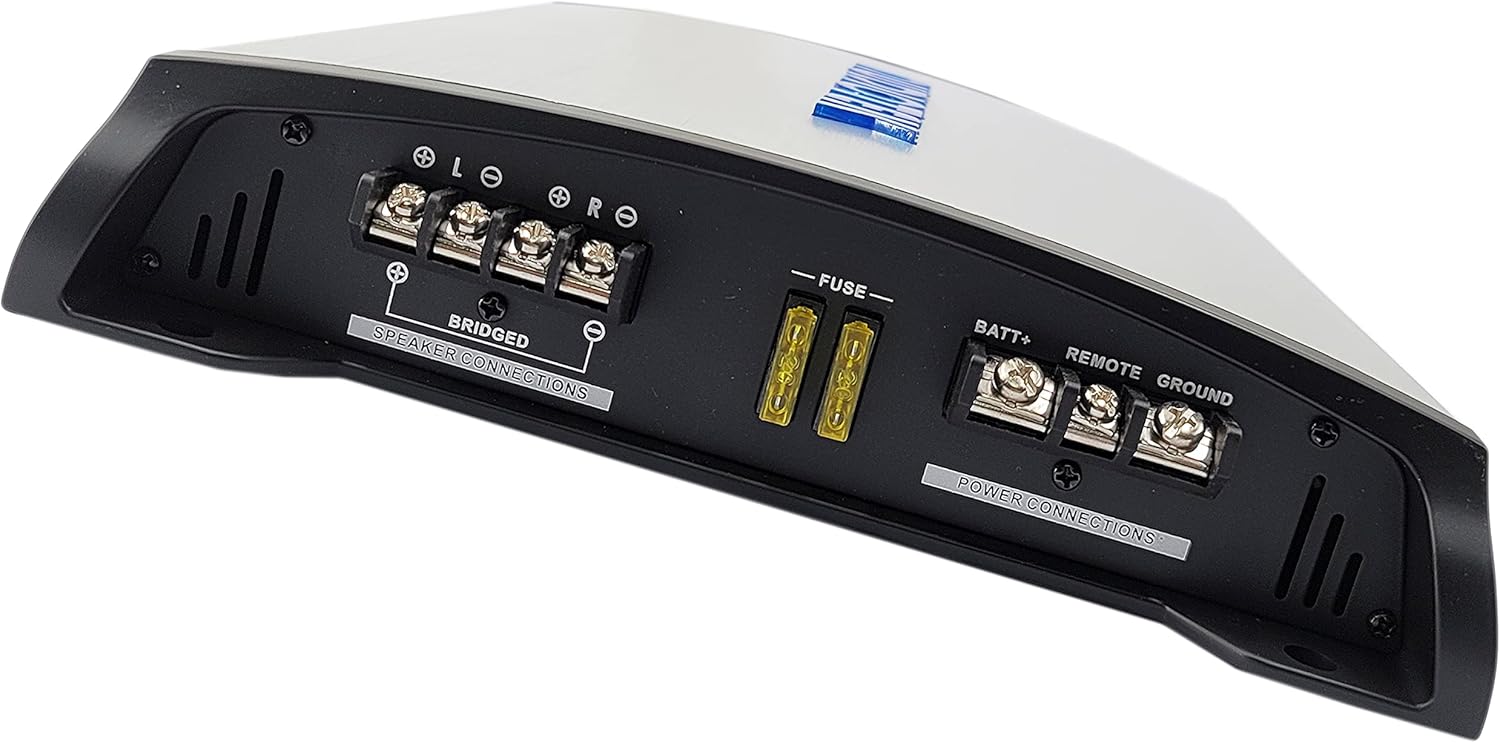
Image: Rear panel of the AUDIOTEK AT3500S amplifier, highlighting the power connections (BATT+, REMOTE, GROUND) and the fuse slots.
3.3.2 Input Connections (RCA or High Level)
- Low Level Inputs (RCA): For head units with RCA pre-outs, connect RCA cables from the head unit's pre-outs to the amplifier's LEFT and RIGHT LOW LEVEL INPUTS.
- High Level Inputs: If your head unit does not have RCA outputs, use the HIGH LEVEL INPUTS. Connect the speaker wires from your head unit's speaker outputs to the amplifier's HIGH LEVEL INPUT connector. The amplifier features a remote sensing capability that can automatically turn it on when a signal is detected on the high-level inputs.

Image: Front panel of the AUDIOTEK AT3500S amplifier, displaying the High Level and Low Level (RCA) input terminals, along with various control knobs.
3.3.3 Speaker Connections
Connect your speakers or subwoofers to the SPEAKER CONNECTIONS terminals. The AT3500S is a 2-channel amplifier and can be configured for stereo or bridged (mono) operation.
- Stereo Mode: Connect one speaker to the Left (+) and Left (-) terminals, and another speaker to the Right (+) and Right (-) terminals. Ensure the total impedance for each channel is 2 Ohms or higher.
- Bridged Mode (Mono): For higher power output to a single subwoofer, connect the subwoofer to the BRIDGED (+) and BRIDGED (-) terminals. Ensure the total impedance for bridged operation is 4 Ohms or higher. Refer to the amplifier's specifications for minimum impedance in bridged mode.
Image: Rear panel of the AUDIOTEK AT3500S amplifier, showing the speaker connection terminals, including the "BRIDGED" markings for mono operation.
3.4 Initial Power-Up
Once all connections are made and double-checked, reconnect the vehicle's negative battery terminal. Turn on your head unit. The amplifier's POWER LED should illuminate, indicating it is receiving power and is operational.
4. Operating Instructions
The AT3500S amplifier features several controls to fine-tune your audio system.
4.1 Control Panel Overview
Image: Front panel of the AUDIOTEK AT3500S amplifier, detailing the input level, bass boost, crossover frequency, and mode controls.
4.2 Adjusting Controls
- INPUT LEVEL (GAIN): This control matches the output voltage of your head unit to the amplifier's input. Start with the INPUT LEVEL at minimum (MIN). Turn your head unit volume to about 75% of its maximum. Slowly increase the INPUT LEVEL on the amplifier until you hear slight distortion, then back it off slightly. This ensures maximum clean signal without clipping.
- BASS BOOST: This control provides a variable bass boost from 0 to +18dB. Use this to enhance low-frequency response. Adjust carefully to avoid distortion.
- LOW PASS FREQ. (Crossover): This knob sets the cutoff frequency for the low-pass filter. When set to "LOW PASS" mode, frequencies above this setting will be attenuated. This is typically used for subwoofers. The range is from 35Hz to 160Hz.
- MODE (Crossover Selection):
- FULL RANGE: The amplifier outputs all frequencies. Suitable for full-range speakers.
- LOW PASS: The amplifier acts as a low-pass filter, allowing only frequencies below the LOW PASS FREQ. setting to pass through. Ideal for subwoofers.
- HIGH PASS: The amplifier acts as a high-pass filter, allowing only frequencies above a certain point (not explicitly adjustable via a separate knob, but implied by the "Full Range" and "Low Pass" options, often a fixed high-pass or used in conjunction with head unit settings for speakers). For this model, the "HIGH PASS" setting is typically used for speakers to prevent low frequencies from reaching them.
- REMOTE (Bass Knob): Connect the included remote bass knob to the REMOTE port. This allows for convenient adjustment of the bass level from the driver's seat.
4.3 LED Indicators
- POWER LED: Illuminates when the amplifier is powered on and operating normally.
- PROTECTION LED: Illuminates when the amplifier detects a fault condition (e.g., thermal overload, speaker short circuit, low voltage). If this LED lights up, the amplifier will enter protection mode and shut down. Refer to the Troubleshooting section.
5. Maintenance
The AUDIOTEK AT3500S amplifier requires minimal maintenance to ensure long-term performance.
- Cleaning: Periodically wipe the amplifier's exterior with a soft, dry cloth to remove dust and dirt. Do not use harsh chemicals or abrasive cleaners.
- Ventilation: Ensure that the amplifier's heatsink fins are free from obstructions (e.g., carpet fibers, debris) to maintain proper airflow and prevent overheating.
- Connections: Occasionally check all power, ground, remote, and speaker connections to ensure they are secure and free from corrosion. Loose connections can lead to poor performance or damage.
- Fuses: If the amplifier fails to power on, check the external inline fuse near the battery and the internal fuses on the amplifier (located on the rear panel). Replace blown fuses only with fuses of the exact same type and rating.
6. Troubleshooting
If you experience problems with your amplifier, consult the following troubleshooting guide before contacting support.
| Problem | Possible Cause | Solution |
|---|---|---|
| No Power (Power LED Off) |
|
|
| Protection LED On (Amplifier Shuts Down) |
|
|
| No Sound Output |
|
|
| Distorted Sound |
|
|
7. Specifications
The following are the technical specifications for the AUDIOTEK AT3500S 2 Channel Stereo Car Amplifier:
| Feature | Specification |
|---|---|
| Brand | AUDIOTEK |
| Model Name | AT3500S |
| Number of Audio Channels | 2.0 |
| Max Power Output | 3500 Watts |
| Impedance Stability | 2 Ohm Stable |
| Amplifier Class | Class A-B |
| Connectivity Technology | RCA |
| Audio Output Mode | Stereo |
| Mounting Type | Surface Mount |
| Speaker Type Compatibility | Subwoofer (and full-range speakers) |
| Additional Features | Protection Circuitry, Bass Boost, Remote Control |
| Power Source | Corded Electric (12V DC Car Battery) |
| Bass Boost | 0 to +18dB (Continuously Variable) |
| Crossover Type | Low Pass (Continuously Variable) |
| Heatsink | Heavy-Duty Aluminum Alloy |
8. Warranty & Support
AUDIOTEK products are designed for reliability and performance. For specific warranty details, please refer to the warranty card included with your product or contact AUDIOTEK customer service. Keep your purchase receipt as proof of purchase for any warranty claims.
For technical support or assistance with installation and troubleshooting, please contact your authorized AUDIOTEK dealer or visit the official AUDIOTEK website for contact information.
Note: Unauthorized service or modification of the amplifier will void the warranty.