Introduction
Thank you for choosing the Audiotek AT804 4 Channel Stereo Car Amplifier. This amplifier is designed to enhance your car audio system with powerful and clear sound reproduction. This manual provides essential information for proper installation, operation, and maintenance to ensure optimal performance and longevity of your amplifier.

Image: Top view of the Audiotek AT804 amplifier, showcasing its sleek silver finish and the Audiotek logo.
Safety Information
Please read all instructions carefully before installing and operating your amplifier. Failure to follow these guidelines may result in damage to the amplifier, vehicle, or personal injury.
- Always disconnect the vehicle's battery negative terminal before starting any electrical work.
- Ensure proper grounding for the amplifier to prevent electrical issues and noise.
- Use appropriate gauge wiring for power, ground, and speaker connections as recommended.
- Mount the amplifier securely in a location that allows for adequate ventilation and is protected from moisture and excessive heat.
- Avoid running wires near sharp edges or moving parts to prevent damage.
- If you are unsure about any installation steps, consult a professional car audio installer.
Product Features
The Audiotek AT804 amplifier incorporates advanced features for superior audio performance:
- 4 Channel Stereo Car Amplifier: Provides versatile audio configuration for multiple speakers.
- 1000 Watts Max Power: Delivers significant power output for dynamic sound.
- 2 Ohm Stable Operation: Allows for flexible speaker impedance configurations.
- Bridgeable MOSFET Amplifier: Offers options for increased power output to specific channels.
- Class A-B Operation: Combines efficiency with high-fidelity sound.
- Heavy-Duty Aluminum Alloy Heat Sink: Ensures efficient heat dissipation for reliable performance.
- Continuously Variable Crossover: Adjustable high-pass and low-pass filters for precise sound tuning.
- Bass Boost: Adjustable bass enhancement from 0 to +18dB.
- Nickel Plated RCA and Speaker Level Inputs: Provides flexible input options and corrosion resistance.
- Remote Turn-On/Turn-Off Circuit: Integrates seamlessly with your car's head unit.
- MOSFET Pulse Width Modulated Power Supply: Delivers stable and efficient power.
- Thermal and Speaker Short Protection Circuitry: Safeguards the amplifier and speakers from damage.
- LED Power and Protection Indicators: Provides visual status of the amplifier's operation.
Specifications
| Feature | Specification |
|---|---|
| Model Number | AT804 |
| Manufacturer | AUDIOTEK |
| Number of Channels | 4 |
| Mounting Type | Surface Mount |
| Power Output | 1000 Watts (Max) |
| Impedance Stability | 2 Ohm Stable |
| Amplifier Class | Class A-B |
| Bass Boost | 0 to +18dB |
Setup and Installation
Proper installation is crucial for the performance and safety of your amplifier. Ensure all connections are secure and correctly wired.
1. Mounting Location
Choose a mounting location that is dry, well-ventilated, and away from direct sunlight or heat sources. Ensure sufficient space around the amplifier for air circulation. Secure the amplifier firmly to a solid surface using appropriate hardware.
2. Wiring Connections
Refer to the diagrams below for proper wiring. Always use high-quality, appropriate gauge wiring.
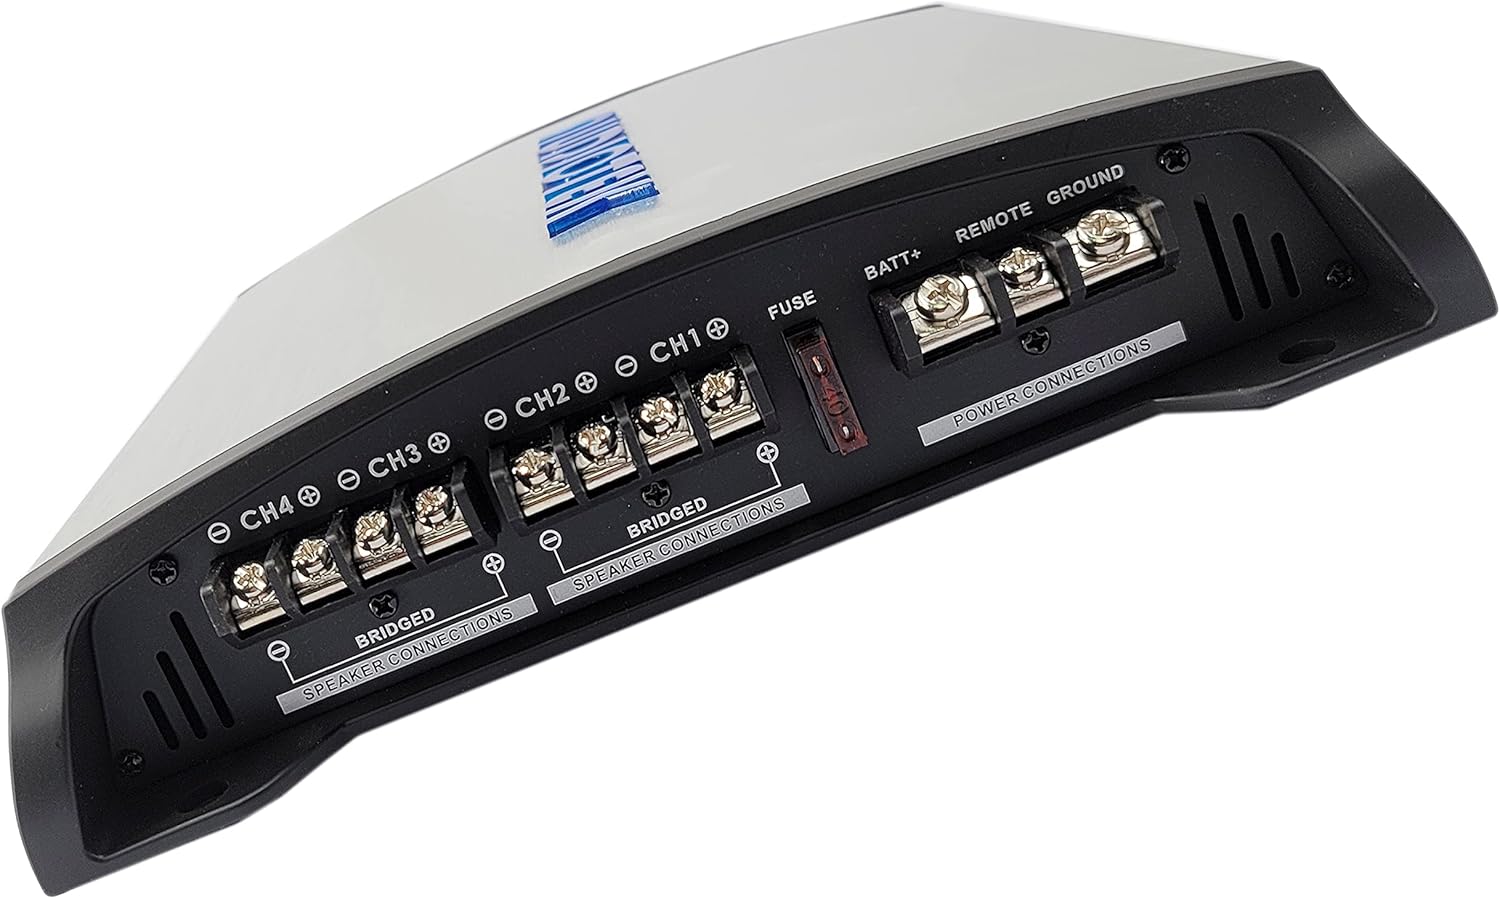
Image: Rear view of the Audiotek AT804 amplifier, showing the power input terminals (BATT+, REMOTE, GROUND) and speaker output terminals (CH1, CH2, CH3, CH4) with bridging options clearly labeled.
Power Connections:
- BATT+ (12V Power): Connect directly to the positive terminal of the vehicle's battery. Install an in-line fuse (not supplied) within 18 inches of the battery.
- GROUND: Connect to a clean, unpainted metal surface of the vehicle chassis. Ensure a solid electrical connection.
- REMOTE: Connect to the remote turn-on lead from your head unit. This wire turns the amplifier on and off with your stereo.
Speaker Connections:
- Connect your speakers to the CH1, CH2, CH3, and CH4 output terminals. Observe correct polarity (+ to + and - to -).
- For bridged operation (e.g., for a subwoofer), use the designated "BRIDGED" terminals as indicated on the amplifier. Refer to the diagram for specific bridged wiring.

Image: Front view of the Audiotek AT804 amplifier, displaying the input level controls, crossover settings (High Pass, Full Range, Low Pass), and RCA/High-Level inputs for channels 1-4.
Input Connections:
- Low Level Inputs (RCA): Connect RCA cables from your head unit's pre-amp outputs to the amplifier's RCA inputs (CH1, CH2, CH3, CH4).
- High Level Inputs: If your head unit does not have RCA outputs, use the high-level inputs. Connect speaker wires from your head unit's speaker outputs to the amplifier's high-level input terminals.
Operating Instructions
Once installed, adjust the amplifier settings for optimal sound performance.
1. Initial Power-Up
- After all connections are made, reconnect the vehicle's battery.
- Turn on your car's ignition and head unit. The "POW" (Power) LED on the amplifier should illuminate, indicating it is receiving power.
- If the "PRO" (Protection) LED illuminates, there is an issue. Refer to the Troubleshooting section.
2. Adjusting Input Level (Gain)
The "INPUT LEVEL" control matches the amplifier's input sensitivity to the output level of your head unit. This is not a volume control.
- Set the head unit volume to about 75% of its maximum.
- Turn the amplifier's "INPUT LEVEL" control to its minimum (MIN) position.
- Slowly increase the "INPUT LEVEL" control until you hear slight distortion, then back it off slightly until the sound is clear.
3. Crossover Settings
The crossover controls allow you to direct specific frequency ranges to your speakers, optimizing sound quality and protecting speakers.
- FULL RANGE: Passes all frequencies to the speakers. Suitable for full-range speakers.
- HPF (High Pass Filter): Allows frequencies above the set point to pass. Use for tweeters or mid-range speakers to prevent low bass.
- LPF (Low Pass Filter): Allows frequencies below the set point to pass. Use for subwoofers to prevent high frequencies.
Adjust the frequency knobs (e.g., 50Hz-250Hz) according to your speaker types and desired sound profile.
4. Bass Boost
The "BASS BOOST" control (0 to +18dB) enhances low-frequency output. Use sparingly to avoid distortion and speaker damage. Adjust to your preference.
Maintenance
Regular maintenance helps ensure the longevity and performance of your amplifier.
- Cleaning: Periodically wipe the amplifier's exterior with a soft, dry cloth. Avoid using harsh chemicals or abrasive cleaners.
- Connections: Check all wiring connections periodically to ensure they are secure and free from corrosion. Loose connections can cause performance issues or damage.
- Ventilation: Ensure that the amplifier's heat sink fins are free from dust and debris to maintain proper cooling. Do not obstruct airflow around the amplifier.
Troubleshooting
If you experience issues with your Audiotek AT804 amplifier, refer to the following common problems and solutions:
| Problem | Possible Cause | Solution |
|---|---|---|
| No Power (POW LED off) | Blown fuse, loose power/ground/remote wire, faulty battery connection. | Check in-line fuse, verify all power connections are secure, test battery voltage. |
| Protection LED (PRO) is on | Speaker short circuit, overheating, low impedance load, DC offset. | Check speaker wiring for shorts, ensure proper ventilation, verify speaker impedance, allow amplifier to cool. |
| No Sound Output | No input signal, incorrect gain setting, faulty RCA/speaker cables, amplifier in protection mode. | Check RCA/high-level input connections, adjust gain, test cables, check PRO LED. |
| Distorted Sound | Gain set too high, improper crossover settings, poor speaker connections, damaged speakers. | Reduce gain, adjust crossover, check speaker wiring, inspect speakers for damage. |
| Engine Noise/Whine | Poor grounding, RCA cables too close to power wires, ground loop. | Ensure solid ground connection, reroute RCA cables away from power wires, consider a ground loop isolator. |
Warranty Information
Audiotek products are designed and manufactured to the highest quality standards. This product is covered by a limited warranty against defects in materials and workmanship. The specific terms and duration of the warranty may vary by region and retailer.
Please retain your proof of purchase for warranty claims. For detailed warranty information, including coverage, exclusions, and how to make a claim, please refer to the official Audiotek website or contact your authorized dealer.
Customer Support
If you have any questions, require technical assistance, or need further support regarding your Audiotek AT804 amplifier, please contact Audiotek customer service or your authorized dealer.
For the most up-to-date contact information, please visit the official Audiotek website: www.audiotek.com (Note: This is a placeholder URL, please refer to actual product documentation for correct support links).


