Download PDFFree PDF. The Save button below keeps a bookmark and private notes in your account.
RockJam 61-Key Keyboard Piano Kit User Manual
Model: RJ660-SK
Introduction
Welcome to the RockJam RJ660-SK 61-Key Keyboard Piano Kit. This comprehensive kit is designed to provide a complete musical experience for both beginners and experienced players. It includes a 61-key digital keyboard, a sturdy stand, a comfortable bench, headphones for private practice, and note stickers to aid in learning. This manual will guide you through the assembly, operation, and maintenance of your new instrument, ensuring you can unlock its full potential and enjoy countless hours of musical creativity.
What's Included
Your RockJam RJ660-SK kit comes with the following components:
61-Key Digital Keyboard Piano
Adjustable Keyboard Stand
Padded Piano Bench
Over-Ear Headphones
Sheet Music Stand
Power Supply
Image: The complete RockJam 61-Key Keyboard Piano Kit, showcasing the keyboard, stand, bench, headphones, and sheet music stand.
Setup Guide
1. Keyboard Placement and Power Connection
Place the keyboard on a stable, flat surface or on the assembled keyboard stand. Connect the included power supply to the DC IN port on the back of the keyboard and plug it into a wall outlet. Alternatively, the keyboard can be powered by batteries for portable use.
Image: A close-up view of the RockJam 61-Key Keyboard Piano, highlighting its design and key layout.
2. Keyboard Stand Assembly
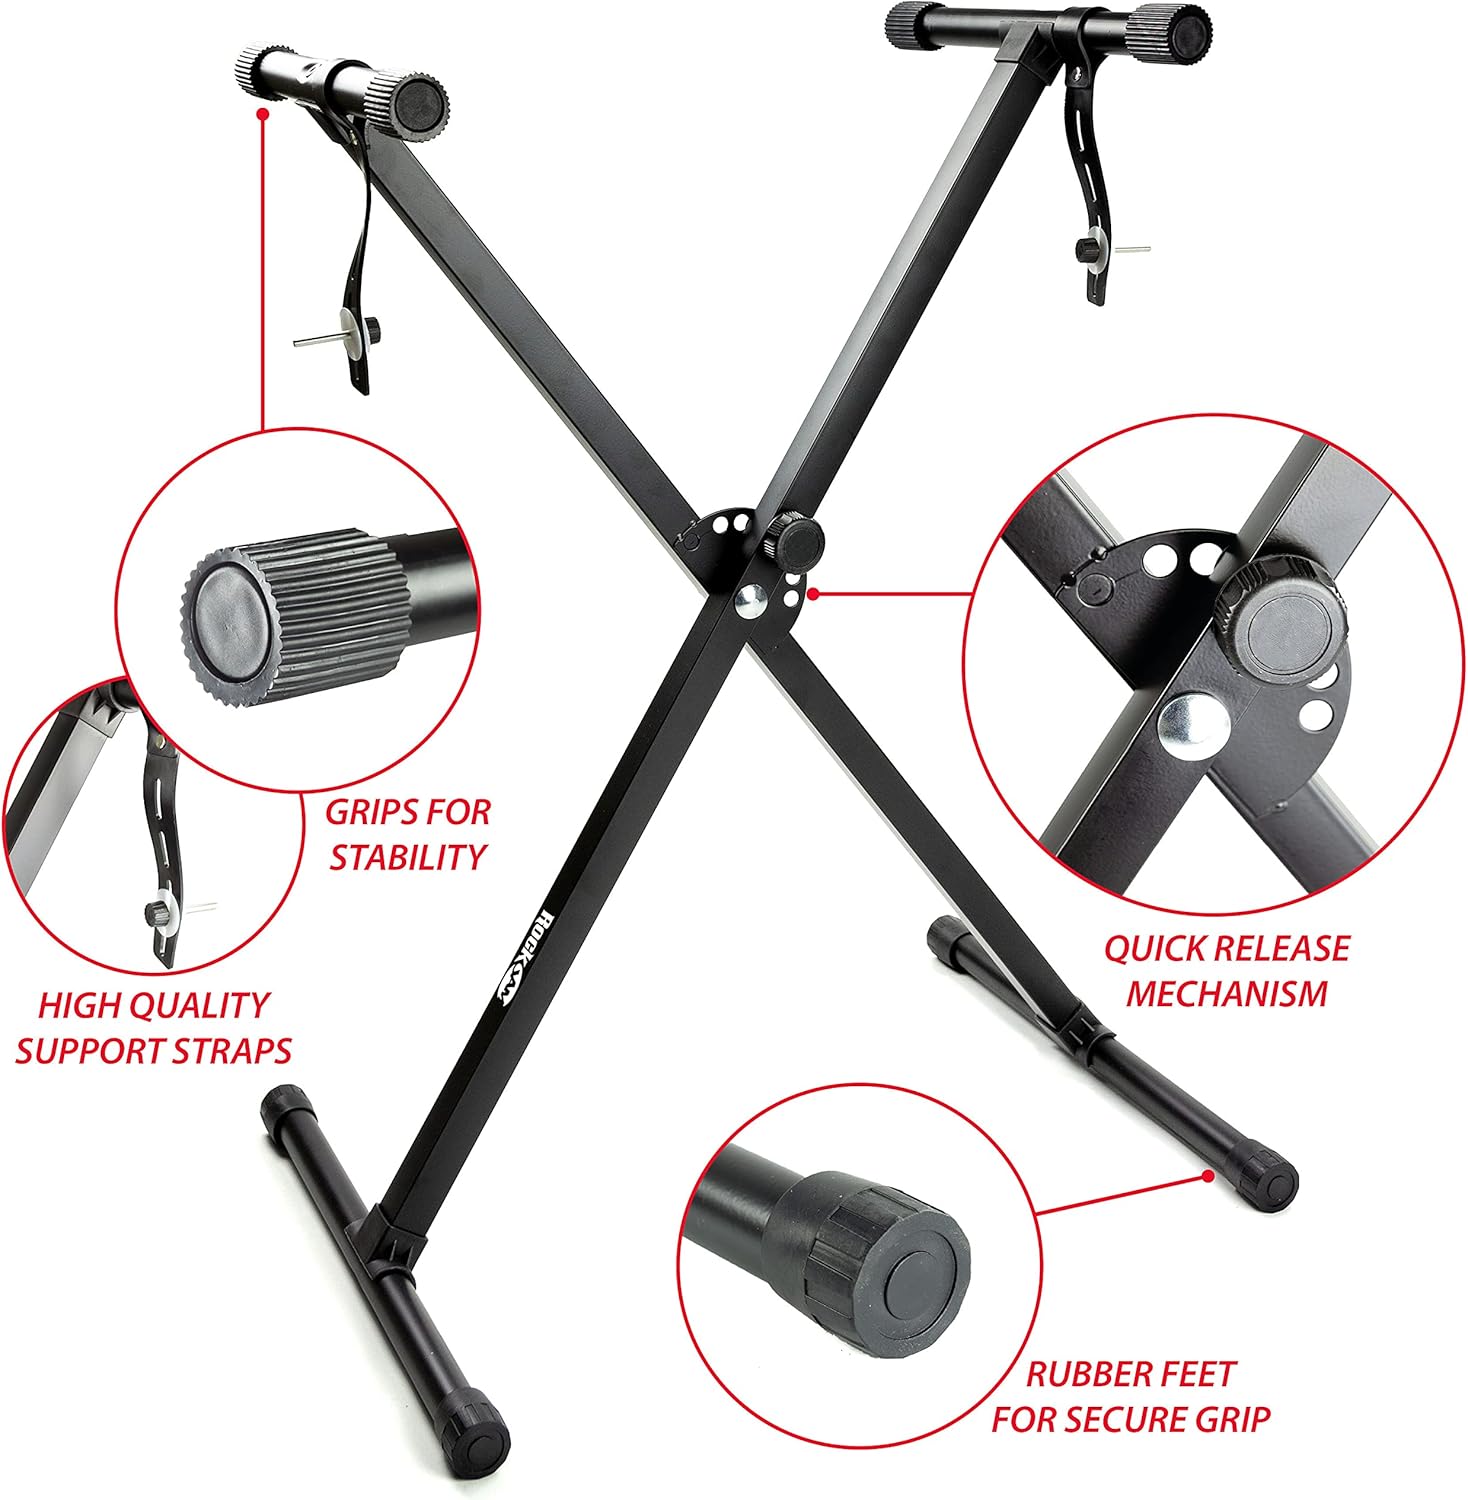
Unfold the X-style keyboard stand. Adjust the height using the quick-release mechanism to a comfortable playing position. Ensure the support straps are securely attached to the keyboard to prevent movement during play. The rubber feet provide secure grip on various surfaces.
Image: Detailed view of the RockJam keyboard stand, showing grips for stability, high-quality support straps, quick release mechanism, and rubber feet for secure placement.
3. Piano Bench Assembly
Unfold the piano bench and ensure the secure fastening mechanism is engaged. The bench features extra padding for comfort during extended practice sessions and rubber feet for stability.
Image: A close-up of the RockJam piano bench, highlighting its extra padding for comfort, secure fastening, and rubber feet for stability.
4. Headphone Connection
For private practice, connect the included over-ear headphones to the 3.5mm headphone jack on the keyboard. This will mute the internal speakers, allowing you to play without disturbing others.
Image: The RockJam over-ear headphones, designed for comfortable and private listening during practice.
5. Note Sticker Application
The kit includes piano note stickers to assist with learning. Carefully apply these stickers to the corresponding keys as indicated in the sticker guide. This visual aid can significantly help beginners identify notes and learn scales and chords.
Image: A close-up of the piano keys with note stickers applied, showing the visual aid for learning.
Operating Instructions
1. Power On/Off
To power on the keyboard, press the 'Power' button located on the control panel. The LED display will illuminate. To power off, press the 'Power' button again.
2. Basic Functions
Volume Control: Use the dedicated volume knob or buttons to adjust the overall sound output.
Instrument Selection: The keyboard features 600 different instrument voices. Use the 'Instrument' button and the numeric keypad or arrow keys to select your desired sound. The LED display will show the current instrument number.
Rhythm Selection: Explore 400 built-in rhythms. Press the 'Rhythm' button and use the numeric keypad or arrow keys to choose a rhythm. Adjust the tempo using the 'Tempo' buttons.
Demo Songs: The keyboard includes 40 demo songs. Press the 'Demo' button to cycle through and play the pre-recorded songs.
3. Learning Features
The RockJam RJ660-SK includes three teaching functions to assist with learning. Additionally, your kit comes with exclusive content from Simply Piano, an award-winning application. Connect your device (tablet/smartphone) to the keyboard (if applicable via auxiliary input or MIDI, check specific keyboard ports) and follow the in-app lessons to learn your favorite songs step-by-step.
Image: The Simply Piano application interface, demonstrating how it guides users through interactive lessons and displays notes.
Maintenance and Care
Cleaning: Use a soft, dry cloth to wipe down the keyboard and accessories. For stubborn marks, a slightly damp cloth can be used, followed by a dry one. Avoid abrasive cleaners or solvents.
Storage: When not in use, store the keyboard and accessories in a cool, dry place away from direct sunlight and extreme temperatures.
Handling: Handle the keyboard with care. Avoid dropping it or placing heavy objects on it.
Troubleshooting
If you encounter any issues with your RockJam keyboard, please refer to the following table for common problems and their solutions:
Problem
Solution
No sound from keyboard
Ensure the power supply is connected and the keyboard is turned on. Check the volume level. If headphones are plugged in, unplug them to enable the internal speakers.
Keys are not responding
Turn the keyboard off and then on again. Ensure no debris is lodged between the keys.
Distorted sound
Reduce the volume level. Ensure the power supply is stable.
LED display is blank
Check power connection and ensure the keyboard is turned on. If using batteries, check battery level.
Technical Specifications
Feature
Detail
Model Name
RockJam RJ660 61 Key Keyboard Piano
Number of Keys
61 Full-Size Keys
Dimensions (Keyboard)
92.8 x 29.8 x 8.5 cm
Item Weight
8.6 kg (total kit)
Power Source
Corded Electric / Batteries
Connectivity
3.5mm Jack (Headphone, Auxiliary)
Rhythms
400
Instruments
600
Demo Songs
40
Supported Software
Simply Piano
Material Type
Plastic, Metal
Warranty and Support
For information regarding warranty coverage, technical support, or service inquiries, please refer to the documentation included with your product packaging or visit the official RockJam website. Contact details for customer support are typically provided by the manufacturer.
Ask a question about this manual
Ask about setup, troubleshooting, compatibility, parts, safety, or missing instructions. Manuals+ will review the question and use this page’s manual context to help answer it.