Introduction
This manual provides detailed instructions for the installation, maintenance, and troubleshooting of the Wayne Dalton Anti-Pinch Hinge, specifically designed for Wayne Dalton 9100 and 9600 series garage doors. This hinge is crucial for the proper and safe operation of your garage door, helping to prevent panel pinching and ensuring smooth roller movement within the track.
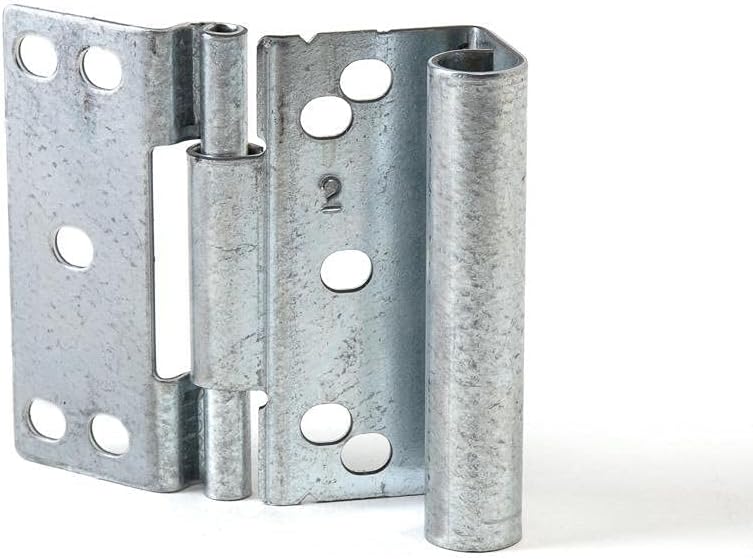
Figure 1: Front view of the Wayne Dalton Anti-Pinch Hinge #2. This galvanized steel hinge is designed for durability and features a unique shape to accommodate the garage door roller and prevent finger pinching between door sections.
Safety Information
WARNING: Garage door springs are under extreme tension and can cause serious injury or death. Do NOT attempt to adjust, repair, or remove garage door springs or cables. Always consult a qualified garage door technician for any work involving springs or cables.
- Always disconnect power to the garage door opener before performing any work on the door.
- Wear appropriate personal protective equipment, including safety glasses and gloves.
- Ensure the garage door is fully open and secured in place before working on hinges or rollers. Use C-clamps or vice grips to secure the door to the track above the hinge you are replacing.
- Do not place fingers or hands between door sections when the door is in motion or unsecured.
- If unsure about any step, seek professional assistance.
Setup and Installation
Tools Required:
- Power drill or impact driver
- T25 Torx bit (for original screws) or 5/16" hex head bit (for self-tapping screws)
- C-clamps or vice grips (for securing door panels)
- Safety glasses
- Gloves
Installation Video Guide:
Video: "Replace Wayne Dalton Anti-Pinch Roller Hinge Install Guide" by Express Garage Doors Inc. This video demonstrates the step-by-step process of replacing an outer edge anti-pinch hinge on Wayne Dalton 9100 or 9600 series garage doors.
Step-by-Step Installation:
- Prepare the Door: Ensure the garage door is fully open and stable. Disconnect the garage door opener. Secure the door panels above and below the hinge you are replacing using C-clamps or vice grips to prevent accidental movement.
- Remove Old Hinge: Using a T25 Torx bit or appropriate driver, carefully remove the screws securing the old hinge to the garage door panels. Once screws are removed, slide the roller out of the track and remove the old hinge.

Figure 2: Close-up view of a hinge attached to a garage door panel, showing the screws that need to be removed. Note the number "2" stamped on the hinge, indicating its position.
- Insert Roller into New Hinge: Take your new Wayne Dalton Anti-Pinch Hinge. Insert the garage door roller into the designated slot on the new hinge.
- Align and Reinstall: Carefully align the new hinge with the original screw holes on the garage door panels. Ensure the roller is properly seated within the garage door track.
- Secure New Hinge: Reinstall the screws using your original T25 Torx screws. Alternatively, you can use hex head self-tapping screws for a quicker install (screws are not included with the hinge). Tighten all screws securely, but do not overtighten.
- Test Operation: Once the new hinge is securely installed, remove any clamps. Manually operate the garage door a few times to ensure smooth movement and proper function of the new hinge and roller. Reconnect the garage door opener.
Important Note: These hinges are sold individually and do not include mounting hardware. Ensure you have the correct screws before beginning the installation.
Operating the Hinge
The Wayne Dalton Anti-Pinch Hinge operates as an integral part of your garage door system, facilitating the smooth articulation of door panels as the door opens and closes. Its design ensures that the rollers remain securely in the track, while the anti-pinch feature minimizes the risk of finger injuries between door sections. No specific user operation is required for the hinge itself beyond ensuring the garage door system is functioning correctly.
Maintenance
Regular maintenance helps prolong the life of your garage door hinges and ensures safe operation.
- Visual Inspection (Monthly): Periodically inspect all hinges for signs of wear, rust, bending, or cracks. Check that all screws are tight. If any hinge appears damaged, replace it immediately.
- Lubrication (Annually): Apply a silicone-based garage door lubricant to the hinge pins and rollers. Avoid using grease or oil, as these can attract dirt and debris.
- Cleanliness: Keep the hinges and surrounding door panels clean from dirt, dust, and debris that could impede movement.
Troubleshooting
If you experience issues with your garage door after hinge replacement, consider the following:
| Problem | Possible Cause | Solution |
|---|---|---|
| Door is noisy or squeaky | Lack of lubrication on hinges/rollers, loose screws. | Apply silicone-based lubricant to hinge pins and rollers. Tighten all hinge screws. |
| Door binds or sticks | Hinge not properly aligned, damaged roller, bent track. | Check hinge alignment and ensure roller is seated correctly. Inspect rollers for damage and replace if necessary. If track is bent, consult a professional. |
| Hinge appears loose or wobbly | Loose mounting screws, worn hinge. | Tighten all mounting screws. If the hinge itself is worn or damaged, replace it. |
For issues not listed or if problems persist, it is recommended to contact a qualified garage door technician.
Specifications
| Feature | Detail |
|---|---|
| Brand | WAYNE DALTON |
| Model Number | #2 |
| Part Number | 161526 |
| UPC | 810063396992 |
| Material | Galvanized Steel |
| Product Dimensions | 3"L x 3"W |
| Hole Count | 3 |
| Mounting Type | Door Mount |
| Compatibility | Wayne Dalton 9100 and 9600 Doors |
| Item Weight | 5 ounces |
Warranty and Support
For specific warranty information regarding your Wayne Dalton Anti-Pinch Hinge, please refer to the documentation provided at the time of purchase or contact the seller directly. This product is from a small business brand, Express Garage Doors Inc., which typically offers support for their products.
If you require assistance or have questions about the product, please reach out to the seller, Express Garage Doors Inc., through the platform where the purchase was made or via their official contact channels.
For general inquiries or to find more information about Wayne Dalton products, you may visit the official Wayne Dalton website.


