
Introduction
The Kelty Sideroads Awning Shelter is designed to provide protection from elements and UV rays during car camping, tailgating, and other outdoor activities. It features a universal mount system for attachment to various vehicles and a sturdy fiberglass frame for stability. This manual provides detailed instructions for the proper setup, operation, and maintenance of your Sideroads Awning Shelter.

The Kelty Sideroads Awning Shelter provides versatile outdoor coverage.
Safety Information
Important: Read all safety information before setting up or using the awning.
- Ensure the shelter is securely anchored in accordance with the provided instructions, taking into account wind conditions and terrain.
- Avoid exposure to direct sunlight for extended periods to prevent material degradation.
- Use appropriate fire safety measures when cooking or using open flames near the shelter. Maintain a safe distance from flammable materials.
- Do not use the awning in severe weather conditions, including high winds, heavy rain, or lightning. Disassemble and store the awning during such conditions.
- Keep children and pets away from the awning during setup and takedown to prevent injury.
What's in the Box
Your Kelty Sideroads Awning Shelter package includes the following components:
- Sideroads Awning Tent Fabric
- Fiberglass Poles (3x)
- Stuff Sack
- Tent Stakes
- Kelty Limited Lifetime Warranty Information
Setup Instructions
Follow these steps to properly set up your Kelty Sideroads Awning Shelter:
Step 1: Unpack and Lay Out
Remove all components from the stuff sack. Lay the awning fabric flat on a clear, level surface near your vehicle. Ensure the area is free of sharp objects.

Lay out the awning fabric before assembly.
Step 2: Assemble Poles
Connect the fiberglass pole sections. The Sideroads Awning uses three fiberglass poles for its structure. Ensure all sections are fully seated.

Ensure pole sections are securely connected.
Step 3: Insert Poles into Sleeves and Attach
Slide the assembled poles through the fabric sleeves on the awning. Once the poles are in place, secure the ends into the corner grommets or sleeves. The awning features "Quick Corners" for fast and easy setup.

The Quick Corners facilitate rapid pole insertion and securing.
Step 4: Attach to Vehicle
The Sideroads Awning features a universal vehicle attachment system. This system allows connection to nearly any SUV, Crossover, or RV, including roof racks. Use the provided straps and buckles to secure the awning to your vehicle. Common attachment points include roof racks, wheels, or other sturdy parts of the vehicle. Ensure the attachment is taut and stable.

The universal attachment system connects to various vehicle types.

Detail of the buckle attachment for secure mounting.
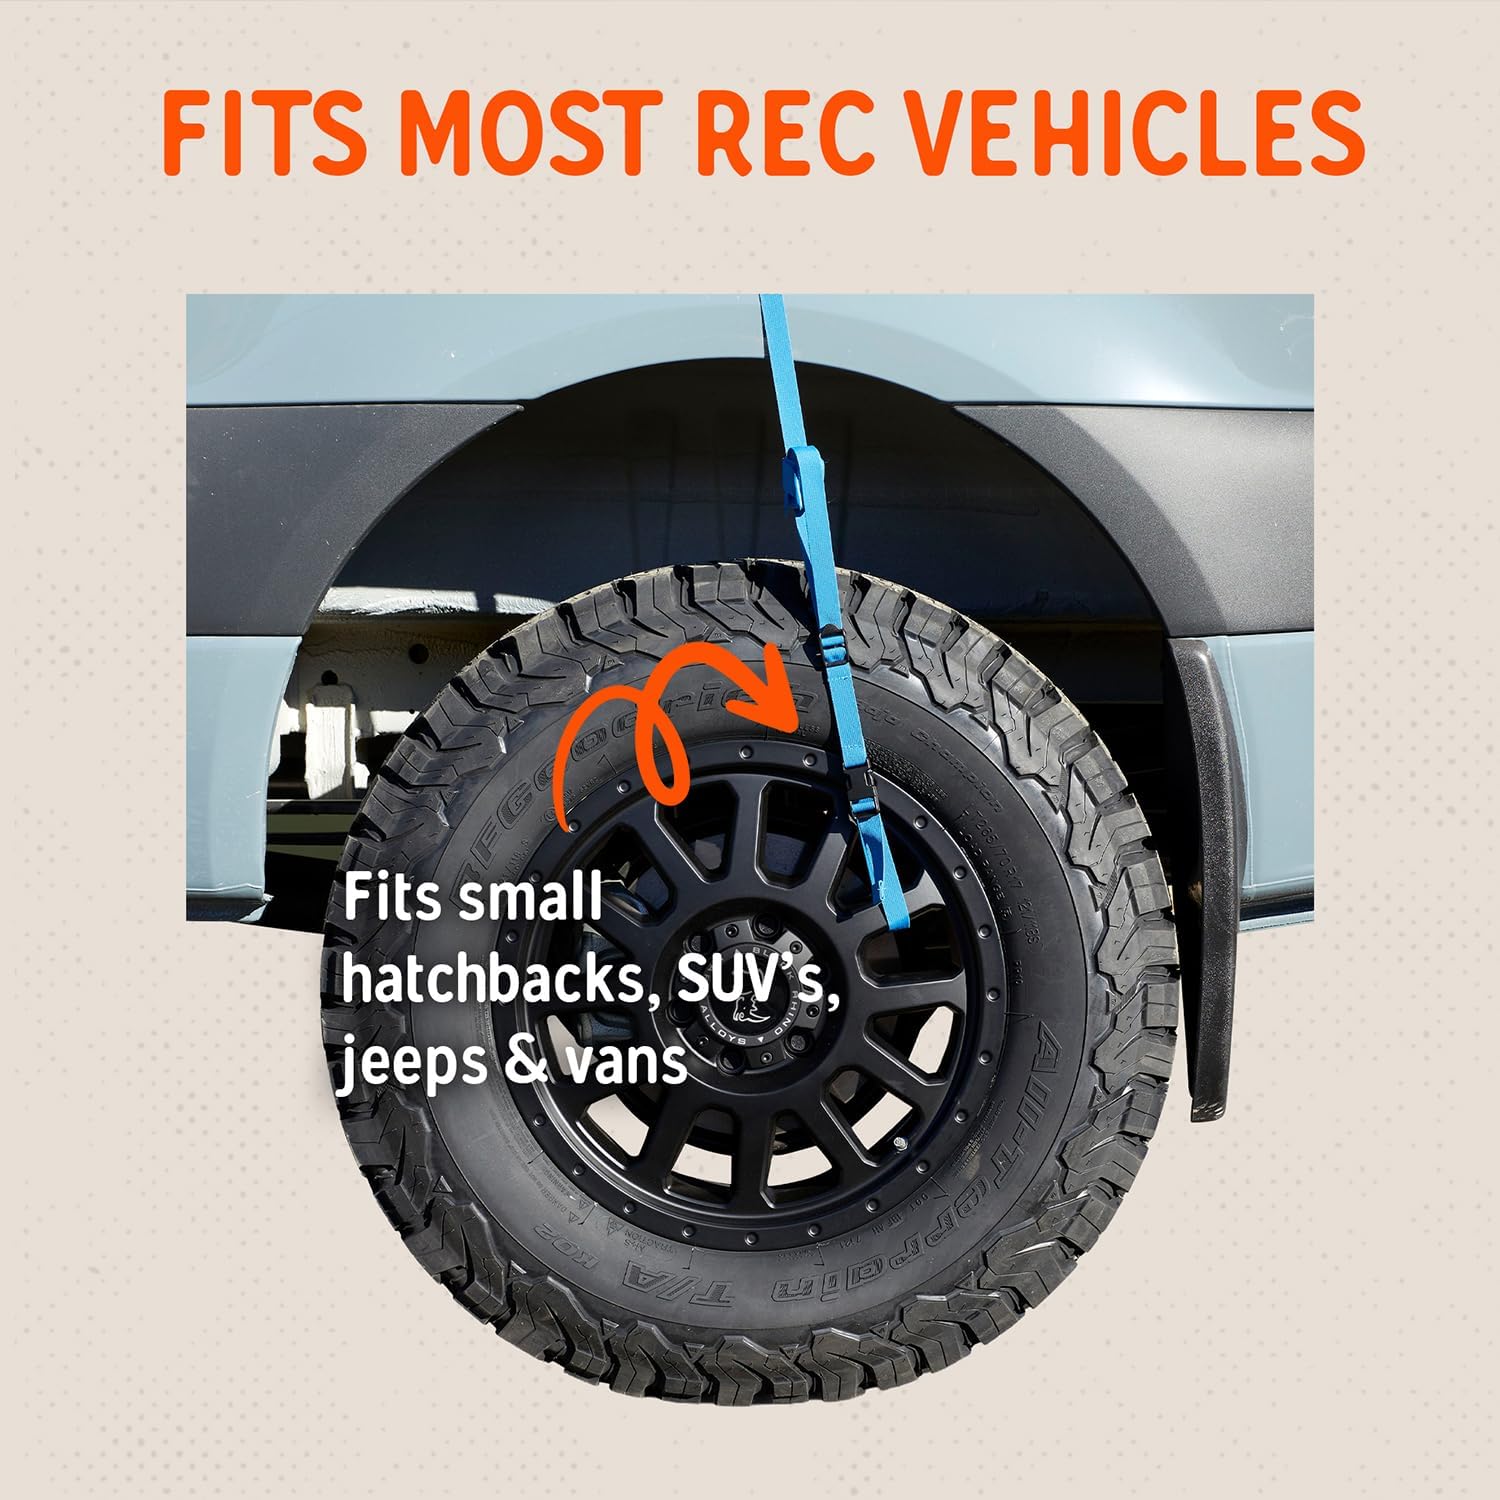
Straps can be secured around vehicle tires for stability.
Step 5: Stake Down and Guy Lines
Once the awning is attached to the vehicle and standing, use the provided tent stakes to secure the base of the awning to the ground. Attach and tension the guy lines to further stabilize the structure, especially in windy conditions. Ensure all lines are taut to prevent flapping and maintain structural integrity.
Setup Video Guide
Official video demonstrating the setup process for the Kelty Sideroads Awning.
Operation
The Kelty Sideroads Awning Shelter provides a versatile, floorless tarp structure designed for shade and weather protection. Once set up, it offers an 81 sq. ft. floor area with a variable peak height (dependent on mounting point).
- Shade and UV Protection: Position your vehicle and awning to maximize shade coverage throughout the day. The awning fabric provides protection from the sun's UV rays.
- Rain Protection: The 68D Poly fabric with 1200mm waterproof rating offers protection from rain. Ensure the awning is properly tensioned to allow water to run off and prevent pooling.
- Ventilation: The open, floorless design allows for excellent airflow, reducing heat buildup under the awning.
- Adjusting Height: The peak height can be adjusted by changing the vehicle attachment point or by using additional poles (not included) to raise the outer edges, if desired.

The awning provides a comfortable shaded area for various activities.
Maintenance
Proper care and maintenance will extend the life of your Kelty Sideroads Awning Shelter.
- Cleaning: Clean the awning fabric with a soft brush or sponge and mild soap (non-detergent) and lukewarm water. Do not use harsh chemicals or bleach. Rinse thoroughly and allow to air dry completely before packing.
- Drying: Always ensure the awning is completely dry before storing it to prevent mildew and fabric degradation. If you must pack it wet, unpack and dry it as soon as possible.
- Storage: Store the awning in its stuff sack in a cool, dry place, away from direct sunlight and extreme temperatures.
- Pole Care: Inspect fiberglass poles for cracks or damage before and after each use. Clean poles with a damp cloth if dirty.
- Stakes and Guy Lines: Clean stakes and store them with the awning. Check guy lines for fraying or damage and replace if necessary.
Troubleshooting
Here are solutions to common issues you might encounter:
| Problem | Possible Cause | Solution |
|---|---|---|
| Awning is unstable or sways in wind. | Insufficient anchoring or loose guy lines. | Ensure all stakes are fully driven into the ground. Tighten all guy lines evenly. Re-position vehicle if necessary to provide more shelter from wind. |
| Water pools on the awning fabric. | Awning not properly tensioned or set up on uneven ground. | Adjust pole positions and guy line tension to create a steeper slope for water runoff. Ensure the awning is set up on as level ground as possible. |
| Poles are difficult to assemble/disassemble. | Dirt or debris in pole ferrules, or poles are cold. | Clean pole sections. If cold, warm them slightly. Apply a small amount of silicone lubricant if needed. |
| Awning does not fit vehicle correctly. | Incorrect attachment method or vehicle type. | Review the "Attach to Vehicle" section. The universal mount is designed for most SUVs, Crossovers, and RVs. Ensure straps are routed correctly and tightened. |
Specifications
Detailed specifications for the Kelty Sideroads Awning Shelter:
- Brand: Kelty
- Model: Sideroads Awning
- Material: 68D polyester (1200mm)
- Frame Material: Fiberglass
- Item Weight: 8 lbs 14 oz (packed)
- Packed Dimensions: 22"L x 8"W x 7"H
- Floor Area: 81 sq. ft.
- Number of Guylines: 4
- Water Resistance Level: Waterproof
- UV Protection: Some ultraviolet light protection (UV protection level not specified)
- Recommended Uses: Camping & Hiking, Car Camping, Festival
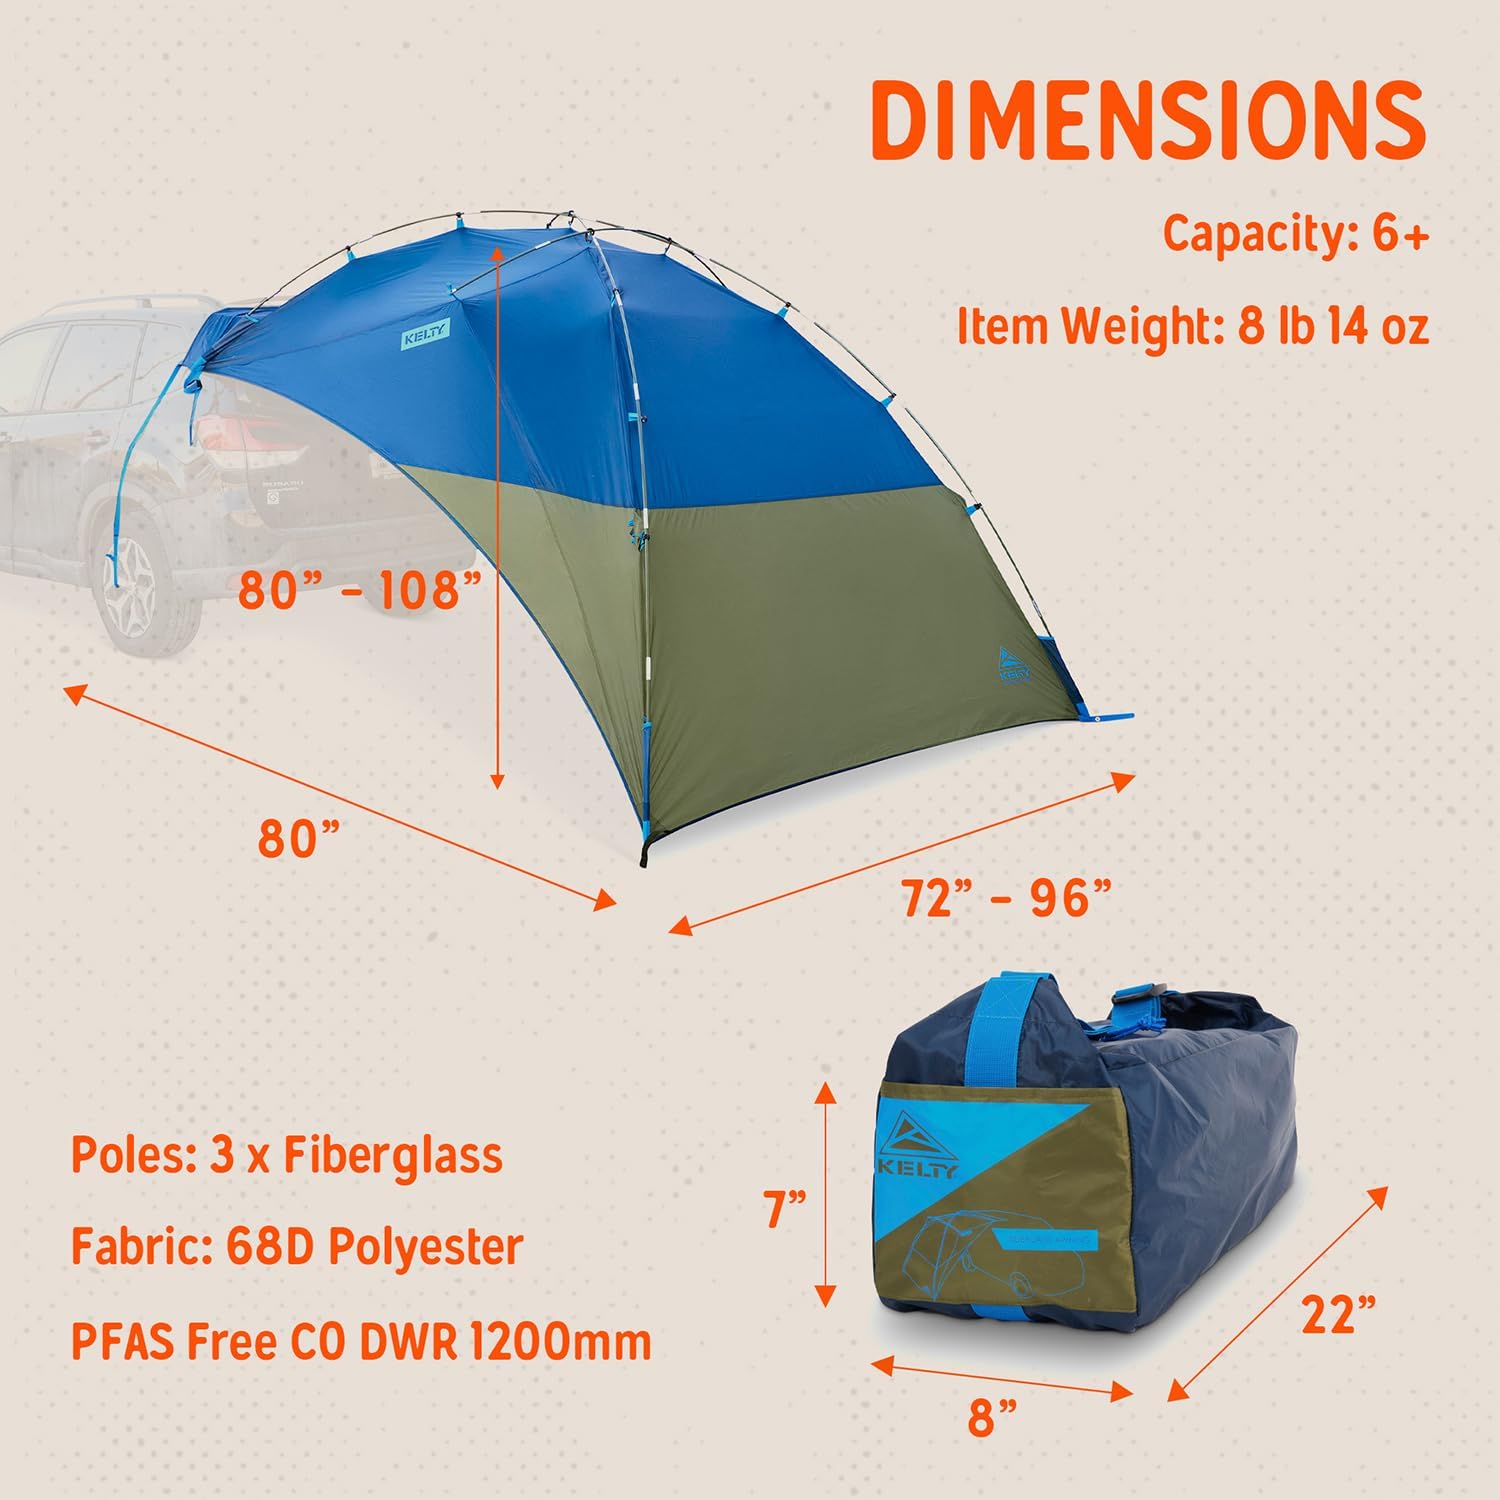
Key dimensions and specifications of the awning.
Warranty Information
The Kelty Sideroads Awning Shelter is backed by Kelty's Limited Lifetime Warranty. This warranty covers defects in materials and workmanship for the reasonable lifetime of the product. For specific details regarding warranty coverage, claims, or service, please refer to the official Kelty website or contact their customer support.
Customer Support
If you have any questions, require assistance with setup, or need to troubleshoot an issue not covered in this manual, please contact Kelty customer support:
- Website: Visit the official Kelty website for FAQs, product registration, and contact information.
- Contact: Refer to the contact section on the Kelty website for phone numbers or email support.
Please have your product model number (Sideroads Awning) and purchase date available when contacting support.