1. Introduction
The NovaStar H9 is a flagship all-in-one video splicing processor designed for fine-pitch LED applications. This device integrates splicing and control functionalities, simplifying system integration for professional video display setups. Utilizing advanced image processing technology, the H9 delivers high-quality visual effects, making it an ideal solution for demanding LED display environments.
2. Setup
2.1 Unpacking and Inspection
- Carefully remove the H9 unit from its packaging.
- Inspect the unit for any signs of physical damage during transit. Report any damage to your supplier immediately.
- Verify that all accessories listed in the packing list are present.
2.2 Physical Installation
The H9 is designed for rack mounting. Ensure the rack is stable and capable of supporting the unit's weight (approximately 90 pounds). Allow adequate ventilation space around the unit.
- Mount the H9 into a standard 19-inch equipment rack using appropriate rack-mount screws.
- Ensure the front and rear panels are accessible for connections and operation.
2.3 Connecting Power
- Connect the provided power cable to the power input port on the rear panel of the H9.
- Plug the other end of the power cable into a grounded AC power outlet.
- Ensure the power switch on the rear panel is in the OFF position before connecting.
2.4 Input and Output Connections
The NovaStar H9 features a modular design with various input and output cards. Refer to the image below for a visual guide to the front panel connections.
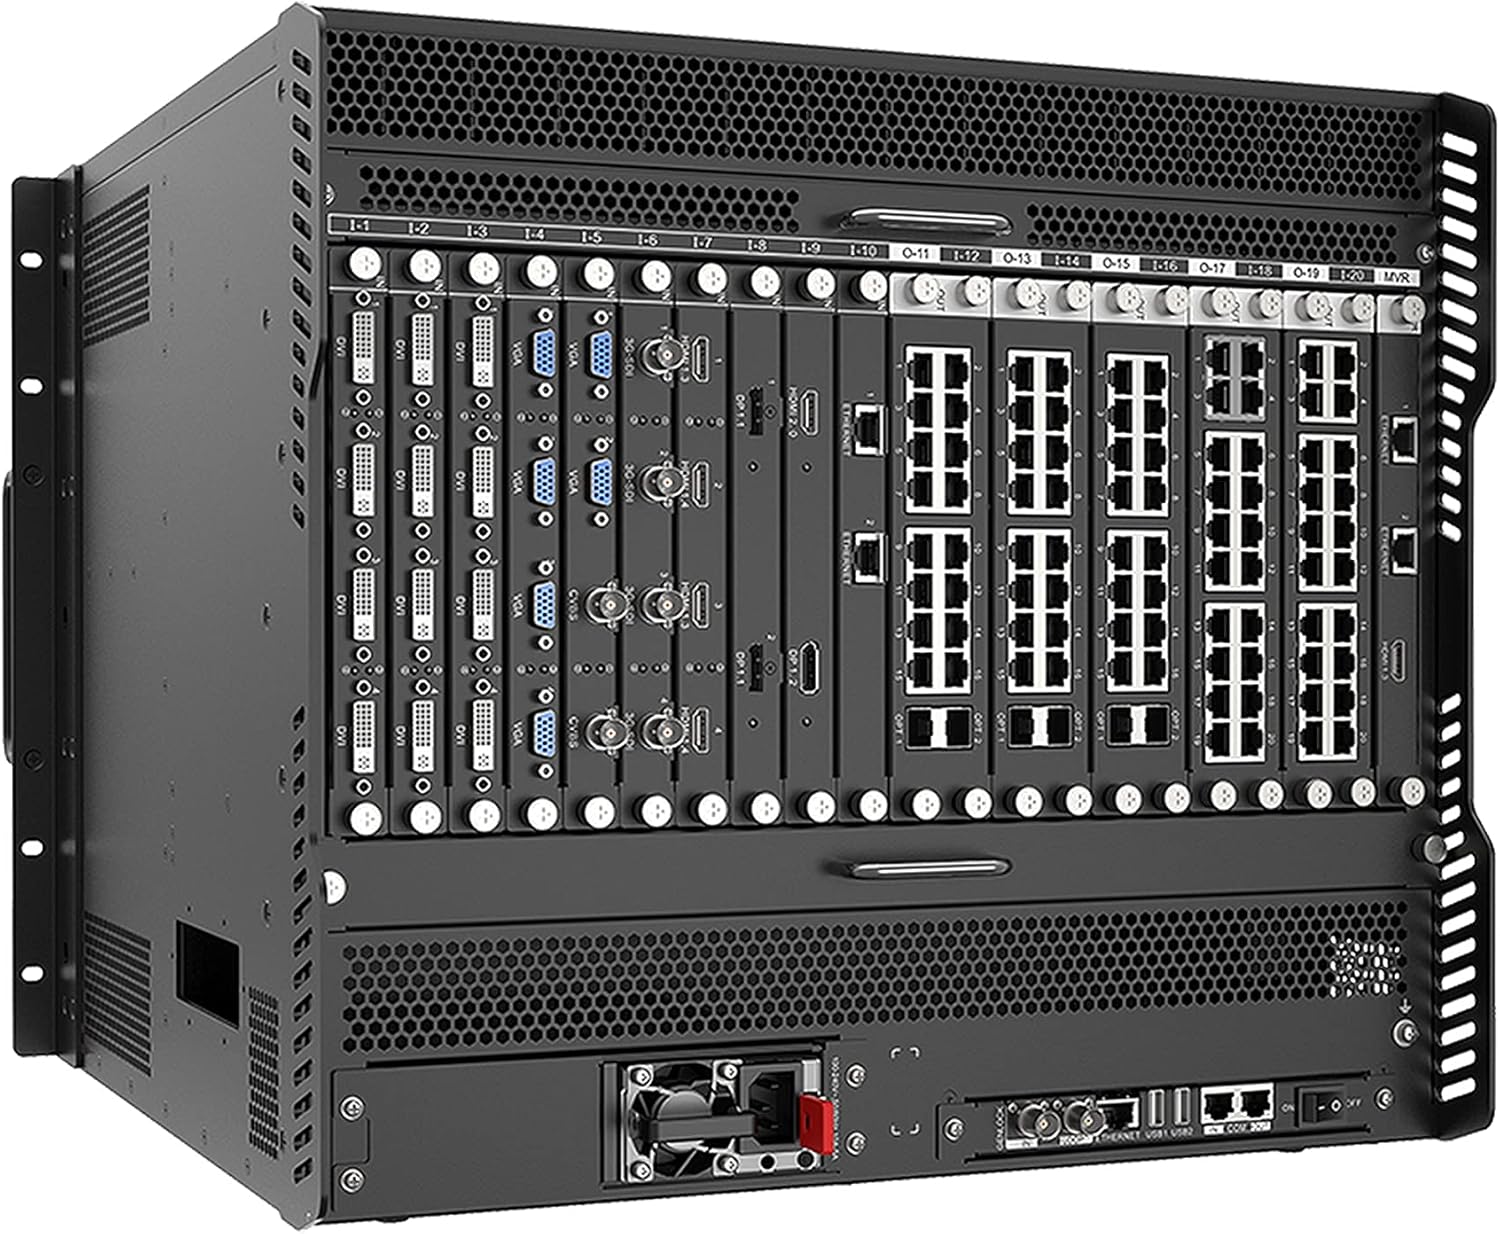
Figure 1: Front panel of the NovaStar H9 showing various input and output modules.
Image Description: The image displays the front view of the NovaStar H9 9U chassis. The unit is black with a perforated top and bottom for ventilation. The front panel is populated with multiple modular cards. From left to right, there are several input cards featuring DVI and VGA ports, labeled 1-1 through 1-8. Following these are output cards with Ethernet ports, labeled 0-11 through 0-20, and additional HDMI 2.0 and Ethernet ports. The bottom section of the unit shows additional ventilation and a power supply fan on the right side of the rear panel, along with various network and control ports like GENLOCK, ETHERNET, USB, and COM ports.
- Input Modules (e.g., DVI, VGA): Connect your video sources (e.g., computers, media players) to the corresponding input ports on the front panel modules. Labels such as "DVI" and "VGA" are clearly marked.
- Output Modules (e.g., Ethernet, HDMI): Connect the Ethernet output ports to your LED receiving cards. The H9 also features HDMI 2.0 outputs for monitoring or additional display connections.
- Control Ports (Rear Panel): Utilize the GENLOCK, ETHERNET, USB, and COM ports on the rear for system control, synchronization, and firmware updates.
3. Operation
3.1 Powering On/Off
- Power On: After all connections are secure, flip the power switch on the rear panel to the ON position. The unit will initiate its boot sequence.
- Power Off: Before powering off, ensure all operations are saved and gracefully shut down any connected systems if necessary. Flip the power switch to the OFF position.
3.2 Basic Configuration
Initial configuration of the H9 is typically performed via a connected computer running NovaStar's control software. This software allows for detailed setup of input sources, output resolutions, splicing modes, and other advanced parameters.
- Connect a computer to the H9 via the Ethernet control port on the rear panel.
- Launch the NovaStar control software.
- Follow the software's interface to detect the H9 unit and begin configuring input sources, output mappings, and display parameters.
- Refer to the software's dedicated user manual for detailed instructions on specific configuration steps.
3.3 Splicing and Display Management
The H9's primary function is to splice multiple video inputs and output them to large LED displays. The control software provides tools for:
- Input Source Selection: Choose which input (DVI, VGA, HDMI) is active.
- Layer Management: Create and manage multiple video layers for complex display layouts.
- Output Resolution and Mapping: Define the resolution of the LED display and map the video content to the physical layout of the LED panels.
- Preset Management: Save and recall various display configurations for quick changes during events.
4. Maintenance
4.1 Cleaning
- Ensure the unit is powered off and disconnected from the power source before cleaning.
- Use a soft, dry cloth to wipe the exterior surfaces.
- For stubborn dirt, a slightly damp cloth with a mild, non-abrasive cleaner can be used, followed by a dry cloth.
- Periodically clean the ventilation grilles to prevent dust buildup, which can impede airflow and cause overheating. Use compressed air to clear dust from vents.
4.2 Firmware Updates
NovaStar may release firmware updates to improve performance, add features, or fix bugs. Always refer to the official NovaStar website or contact technical support for the latest firmware and update instructions.
- Download the official firmware package from the NovaStar support portal.
- Follow the specific update procedure provided with the firmware, typically involving a USB drive or network connection.
- Caution: Do not interrupt the power supply during a firmware update, as this may damage the unit.
5. Troubleshooting
| Problem | Possible Cause | Solution |
|---|---|---|
| No power | Power cable disconnected; Power switch off; Power outlet fault. | Check power cable connection; Ensure power switch is ON; Test power outlet with another device. |
| No video output | Input source not connected; Incorrect input selected; Output resolution mismatch; Cable fault. | Verify input source connections; Select correct input in software; Adjust output resolution; Check video cables. |
| Control software cannot connect to H9 | Network cable disconnected; IP address conflict; Firewall blocking connection. | Check Ethernet cable; Verify IP settings; Temporarily disable firewall for testing. |
| Image flickering or distortion | Poor cable quality; Signal interference; Incorrect refresh rate. | Use high-quality shielded cables; Ensure proper grounding; Adjust refresh rate in software. |
If the problem persists after attempting these solutions, please contact NovaStar technical support for further assistance.
6. Specifications
| Feature | Detail |
|---|---|
| Brand | Novastar |
| Series | H9 |
| Model Name | H9 |
| Item Weight | 90 pounds |
| Number of USB 3.0 Ports | 4 |
| Case Type | Integrated |
| Recommended Uses | Business |
| Cooling Method | Air |
| Color | Black |
| ASIN | B096H72FY3 |
| First Available | December 9, 2022 |
7. Warranty and Support
7.1 Product Warranty
The NovaStar H9 All-In-One Splicer and Controller is covered by a manufacturer's warranty. Please refer to the warranty card included with your product or visit the official NovaStar website for detailed terms and conditions regarding warranty coverage, duration, and service procedures. Keep your proof of purchase for warranty claims.
7.2 Technical Support
For technical assistance, troubleshooting beyond this manual, or inquiries regarding product operation and maintenance, please contact NovaStar technical support. Support contact information can typically be found on the official NovaStar website or in the documentation provided with your purchase.
- Online Resources: Visit the NovaStar official website for FAQs, knowledge base articles, and software downloads.
- Contact Information: Refer to your product packaging or the NovaStar website for phone numbers and email addresses for technical support.


