1. Introduction
This manual provides detailed instructions for the installation, operation, and maintenance of your ELEGANT TD3-4858-Q Frameless Bathtub Shower Door. Please read all instructions carefully before beginning installation and retain this manual for future reference. This product features a hinged pivot design, 1/4" (6mm) clear tempered glass, and a chrome finish.

Image 1.1: ELEGANT Frameless Bathtub Shower Door (Model TD3-4858-Q).
2. Safety Information
- Professional Installation Recommended: Due to the weight and fragility of glass, professional installation is strongly recommended.
- Tempered Glass: The shower door is constructed from 1/4" (6mm) ANSI Z97.1 certified clear tempered glass. While highly durable, tempered glass can shatter into small, blunt pieces if impacted forcefully at the edges. Handle with extreme care.
- Heavy Product: The glass panels are heavy. Always use appropriate lifting techniques and have at least two people for handling and installation.
- Secure Mounting: Ensure the wall structure is capable of supporting the weight of the shower door. Use appropriate fasteners for your wall type.
- Protective Gear: Wear safety glasses, gloves, and appropriate footwear during installation.

Image 2.1: Illustration of 6mm clear tempered glass safety features.
3. Package Contents
Verify that all components are present and undamaged before beginning installation. If any parts are missing or damaged, contact ELEGANT customer support.

Image 3.1: Exploded view of shower door components.
- Glass Panels (2) - 1/4" (6mm) Clear Tempered Glass
- Hinge Clamps (Stainless Steel)
- Support Bar (Stainless Steel)
- Handle (Aluminum Alloy)
- Wall Mount Brackets
- Bottom Seal Strip
- Mounting Hardware (Screws, Anchors)
- Installation Manual
4. Setup and Installation
This section outlines the general steps for installing the ELEGANT TD3-4858-Q shower door. Due to the complexity and precision required, professional installation is highly recommended.
4.1 Tools Required
- Measuring Tape
- Level
- Drill
- Drill Bits (appropriate for wall material)
- Screwdriver (Phillips head)
- Pencil
- Caulking Gun and Silicone Sealant (mildew-resistant)
- Safety Glasses and Gloves
4.2 Pre-Installation Steps
- Inspect Components: Unpack all parts and inspect for any damage. Report any issues immediately.
- Measure and Verify: Confirm that your bathtub and wall dimensions are compatible with the 48" W x 58" H shower door.
- Prepare Installation Area: Ensure the wall surface is clean, dry, and structurally sound.
- Determine Door Orientation: The hinged tub door can be installed for right or left-hand opening. Decide your preferred orientation.
4.3 Installation Procedure
- Mark Wall Positions: Using a level and measuring tape, mark the precise locations for the wall mount brackets on your bathroom wall.
- Drill Pilot Holes: Drill pilot holes at the marked locations. Ensure the depth is appropriate for the anchors.
- Install Wall Brackets: Secure the wall mount brackets using the provided screws and anchors. Ensure they are firmly attached and level.
- Mount Fixed Glass Panel: Carefully lift and position the fixed glass panel into the wall brackets. Secure it according to the specific hardware design.
- Attach Hinges: Connect the hinge clamps to the fixed glass panel and the pivot glass panel. Ensure proper alignment for smooth operation.
- Install Support Bar: Attach the stainless steel support bar between the fixed glass panel and the wall. This enhances stability and prevents shaking.
- Attach Handle: Secure the aluminum alloy handle to the pivot glass panel.
- Apply Bottom Seal Strip: Install the bottom seal strip along the lower edge of the glass panels to prevent water leakage.
- Seal Edges: Apply a bead of mildew-resistant silicone sealant along all exterior seams where the shower door meets the wall and bathtub. Allow adequate curing time before use.

Image 4.1: Detail of the hinge clamps for glass panel connection.
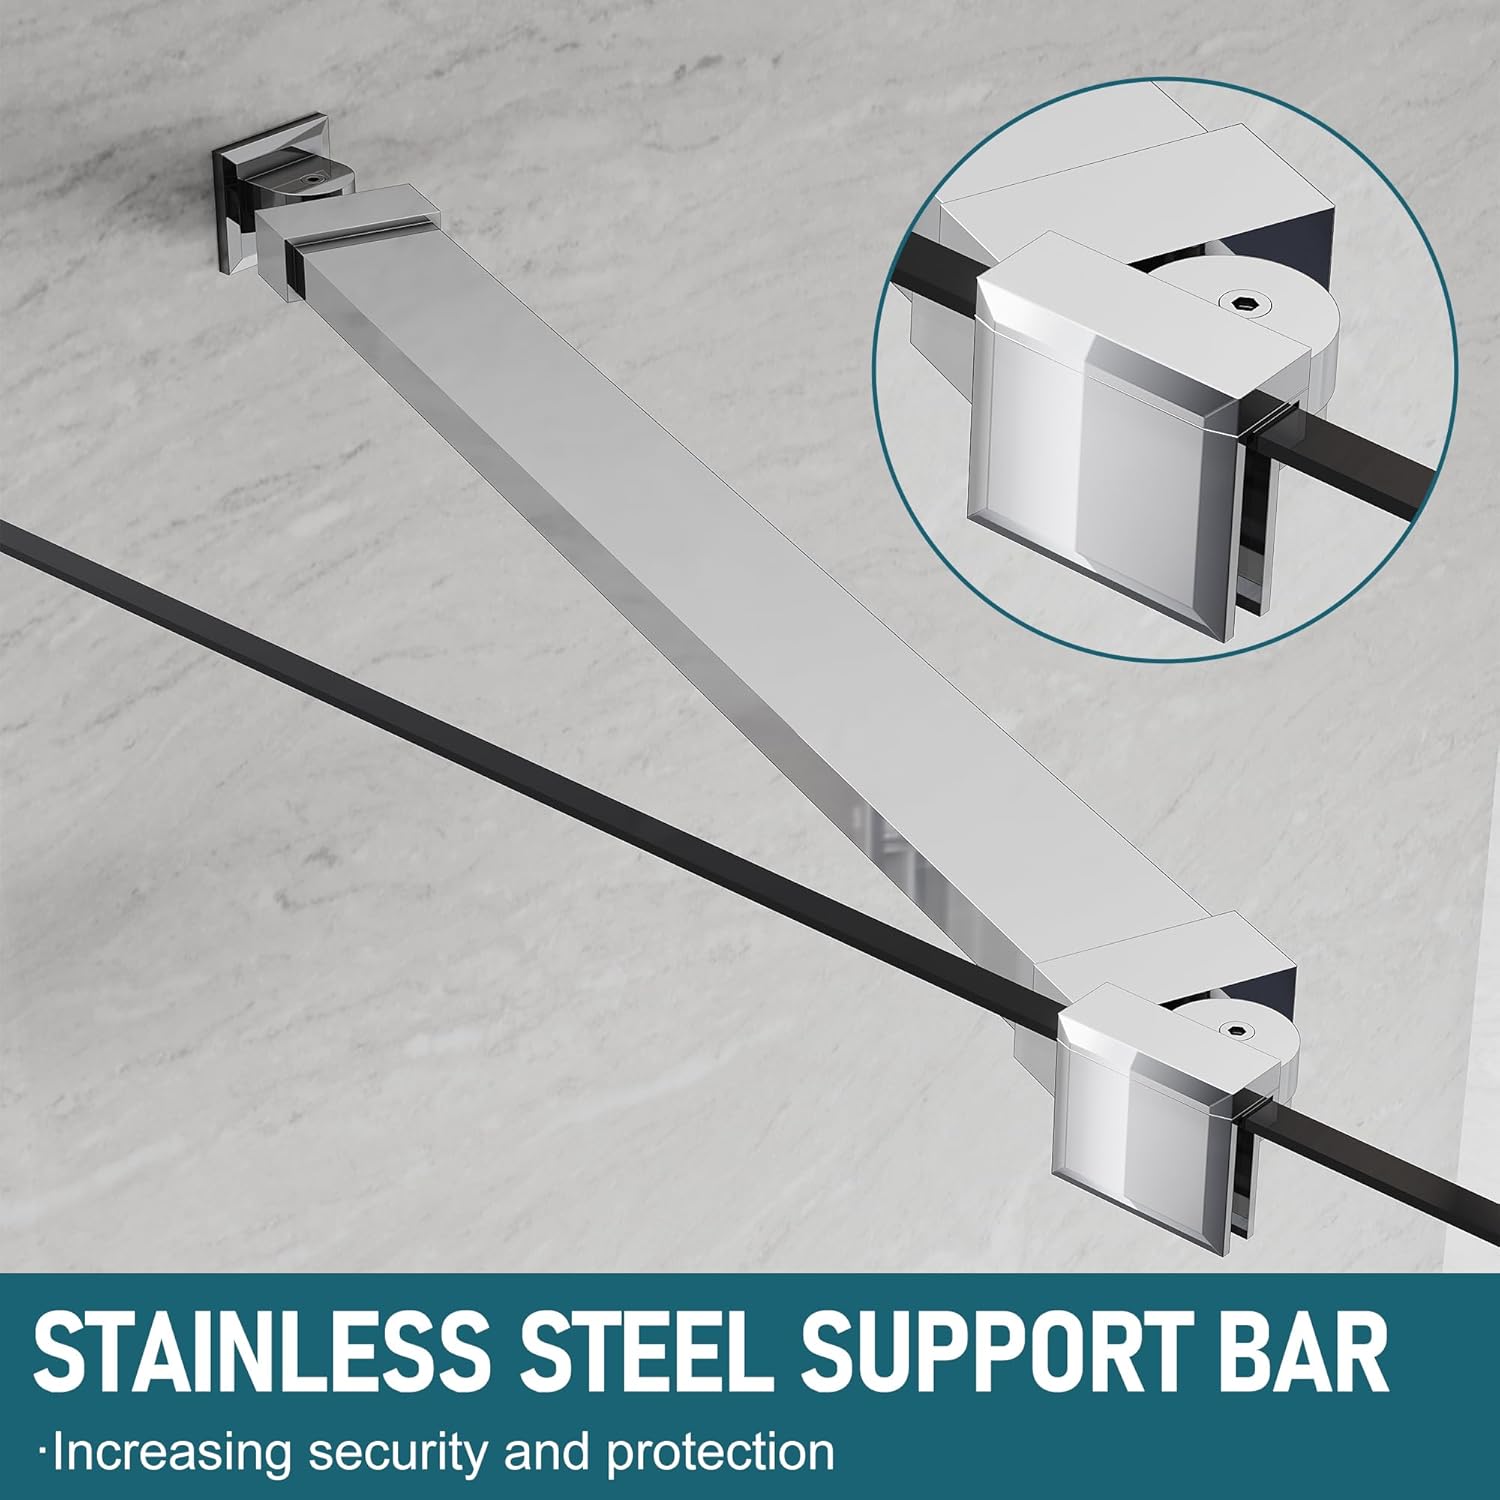
Image 4.2: Stainless steel support bar for enhanced stability.

Image 4.3: Aluminum alloy handle for easy opening and closing.

Image 4.4: Waterproof design with bottom seal strip.
5. Operation
The ELEGANT TD3-4858-Q shower door is designed for smooth and convenient operation.
- Opening and Closing: Use the aluminum alloy handle to gently open and close the pivot door. Avoid forceful movements.
- 180-Degree Rotation: The hinged pivot design allows the door to rotate outwards up to 180 degrees, providing a wide walk-in entrance.
- Anti-Collision Design: The door incorporates an anti-collision design for silent and smooth movement, preventing direct glass-to-glass or glass-to-wall impact during normal use.

Image 5.1: The door's 180-degree outward rotation capability.

Image 5.2: Anti-collision design for quiet and safe operation.
6. Maintenance
Regular cleaning and maintenance will ensure the longevity and appearance of your shower door.
- Glass Cleaning: Clean glass panels regularly with a soft cloth and a non-abrasive glass cleaner. Avoid harsh chemicals or abrasive pads that can scratch the glass or damage protective coatings.
- Hardware Cleaning: Wipe down chrome finish hardware with a soft, damp cloth. For stubborn spots, use a mild, non-abrasive cleaner specifically designed for chrome. Dry thoroughly to prevent water spots.
- Seal Maintenance: Periodically check the bottom seal strip and silicone sealant for wear or mildew. Replace seals or reapply sealant as needed to maintain water tightness.
- Hinge Inspection: Inspect hinges periodically for any signs of loosening or wear. Tighten screws if necessary, but do not overtighten.
7. Troubleshooting
Refer to this section for common issues and their solutions.
| Problem | Possible Cause | Solution |
|---|---|---|
| Door does not close smoothly or is stiff. | Misaligned hinges; debris in hinge mechanism; loose screws. | Check hinge alignment and adjust if necessary. Clean hinges. Tighten hinge screws. |
| Water leakage from bottom or sides. | Damaged or improperly installed bottom seal strip; worn silicone sealant; gaps in installation. | Inspect and replace bottom seal strip if damaged. Reapply silicone sealant where needed. Ensure all connections are tight. |
| Glass appears cloudy or stained. | Hard water deposits; improper cleaning agents. | Use a specialized glass cleaner for hard water stains. Avoid abrasive cleaners. Regular cleaning prevents buildup. |
8. Specifications
- Brand: ELEGANT
- Model Number: TD3-4858-Q
- Product Dimensions: 0.25"D x 48"W x 58"H (Glass thickness x Width x Height)
- Glass Type: 1/4" (6mm) Clear Tempered Glass (ANSI Z97.1 Certified)
- Finish: Chrome
- Material: Stainless Steel (Hinges), Aluminum Alloy (Handle)
- Installation Type: Screw-In
- Number of Doors: 1 (Pivot)
- Number of Panels: 2 (One fixed, one pivot)
- Item Weight: Approximately 65 Pounds
- Assembly Required: Yes
9. Warranty and Support
For warranty information or technical support, please contact ELEGANT customer service. Keep your purchase receipt and model number (TD3-4858-Q) readily available when contacting support.
ELEGANT Customer Service: Refer to your product packaging or the ELEGANT official website for contact details.


