1. Introduction and Overview
The XTUGA E22 is a compact and versatile 2-input, 2-output USB audio interface designed for high-fidelity audio recording and monitoring. It offers professional-grade 24-bit/192 kHz audio resolution, making it suitable for musicians, podcasters, and producers. Its plug-and-play functionality ensures ease of use with both Windows and Mac operating systems, requiring no proprietary drivers.
This manual provides detailed instructions for setting up, operating, maintaining, and troubleshooting your XTUGA E22 audio interface.

Figure 1: Front view of the XTUGA E22 Audio Interface.
2. Key Features
- 24-bit/192 kHz Professional Audio Quality: Delivers pristine audio resolution for recording microphones, electric guitars, bass, and other instruments.
- +48V Phantom Power: Provides power for condenser microphones.
- Simple Plug and Play: Driver-free installation for Windows and Mac, allowing for quick setup.
- Dual Inputs: Two combo XLR/TRS inputs for simultaneous connection of microphones and instruments.
- Hi-Z Switch: Dedicated switch for high-impedance instrument inputs (e.g., electric guitar).
- Real-time Monitoring: 3.5mm headphone output with independent volume control for direct monitoring.
- Stereo/Mono Monitoring and Recording Switches: Flexible options for monitoring and recording input signals.
- DAW Compatibility: Fully compatible with popular recording software such as Pro Tools, Ableton Live Lite, and Reaper.
- Portable Design: Small and lightweight, ideal for mobile recording setups.
- Flexible Power Supply: Can be powered via USB or an external 5V DC adapter (for iPad connectivity or stable power).
3. Setup Guide
Follow these steps to set up your XTUGA E22 Audio Interface:
3.1 Unpacking and Initial Inspection
Carefully remove all components from the packaging. Verify that all items listed in the product list are present: XTUGA E22 Audio Interface (1), Operation Manual (1).
3.2 Connecting to Your Computer
- Ensure all volume knobs on the E22 are set to minimum before connecting any devices.
- Connect the E22 to your computer using the provided USB cable. The E22 is driver-free and should be recognized automatically by your operating system (Windows or Mac).
- For stable power, especially when connecting to an iPad or if experiencing power issues, connect a standard USB power adapter or an external USB battery to the 5V DC IN port on the back of the unit.
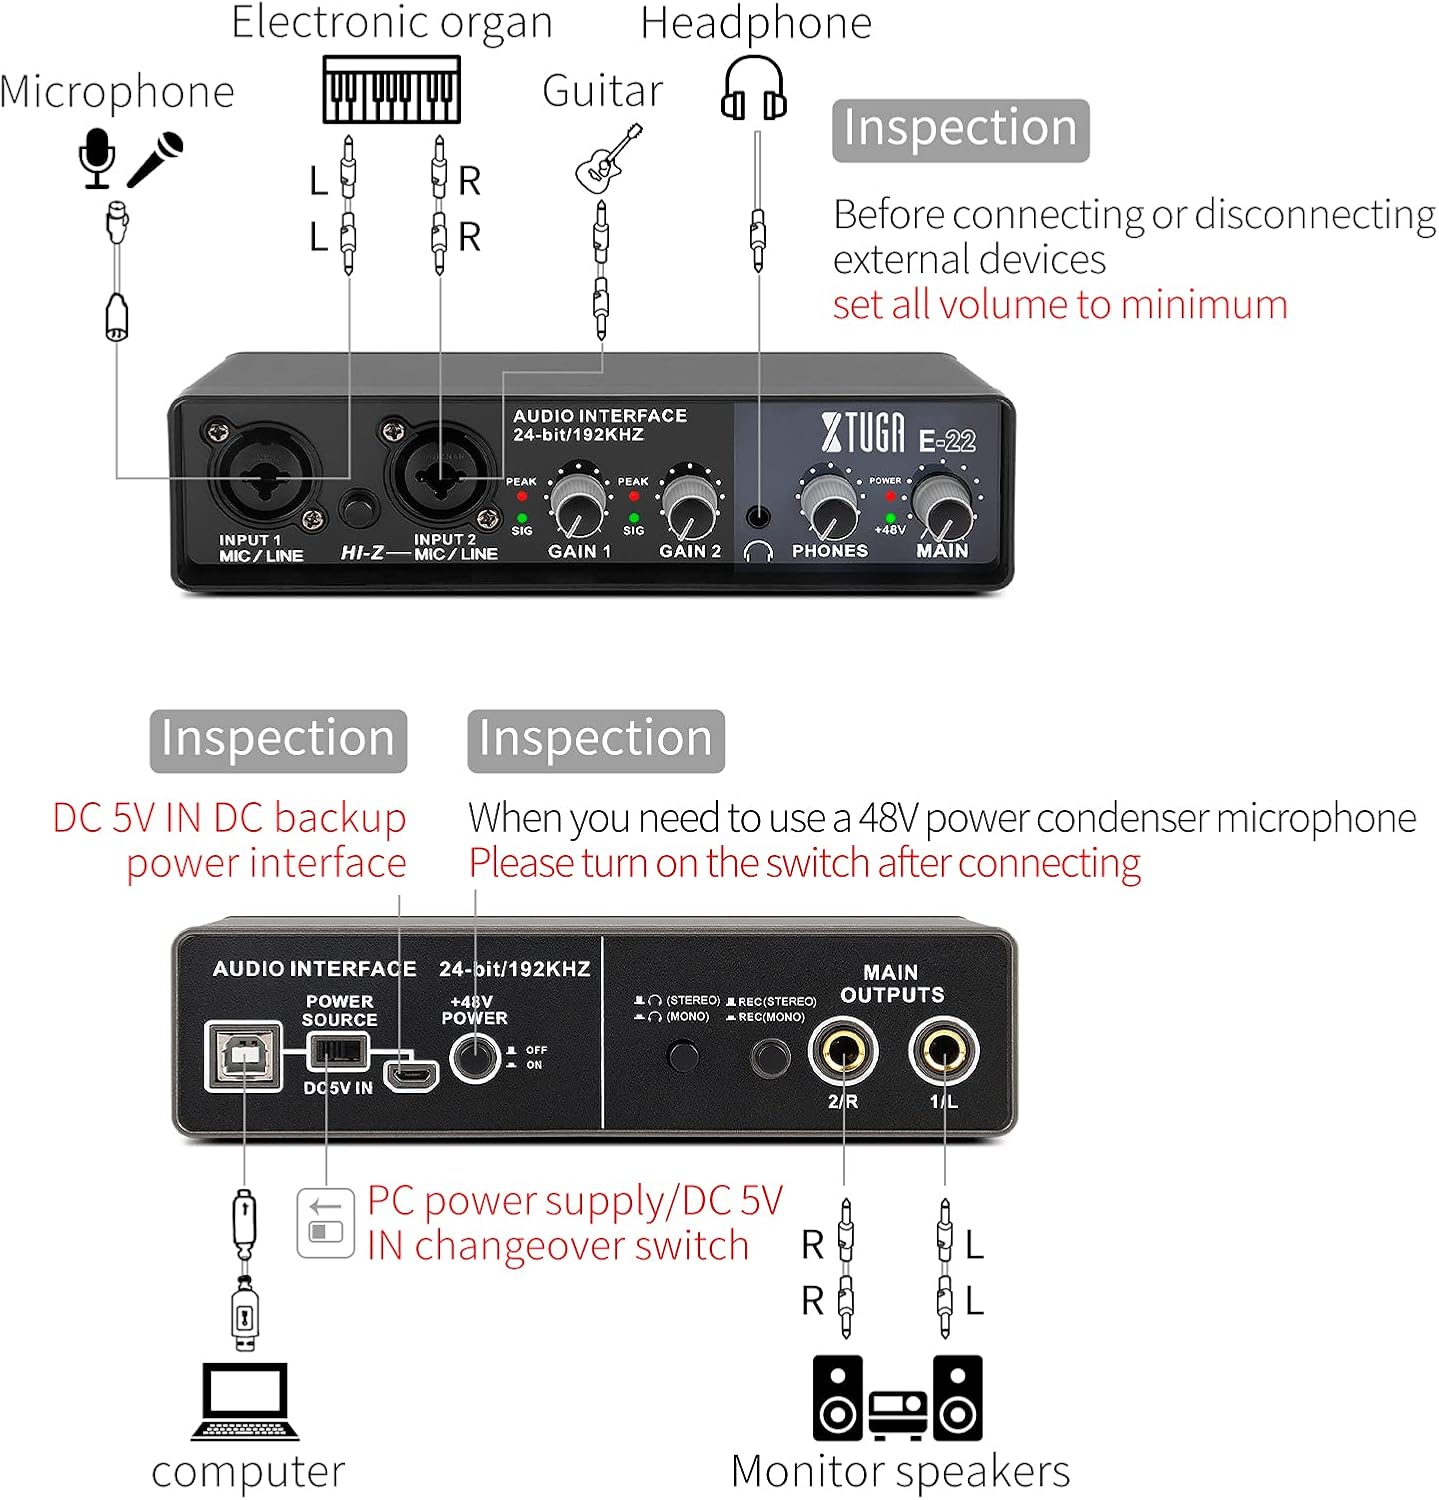
Figure 2: Connection diagram for various devices.
3.3 Connecting Microphones and Instruments
- Connect your microphone(s) to the INPUT 1 MIC/LINE or INPUT 2 MIC/LINE combo jacks on the front panel. These inputs support both XLR and 1/4-inch TRS connectors.
- If using a condenser microphone, ensure the +48V POWER switch on the back panel is set to 'ON' after connecting the microphone. The indicator light on the front panel will illuminate.
- For instruments like electric guitars or basses, connect them to INPUT 2 and press the HI-Z switch to activate the high-impedance input.

Figure 3: Labeled front and back panels of the E22.
3.4 Connecting Monitor Speakers and Headphones
- Connect your monitor speakers to the MAIN OUTPUTS (1/L and 2/R) on the back panel using 1/4-inch TRS cables.
- Connect your headphones to the PHONES jack on the front panel.
4. Operating Instructions
4.1 Adjusting Input Gain
Use the GAIN 1 and GAIN 2 knobs on the front panel to adjust the input level for each connected microphone or instrument. The 'SIG' (signal) indicator will light up green when a signal is present, and the 'PEAK' indicator will light up red if the signal is too high, indicating clipping. Adjust the gain to ensure the 'PEAK' light does not illuminate frequently.
4.2 Monitoring Your Audio
The E22 offers real-time, zero-latency monitoring. Use the PHONES knob to control the headphone volume.
- Stereo Monitoring: Press the 'STEREO' switch (located under the headphone icon) on the back panel to monitor both inputs as a stereo pair.
- Mono Monitoring: Press the 'MONO' switch (located under the headphone icon) on the back panel to sum both inputs to a mono signal for monitoring.

Figure 4: Stereo Monitoring Setup.

Figure 5: Mono Monitoring Setup.
4.3 Recording with DAW Software
The XTUGA E22 is compatible with most major Digital Audio Workstation (DAW) software. Once connected, select the E22 as your audio input/output device within your DAW's audio settings.
- Recording Stereo: Use the 'REC (STEREO)' switch on the back panel to record both inputs as a stereo track.
- Recording Mono: Use the 'REC (MONO)' switch on the back panel to record both inputs summed to a mono track.

Figure 6: Recording setup with XTUGA E22 and DAW.
5. Maintenance
To ensure the longevity and optimal performance of your XTUGA E22 Audio Interface, follow these maintenance guidelines:
- Cleaning: Use a soft, dry cloth to clean the exterior of the unit. Avoid using abrasive cleaners, solvents, or waxes.
- Storage: Store the unit in a cool, dry place away from direct sunlight, extreme temperatures, and high humidity.
- Handling: Handle the unit with care. Avoid dropping it or subjecting it to strong impacts.
- Connections: Always ensure cables are properly connected and disconnected. Avoid pulling on cables directly.
- Power Off: Disconnect the power supply when the unit is not in use for extended periods.
6. Troubleshooting
If you encounter issues with your XTUGA E22, refer to the following common troubleshooting steps:
| Problem | Possible Cause | Solution |
|---|---|---|
| No sound output/input | Incorrect driver selection, loose cables, low volume, phantom power off for condenser mic. |
|
| Distortion or noise in audio | Input gain too high, ground loop, external interference, unstable power. |
|
| Connection cuts out intermittently | Loose USB cable, USB port issue, power instability. |
|
| DAW does not recognize E22 | Incorrect DAW settings, operating system issues. |
|
7. Specifications
| Specification | Value |
|---|---|
| Model Number | E22 |
| Item Weight | 1.36 pounds |
| Product Dimensions | 9.45 x 5.91 x 2.76 inches |
| Body Material | Plastic |
| Color | Black |
| Compatible Devices | Amplifier, Personal Computer, Headphone |
| Connector Type | Jack, USB, XLR |
| Hardware Interface | USB |
| Supported Software | Pro Tools, Ableton Live Lite, Reaper |
| Operating System | Windows (also Mac compatible) |
| Power Source | Corded Electric |
| Number of Channels | 2 |
| Sampling Rate / Resolution | 192kHz / 24-bit |
8. Warranty and Support
The XTUGA E22 Audio Interface is guaranteed for one year from the date of purchase. If you have any questions or require assistance, please feel free to contact XTUGA customer support. For more information and support resources, visit the XTUGA Store on Amazon.


