Introduction
This manual provides essential information for the safe and effective operation, setup, and maintenance of your Traynor YBA-100 All Tube Lightweight 100 Watt Bass Head. Please read this manual thoroughly before operating the unit to ensure proper use and to prevent damage.
Safety Instructions
Always follow basic safety precautions when using this product to reduce the risk of fire, electric shock, or injury to persons.
- Do not expose this apparatus to rain or moisture.
- Do not block any ventilation openings. Install in accordance with the manufacturer's instructions.
- Do not install near any heat sources such as radiators, heat registers, stoves, or other apparatus (including amplifiers) that produce heat.
- Protect the power cord from being walked on or pinched, particularly at plugs, convenience receptacles, and the point where they exit from the apparatus.
- Only use attachments/accessories specified by the manufacturer.
- Unplug this apparatus during lightning storms or when unused for long periods of time.
- Refer all servicing to qualified service personnel. Servicing is required when the apparatus has been damaged in any way, such as power-supply cord or plug is damaged, liquid has been spilled or objects have fallen into the apparatus, the apparatus has been exposed to rain or moisture, does not operate normally, or has been dropped.
Front Panel Overview

Figure 1: Front panel of the Traynor YBA-100 Bass Head, showing inputs, controls, and power switches.
- Inputs: Two 1/4-inch inputs, one Passive and one Active, for connecting your bass guitar.
- Deep Switch: Engages a low-frequency boost for a fuller sound.
- Bright Switch: Engages a high-frequency boost for added clarity and presence.
- Gain Control: Adjusts the input sensitivity and overall preamp gain.
- Bass Control: Adjusts the low-frequency equalization.
- Mid Control: Adjusts the mid-frequency equalization.
- Frequency Control: Selects the center frequency for the Mid control.
- Treble Control: Adjusts the high-frequency equalization.
- Master Control: Adjusts the overall output volume of the amplifier.
- Power Switch: Turns the amplifier on or off.
- Standby Switch: Places the amplifier in standby mode, allowing tubes to warm up or cool down without signal passing through.
- Resonance Control: Adjusts the low-end damping and resonance of the power amplifier.
Rear Panel Overview
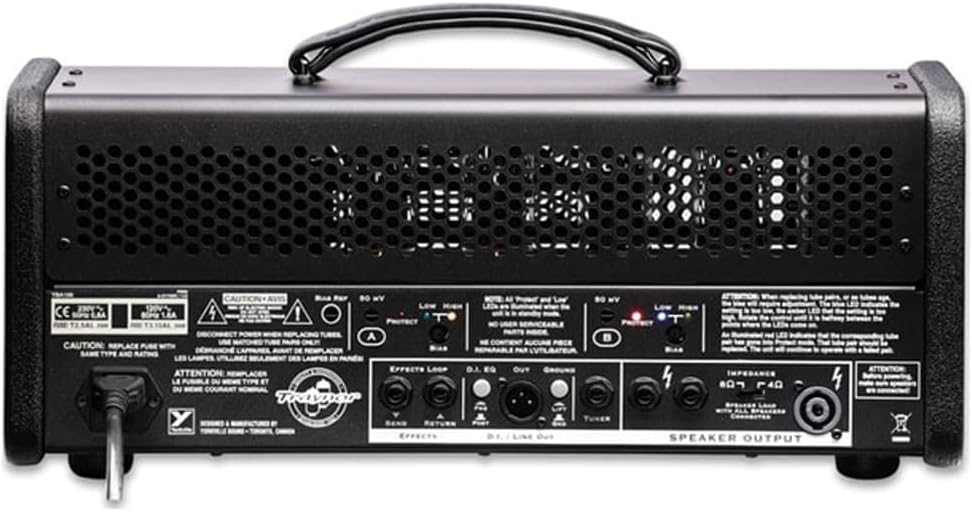
Figure 2: Rear panel of the Traynor YBA-100 Bass Head, showing power input, effects loop, DI out, and speaker outputs.
- AC Input: Standard IEC power inlet for connecting the supplied power cord.
- Fuse Holder: Contains the main fuse for the amplifier.
- Effects Loop (Send/Return): 1/4-inch jacks for connecting external effects pedals or processors.
- DI Out (XLR): Balanced XLR output for direct connection to a mixing console or recording interface.
- Ground Lift Switch: Lifts the ground connection for the DI Out to eliminate hum.
- Speaker Outputs: Two 1/4-inch speaker jacks and one Speakon connector for connecting speaker cabinets. Ensure correct impedance matching.
- Bias Adjustment: Controls and LED indicators for adjusting the bias of the power tubes.
Setup
- Placement: Place the YBA-100 on a stable, level surface, ensuring adequate ventilation around the unit. Avoid placing it near heat sources or in direct sunlight.
- Speaker Connection: Connect your speaker cabinet(s) to the Speaker Output jacks on the rear panel. Ensure the total impedance of your speaker setup matches the amplifier's output impedance (4 or 8 ohms). Use high-quality speaker cables.
- Instrument Connection: Connect your bass guitar to either the 'Passive' or 'Active' input on the front panel using a standard 1/4-inch instrument cable. Use the 'Active' input for basses with active pickups or higher output.
- Power Connection: Ensure the Power and Standby switches are in the 'OFF' position. Connect the supplied IEC power cord to the AC Input on the rear panel and then to a grounded electrical outlet.
- Initial Power-Up: With all connections made, first flip the Power switch to 'ON'. Wait approximately 30-60 seconds for the tubes to warm up, then flip the Standby switch to 'ON'. The amplifier is now ready for use.
Operating Instructions
Basic Operation
- Adjust the Gain control to achieve your desired input level and amount of overdrive.
- Use the Bass, Mid, Frequency, and Treble controls to shape your tone. The Frequency control allows you to select the specific mid-range frequency to boost or cut.
- The Deep and Bright switches provide quick tonal enhancements for low-end fullness or high-end clarity.
- The Resonance control fine-tunes the low-end response of the power amplifier, affecting how tight or loose your bass sounds.
- Adjust the Master control for your overall output volume.
Tube Biasing (for Tube Swapping)
The YBA-100 ships with 6L6 power tubes. It can also operate with EL34 tubes after a simple re-biasing procedure. This procedure should only be performed by a qualified technician or experienced user.
- Ensure the amplifier is powered off and unplugged.
- Carefully replace the existing power tubes with the desired type (6L6 or EL34).
- Locate the bias adjustment controls and LED indicators on the rear panel.
- Power on the amplifier (Power then Standby) and allow it to warm up.
- Using a small screwdriver, adjust the bias trim pots (A and B) until the corresponding LED indicators turn green. Refer to the markings on the rear panel for specific instructions.
- If the LEDs are red, the bias is too hot; if they are off, it's too cold. Adjust until green.
Note: Incorrect biasing can damage tubes and the amplifier. If unsure, consult a professional.
Effects Loop and DI Out
- Effects Loop: Connect the 'Send' jack to the input of your effects unit and the output of your effects unit to the 'Return' jack. This places effects after the preamp section.
- DI Out: Use the balanced XLR DI Out to send your signal directly to a mixing board or recording device. The Ground Lift switch can be used to eliminate ground loop hum if present.
Maintenance
- Cleaning: Clean the exterior of the amplifier with a soft, dry cloth. Do not use abrasive cleaners or solvents.
- Tube Replacement: Vacuum tubes have a finite lifespan and will eventually need replacement. If you notice a decrease in performance, excessive noise, or inconsistent tone, it may be time to replace the tubes. Always replace tubes with high-quality, matched sets and ensure proper biasing as described in the 'Operating Instructions' section.
- Fuse Replacement: If the amplifier fails to power on, check the main fuse located in the AC input receptacle. Always replace the fuse with one of the exact same type and rating as specified on the unit.
- Ventilation: Ensure that the ventilation grilles are kept clear of dust and debris to prevent overheating.
Troubleshooting
| Problem | Possible Cause | Solution |
|---|---|---|
| No power / Unit does not turn on | Power cord not connected; Blown fuse; Faulty power outlet | Check power cord connection; Replace fuse with correct type; Try a different outlet |
| No sound output | Standby switch off; Speaker cable disconnected/faulty; Instrument cable disconnected/faulty; Master volume too low; Faulty tubes | Flip Standby switch to ON; Check all cable connections; Increase Master volume; Consult technician for tube check |
| Distorted or weak sound | Incorrect impedance match; Worn out tubes; Input gain too high; Faulty speaker | Verify speaker impedance; Consider tube replacement/biasing; Reduce Gain control; Test with another speaker |
| Hum or unwanted noise | Ground loop; Faulty cables; Proximity to other electronics; Worn tubes | Engage DI Out Ground Lift switch; Try different cables; Move amplifier away from noise sources; Consult technician for tube check |
If the problem persists after attempting these solutions, please contact qualified service personnel.
Specifications
| Feature | Detail |
|---|---|
| Model Name | YBA-100 |
| Output Wattage | 100 Watts |
| Power Source | Corded Electric |
| Item Weight | 27 pounds |
| Color | Black |
| Compatible Devices | Double Bass |
| Connector Type | 6.35mm Jack |
Warranty and Support
For warranty information and technical support, please refer to the official Traynor website or contact your authorized Traynor dealer. Keep your purchase receipt as proof of purchase for warranty claims.


