
1. Introduction
Thank you for choosing the VEVOR Vacuum Chamber with Pump. This comprehensive kit is designed for efficient vacuum degassing, suitable for a wide range of applications including household air conditioning, automobile maintenance, vacuum packaging, and various industrial uses. This manual provides essential information for safe operation, proper setup, maintenance, and troubleshooting to ensure optimal performance and longevity of your equipment.

Figure 1: VEVOR Vacuum Chamber with Pump Kit
This image displays the complete VEVOR Vacuum Chamber with Pump kit, featuring the stainless steel vacuum chamber with its clear lid and gauge assembly, alongside the blue and silver vacuum pump unit.
2. Safety Instructions
Please read and understand all safety warnings and instructions before operating the vacuum chamber and pump. Failure to follow these instructions may result in electric shock, fire, or serious injury.
- Always operate the pump in a well-ventilated area to prevent the accumulation of fumes.
- Ensure the power supply matches the voltage specified on the pump's rating label.
- Do not operate the pump without sufficient vacuum pump oil. Check the oil level before each use.
- Avoid direct contact with the pump during operation as it may become hot.
- Do not use the vacuum chamber for flammable, corrosive, or explosive materials.
- Always wear appropriate personal protective equipment (PPE), such as safety glasses and gloves, when operating the equipment.
- Keep children and unauthorized personnel away from the operating area.
- Disconnect the power supply before performing any maintenance or cleaning.
- Ensure all connections are secure and leak-free before starting the vacuum process.
3. Product Components
The VEVOR Vacuum Chamber with Pump kit includes the following main components:
- 1 x 4CFM Refrigerant Vacuum Pump
- 1 x 2 Gallon Vacuum Chamber
- 1 x Acrylic Crystal Lid with Gauge Assembly
- 1 x Non-stick Silicone Gasket
- 1 x Steel Wire Reinforced Hose
- Vacuum Pump Oil (initial supply)

Figure 2: Key Features of the Vacuum Pump
This image highlights the robust construction of the vacuum pump, including its copper motor for stable operation, sturdy die-cast aluminum housing, and shock-proof, wear-proof base for durability.
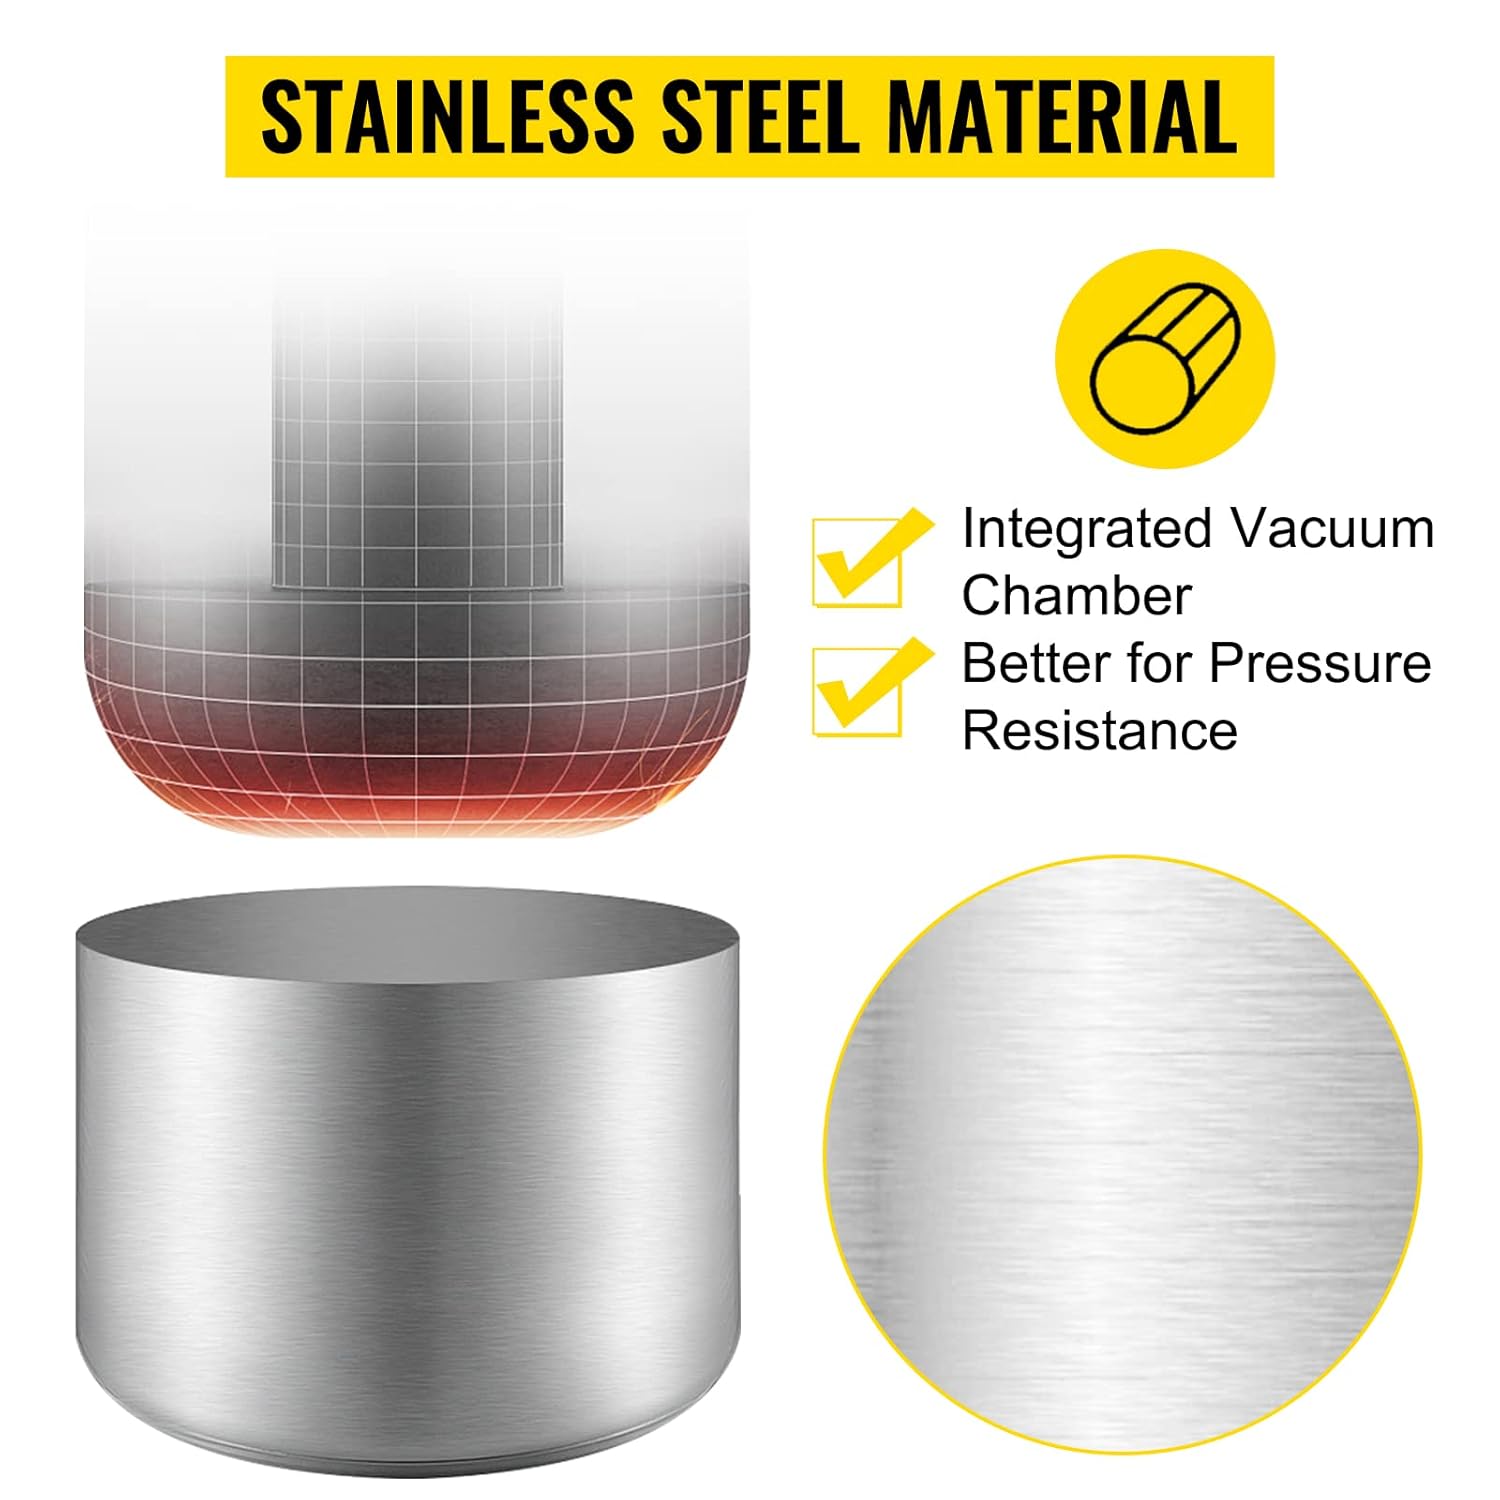
Figure 3: Key Features of the Vacuum Chamber
This image illustrates the premium features of the vacuum chamber, such as its stainless steel material for corrosion resistance, integrated vacuum gauge for precise monitoring, noise silencers for quieter operation, and the oil filling port.
4. Setup Instructions
Follow these steps to set up your VEVOR Vacuum Chamber and Pump:
- Add Vacuum Pump Oil: Locate the oil fill cap on the vacuum pump. Unscrew it and carefully pour the provided vacuum pump oil into the reservoir until the oil level is between the 'MIN' and 'MAX' marks on the oil sight window. Do not overfill. Securely replace the cap.
- Connect the Hose: Connect one end of the steel wire reinforced hose to the vacuum pump's inlet port and the other end to the vacuum chamber's inlet valve on the lid assembly. Ensure all connections are tight to prevent leaks.
- Place Silicone Gasket: Ensure the non-stick silicone gasket is properly seated around the rim of the vacuum chamber. This gasket is crucial for maintaining a proper seal.
- Position the Lid: Carefully place the acrylic crystal lid onto the vacuum chamber, ensuring it sits evenly on the silicone gasket.
- Initial Check: Before powering on, double-check all connections, oil levels, and ensure the chamber is empty or contains only the material to be degassed.

Figure 4: Oil Sight Window and Air Button
This image shows the vacuum pump's oil sight window, allowing for easy monitoring of oil levels, and the air button designed to prevent dust from entering the chamber.
5. Operating Instructions
To operate your VEVOR Vacuum Chamber and Pump:
- Prepare Material: Place the material you wish to degas inside the vacuum chamber. Ensure it does not overflow or block the vacuum port.
- Close Valves: Ensure all valves on the lid assembly are in the closed position before starting the pump.
- Power On: Plug the vacuum pump into a suitable power outlet and turn on the power switch. The pump will begin to draw a vacuum.
- Monitor Vacuum: Observe the vacuum gauge on the lid assembly. The pressure inside the chamber will decrease. For degassing, allow the material to bubble until the bubbling subsides, indicating that trapped air has been removed.
- Maintain Vacuum (Optional): Once the desired vacuum level is reached, you can close the valve connecting the chamber to the pump and turn off the pump. The chamber should maintain its vacuum.
- Release Vacuum: To release the vacuum, slowly open the air release valve on the lid assembly. Do not open it too quickly, as this can cause a sudden rush of air and potentially damage the chamber or its contents.
- Power Off: After use, turn off the vacuum pump and disconnect it from the power supply.

Figure 5: Diverse Applications
This image showcases the versatility of the vacuum chamber and pump, demonstrating its use in lab equipment, vacuum packaging, refrigerator maintenance, and the auto repair industry.
6. Maintenance
Regular maintenance ensures the longevity and efficient operation of your VEVOR Vacuum Chamber and Pump:
- Check Oil Level: Regularly check the vacuum pump oil level using the sight window. Refill or replace oil as needed. Low oil levels can damage the pump.
- Oil Replacement: Replace the vacuum pump oil periodically, especially if it appears cloudy, discolored, or contaminated. Refer to the pump's specifications for recommended oil change intervals.
- Clean Chamber: After each use, clean the inside of the vacuum chamber and the silicone gasket to remove any residue from degassed materials. Use a soft cloth and appropriate cleaning agents that will not damage the stainless steel or acrylic.
- Inspect Gasket: Periodically inspect the silicone gasket for cracks, tears, or signs of wear. A damaged gasket will prevent the chamber from holding a vacuum. Replace if necessary.
- Store Properly: When not in use, store the vacuum chamber and pump in a clean, dry environment, protected from dust and extreme temperatures.
7. Troubleshooting
Refer to the table below for common issues and their solutions:
| Problem | Possible Cause | Solution |
|---|---|---|
| Pump not starting or running. | No power, faulty switch, motor issue. | Check power connection. Ensure switch is ON. If problem persists, contact VEVOR support. |
| Chamber not holding vacuum. | Leaky gasket, loose connections, faulty valve. | Inspect and reseat or replace silicone gasket. Tighten all hose and lid connections. Check valves for proper closure. |
| Pump not reaching full vacuum. | Low oil level, contaminated oil, air leak, worn pump components. | Check and refill/replace pump oil. Inspect all connections for leaks. If issues persist, pump may require professional servicing. |
| Excessive noise or vibration from pump. | Low oil, worn bearings, foreign object. | Check oil level. Ensure pump is on a stable, level surface. If noise continues, contact support. |
| Oil appears milky or discolored. | Water contamination, overheating, old oil. | Drain and replace with fresh vacuum pump oil. Ensure pump is not overheating. |
8. Specifications
| Feature | Detail |
|---|---|
| Product Model | RS-1.5 |
| Vacuum Pump FAD | 4 CFM |
| Vacuum Pump Power | 1/3 HP |
| Vacuum Pump Stage | Single Stage |
| Ultimate Vacuum | 5 Pa |
| Vacuum Chamber Capacity | 2 Gallon |
| Chamber Material | Stainless Steel |
| Lid Material | Acrylic Crystal (3/5" thick) |
| Product Dimensions | 18.9 x 13.8 x 11.4 inches |
| Product Weight | 19.4 Pounds |

Figure 6: Product Specifications and Dimensions
This image provides a visual representation of the product's dimensions and key specifications for both the vacuum pump and the vacuum chamber.
9. Warranty and Support
VEVOR is committed to providing high-quality products and excellent customer service. For warranty information, technical support, or any inquiries regarding your VEVOR Vacuum Chamber with Pump, please contact VEVOR customer support through their official channels.
You can find more information and contact details by visiting the official VEVOR store: VEVOR Official Store


