
Introduction
Thank you for choosing the NuvoMed Rechargeable Over-Ear Hearing Amplifier. This manual provides essential information for the safe and effective use of your device. Please read it thoroughly before first use and retain it for future reference.
Important Safety Information
- Consult a medical professional if you experience sudden or significant hearing loss. This device is an amplifier, not a medical hearing aid.
- Keep the device and its accessories out of reach of children and pets to prevent choking hazards.
- Do not expose the device to extreme temperatures, humidity, or direct sunlight.
- Avoid dropping the device or subjecting it to strong impacts.
- Do not attempt to open or repair the device yourself. Contact customer support for assistance.
- Clean the device regularly as instructed in the maintenance section to prevent earwax buildup and maintain hygiene.
Package Contents
Please check the package for the following items:
- NuvoMed Rechargeable Over-Ear Hearing Amplifier
- Charging Dock
- Ear Tips (various sizes)
- USB Charging Cable
- User Manual
Product Components
Familiarize yourself with the parts of your hearing amplifier and charging dock:
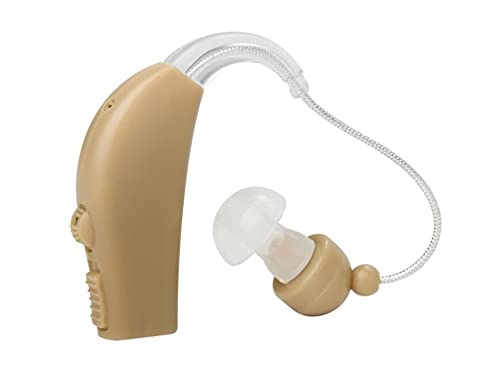
Image: The NuvoMed Rechargeable Over-Ear Hearing Amplifier is shown inserted into its beige charging dock. The amplifier features an over-ear hook and an ear tip. The charging dock has a power switch, a 'CHARGE' indicator light, and a DC 5V 100mA input port.
- Hearing Amplifier: Main unit with microphone, speaker, and controls.
- Over-Ear Hook: Designed to fit comfortably behind the ear.
- Ear Tip: Inserted into the ear canal for sound delivery. Replaceable for different sizes.
- Charging Dock: Base for recharging the amplifier. Features a power input and charge indicator.
- Power Switch (on dock): Controls the charging function.
- Charge Indicator Light (on dock): Illuminates to show charging status.
- DC 5V 100mA Input (on dock): Port for connecting the USB charging cable.
Setup
1. Initial Charging
- Connect the USB charging cable to the DC 5V 100mA input port on the charging dock.
- Plug the other end of the USB cable into a compatible USB power adapter (not included) or a computer USB port.
- Place the hearing amplifier into the charging slot on the dock. Ensure it is seated correctly.
- Turn the power switch on the charging dock to the 'ON' position. The 'CHARGE' indicator light will illuminate, indicating that the device is charging.
- Allow the device to charge fully before first use. Charging time may vary.
2. Selecting and Fitting Ear Tips
- Choose an ear tip size that provides a comfortable and secure fit in your ear canal. A good seal is important for optimal sound quality and to prevent feedback.
- Gently attach the selected ear tip to the sound outlet of the hearing amplifier.
- Place the over-ear hook behind your ear, then carefully insert the ear tip into your ear canal. Adjust for comfort.
Operating
1. Powering On/Off
- To power on the amplifier, locate the power button (refer to product diagram if available) and press it.
- To power off, press the power button again.
2. Adjusting Volume
- The amplifier features button controls for volume adjustment.
- Press the '+' button to increase the volume.
- Press the '-' button to decrease the volume.
- Start with a low volume setting and gradually increase it to a comfortable level. Avoid excessively high volumes to prevent hearing damage.
3. Recommended Uses
This hearing amplifier is recommended for use in various situations to enhance sound perception, such as:
- Noisy environments
- Watching television
- Outdoor activities
Care and Maintenance
- Cleaning the Amplifier: Use a soft, dry cloth to wipe the amplifier body. Do not use water or cleaning solutions directly on the device.
- Cleaning Ear Tips: Remove the ear tip from the amplifier. Clean it with a mild soap solution and rinse thoroughly. Ensure it is completely dry before reattaching. Replace ear tips regularly or if they become damaged.
- Storage: When not in use, store the amplifier in its charging dock or a clean, dry case.
- Battery Care: To prolong battery life, avoid fully discharging the battery frequently. Charge the device when the battery is low.
Troubleshooting
| Problem | Possible Cause | Solution |
|---|---|---|
| No sound or weak sound | Low battery; Volume too low; Ear tip blocked by earwax; Device not powered on. | Charge the device; Increase volume; Clean or replace ear tip; Power on the device. |
| Whistling or feedback sound | Ear tip not properly sealed in ear canal; Volume too high; Hand or object too close to microphone. | Re-insert ear tip for a snug fit; Lower the volume; Keep hands clear of the amplifier. |
| Device not charging | Charging cable not connected properly; Charging dock power switch off; Faulty cable/adapter. | Ensure cable is securely connected; Turn charging dock power switch ON; Try a different USB cable or power adapter. |
Technical Specifications
| Feature | Detail |
|---|---|
| Brand | Nuvomed |
| Model Name | Hearing Amplifier |
| ASIN | B095TNRPRS |
| UPC/GTIN | 859811007186 |
| Color | Beige |
| Power Source | Battery Powered |
| Fit Type | Over Ear |
| Control Type | Button Control |
| Headphone Folding Features | Behind-The-Ear |
| Noise Control | None |
| Strap Type | Over Ear Hook |
| Compatible Devices | Smartphone, Tablet (Note: Functionality may vary based on specific product features not detailed in this manual.) |
| Unit Count | 1 Count |
Warranty and Support
For warranty information and customer support, please refer to the documentation included with your product packaging or contact the manufacturer directly. Keep your purchase receipt as proof of purchase.