1. Introduction
Welcome to the world of Studio Ghibli with your new Sankei MP07-42 Spirited Away Diorama Papercraft kit. This kit allows you to recreate iconic scenes from the beloved film "Spirited Away" using intricately laser-cut paper components. Designed for enthusiasts, this model offers a detailed and engaging assembly experience, resulting in a beautiful 360-degree miniature display.
This manual provides essential information and guidance to help you successfully assemble and maintain your diorama. Please read all instructions carefully before beginning assembly.
2. Safety Information
- Small Parts: This kit contains small parts which may pose a choking hazard. Keep out of reach of small children.
- Sharp Tools: Assembly may require the use of sharp tools such as craft knives or scissors. Exercise caution and supervise children if they are assisting.
- Adhesives: Use appropriate adhesives (e.g., craft glue, PVA glue) in a well-ventilated area. Follow the adhesive manufacturer's safety instructions.
- Ventilation: Ensure adequate ventilation when working with glues or paints (if applicable).
- Eye Protection: Consider wearing eye protection when cutting or handling small pieces.
3. Package Contents
Your Sankei MP07-42 Spirited Away Diorama Papercraft kit includes the following components:
- Multiple sheets of pre-cut, colored paper components.
- Various small accessory parts (e.g., foliage, decorative elements).
- Detailed assembly instructions (often visual, included in the kit).

Image 3.1: Overview of the kit's contents, including various colored paper sheets and landscaping materials.
4. Setup and Preparation
4.1 Recommended Tools
- Craft knife or precision scissors
- Tweezers (fine-tipped recommended for small parts)
- Craft glue or PVA glue (quick-drying recommended)
- Cutting mat
- Ruler
- Small clips or clothespins (to hold parts while glue dries)
4.2 Workspace Preparation
Choose a clean, well-lit, and stable work surface. Ensure good ventilation, especially when using adhesives. Organize your tools and components to prevent loss of small parts.
5. Assembly Instructions
The Sankei MP07-42 diorama is assembled by carefully cutting, folding, and gluing the pre-printed paper components. The estimated assembly time is approximately 100 hours, indicating a detailed and intricate build.
5.1 General Assembly Steps
- Review Instructions: Before starting, thoroughly review the visual instructions provided within your kit. Familiarize yourself with the overall structure and individual component placement.
- Identify Parts: Each paper sheet is typically numbered or labeled. Carefully identify the parts needed for each step.
- Cut Components: Using a craft knife and cutting mat or precision scissors, carefully cut out each component along the designated lines. Pay close attention to intricate details.
- Fold and Score: Score fold lines lightly with a craft knife (without cutting through) or a scoring tool before folding to ensure crisp, clean folds.
- Apply Adhesive: Apply a thin, even layer of craft glue to the designated tabs or surfaces. Avoid excessive glue, which can warp the paper.
- Assemble Sections: Begin assembling smaller sub-sections first, allowing glue to dry completely before attaching them to larger structures.
- Layering and Detail: The diorama involves multiple layers and fine details. Work patiently, ensuring each piece is correctly aligned.
- Landscaping: Once the main structures are complete, apply the provided landscaping materials (e.g., green flocking) to create trees, bushes, and ground textures as per the kit's instructions.
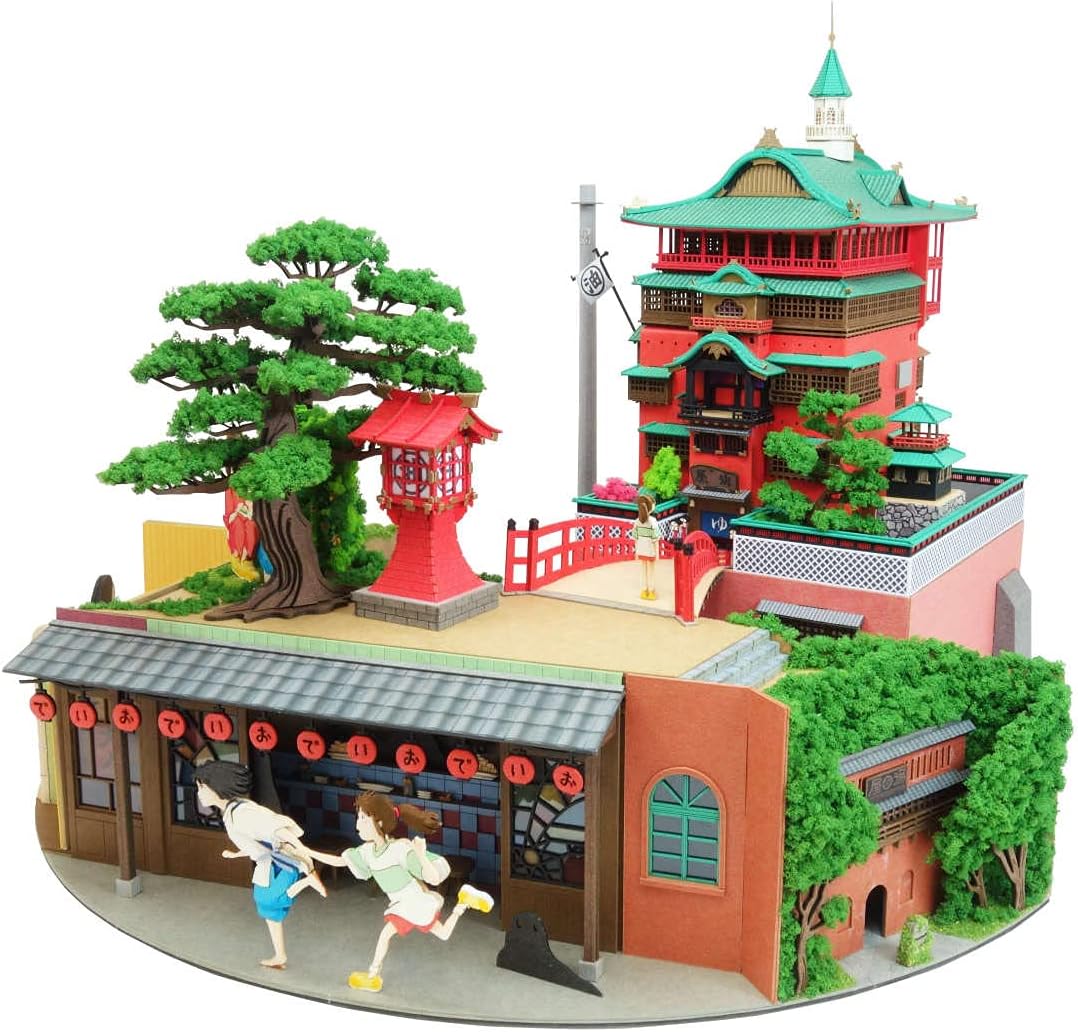
Image 5.1: A completed view of the Spirited Away diorama, featuring the bathhouse and surrounding elements.
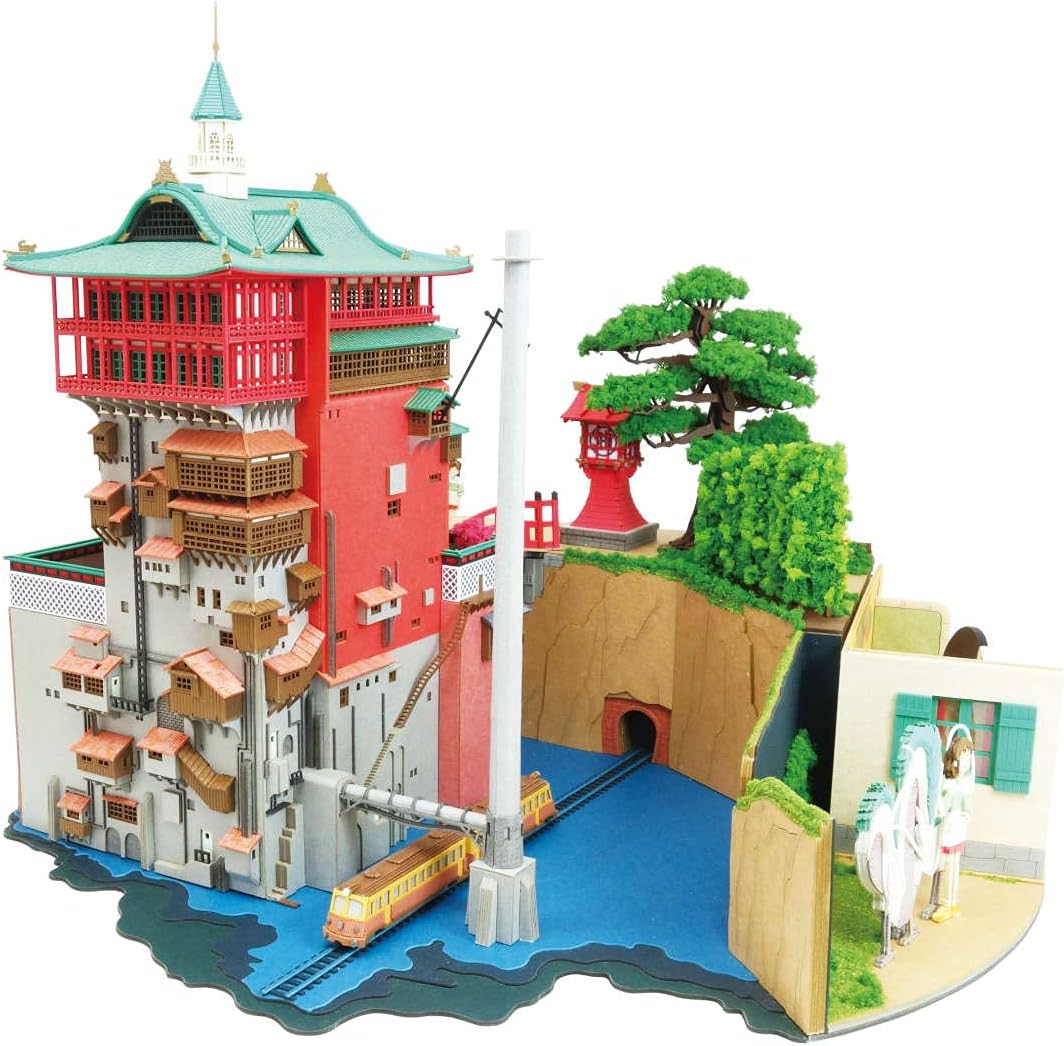
Image 5.2: Another perspective of the diorama, highlighting the multi-layered construction and environmental details.

Image 5.3: The diorama viewed from above, demonstrating its 360-degree design and scale.
6. Maintenance
To ensure the longevity and appearance of your finished papercraft diorama, follow these maintenance guidelines:
- Dusting: Gently dust the diorama regularly using a soft brush or a can of compressed air. Avoid wiping with cloths, which can snag delicate parts.
- Display Environment: Display the diorama in a cool, dry place away from direct sunlight, high humidity, and extreme temperature fluctuations. These conditions can cause paper to fade, warp, or degrade.
- Avoid Moisture: Keep the diorama away from liquids. Paper is highly susceptible to water damage.
- Handling: Handle the diorama by its base whenever possible to avoid damaging delicate structures.
7. Troubleshooting
While assembling your papercraft diorama, you might encounter minor challenges. Here are some common issues and solutions:
| Problem | Solution |
|---|---|
| Parts not fitting correctly | Double-check the part numbers against the instructions. Ensure all cuts are precise and folds are sharp. Trim excess paper if necessary. |
| Glue not holding | Ensure you are using an appropriate craft glue for paper. Apply sufficient pressure and allow adequate drying time. Use small clips or tape to hold parts while drying. |
| Paper warping | Excessive glue or humidity can cause warping. Use glue sparingly and work in a dry environment. If warping occurs, try gently pressing the affected area under a flat, heavy object once completely dry. |
| Lost a small part | Carefully search your workspace. If irreplaceable, consider fabricating a replacement from spare paper or a similar material, or contact Sankei support (if available for parts). |
8. Specifications
| Feature | Detail |
|---|---|
| Model Number | MP07-42 |
| Product Dimensions (Assembled) | W220mm x D226mm x H170mm (approximately 8.66 x 9.06 x 6.69 inches) |
| Item Weight | Approximately 2.24 pounds (1.02 kg) |
| Material | Laser-cut hard paper |
| Assembly Level | Advanced (5 out of 5 stars) |
| Estimated Assembly Time | Approximately 100 hours |
| Theme | Studio Ghibli: Spirited Away |
9. Warranty and Support
9.1 Product Warranty
Sankei papercraft kits are manufactured with high-quality materials and precision. Due to the nature of papercraft assembly, which involves user cutting and gluing, specific warranties against assembly errors are not typically offered. However, if you discover manufacturing defects or missing components upon opening your new kit, please contact your retailer or Sankei customer service immediately with proof of purchase.
9.2 Customer Support
For technical assistance, questions regarding assembly, or to report manufacturing issues, please refer to the contact information provided on the product packaging or visit the official Sankei website.
Sankei Official Website: www.sankei-web.co.jp (Please note: Website content may be in Japanese. Use translation tools if necessary.)


