
1. Introduction
Thank you for choosing the CLOUDY BAY 8-Inch 20W LED Recessed Downlight. This product is designed for easy installation and offers versatile lighting options with 5 selectable color temperatures (2700K, 3000K, 3500K, 4000K, 5000K) and smooth dimming capabilities. This manual provides essential information for safe installation, operation, and maintenance.

Figure 1: CLOUDY BAY 8-inch LED Recessed Light with 5 CCT selection and junction box.
2. Safety Information
- Always turn off the power at the circuit breaker before beginning installation or performing any maintenance.
- Consult a qualified electrician if you are unsure about the installation process.
- Ensure all electrical connections comply with local codes and ordinances.
- Do not modify the fixture or its components.
- This product is suitable for damp locations.
3. Package Contents
Each package contains the following items:
- CLOUDY BAY 8-Inch LED Recessed Downlight (quantity as per pack size, e.g., 6 lights)
- Integrated Junction Box
- Mounting Hardware
- Installation Template
4. Specifications
| Feature | Specification |
|---|---|
| Brand | CLOUDY BAY |
| Model Number | LJD008WH5C-6PK |
| Size | 8 Inch |
| Wattage | 20 Watts |
| Brightness | 1400 Lumens |
| Color Temperature | 2700K/3000K/3500K/4000K/5000K Selectable |
| Voltage | 120 Volts |
| CRI | 90+ |
| Material | Aluminum, Plastic |
| Installation Type | Recessed |
| Special Features | Dimmable, Damp Location Rated |
| Product Dimensions | 8.6"L x 8.6"W x 1"H |
| Lifespan | 25,000 hours |
5. Installation Guide
5.1 Pre-Installation
- Turn off Power: Ensure the power supply to the installation area is completely turned off at the circuit breaker.
- Check Compatibility: Verify that the installation location is suitable for an 8-inch recessed light. This fixture is not compatible with existing remodel or new construction housings designed for 6" to 6-5/8" holes.
- Determine Cut Hole Size: Use the provided template to mark the ceiling for a cut hole of 8-1/4 inches in diameter.
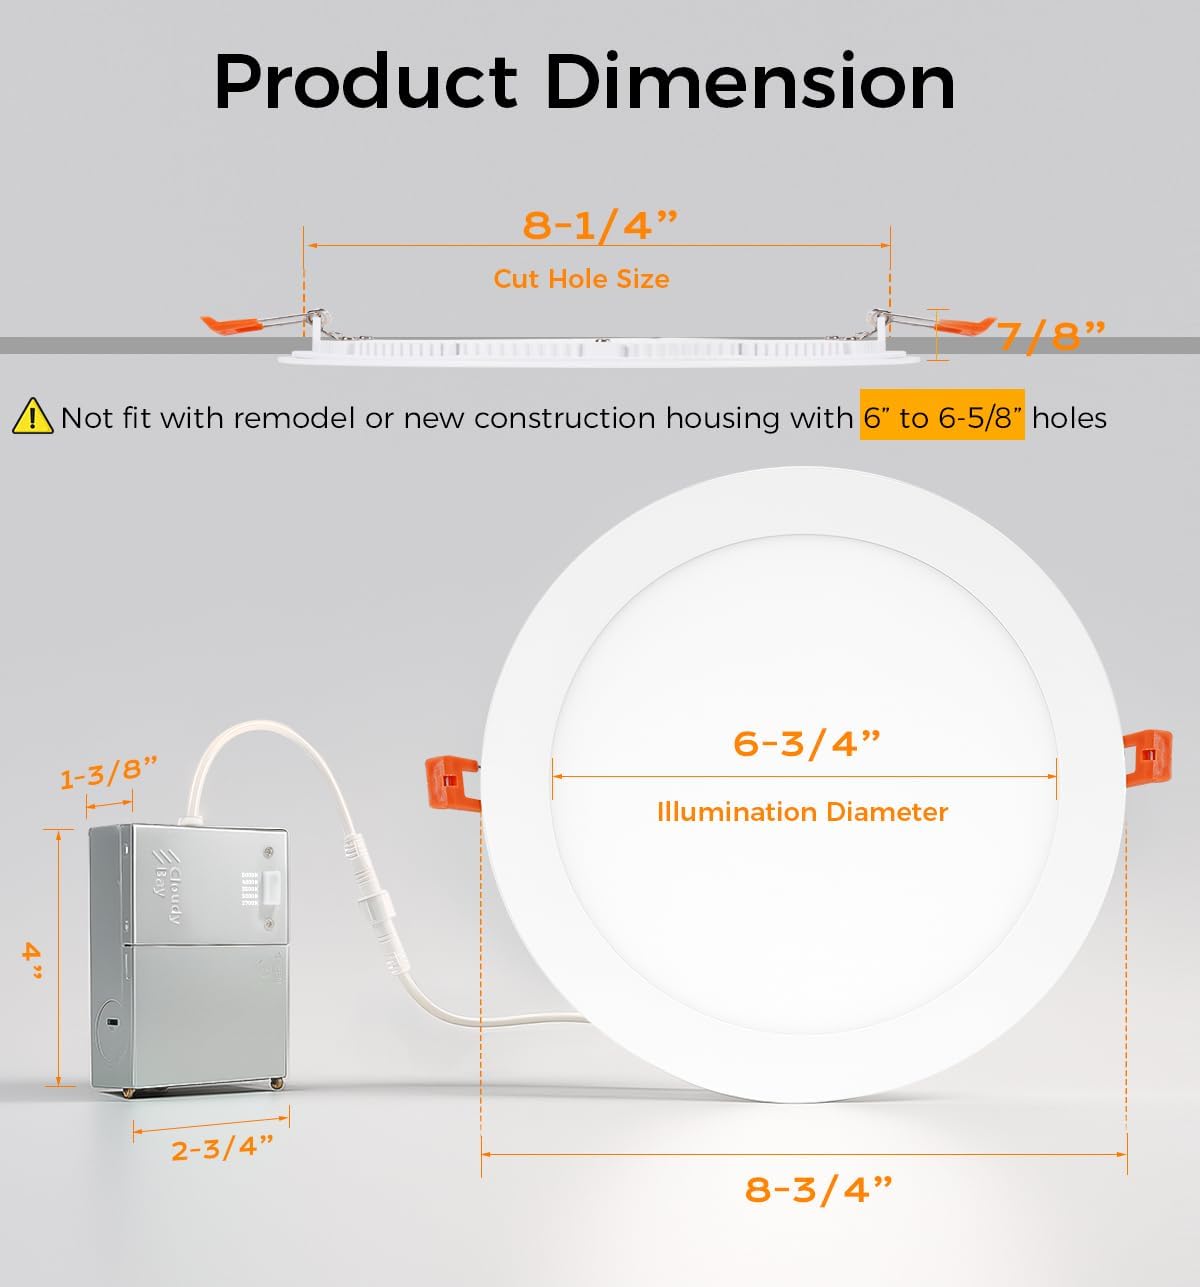
Figure 2: Product dimensions and recommended cut hole size.

Figure 3: Installation compatibility notes.
5.2 Wiring and Color Temperature Selection
- Cut Hole: Carefully cut the 8-1/4 inch hole in the ceiling using a suitable tool.
- Make Wiring Connections: Open the junction box cover. Connect the house wiring (live, neutral, ground) to the corresponding wires inside the junction box using appropriate connectors. Ensure secure connections.
- Select Color Temperature (CCT): Before mounting the light, locate the CCT toggle switch on the side of the junction box. Select your desired color temperature (2700K, 3000K, 3500K, 4000K, or 5000K). This setting cannot be changed easily after installation.

Figure 4: CCT selection switch on the junction box.
5.3 Mounting the Light
- Position Junction Box: Place the junction box through the cut hole into the ceiling cavity.
- Mount Light: Squeeze the spring clips on the recessed light and insert the fixture into the cut hole. The clips will secure the light firmly against the ceiling.
- Restore Power: Once all lights are securely installed, restore power at the circuit breaker.

Figure 5: Step-by-step installation process.
6. Operating Instructions
6.1 Color Temperature Adjustment
The color temperature is set using the toggle switch on the junction box during installation. To change the CCT after installation, you will need to remove the fixture from the ceiling to access the switch.
6.2 Dimming Functionality
This LED recessed downlight is dimmable from 10% to 100% brightness. It is compatible with most standard LED dimmers. For optimal performance and to avoid flickering or humming, refer to the dimmer compatibility list provided in Section 9.1.

Figure 6: Smooth dimming capability.
7. Maintenance
The CLOUDY BAY LED Recessed Downlight requires minimal maintenance.
- Cleaning: Ensure power is off before cleaning. Wipe the fixture with a soft, dry cloth. Do not use abrasive cleaners or solvents, as these may damage the finish or electrical components.
- No User-Serviceable Parts: The LED chips are integrated and not replaceable. Do not attempt to open or repair the fixture.
8. Troubleshooting
If you encounter issues with your recessed light, refer to the following common problems and solutions:
| Problem | Possible Cause | Solution |
|---|---|---|
| Light does not turn on | No power, loose wiring, faulty switch | Check circuit breaker. Verify all wiring connections are secure. Test the wall switch. |
| Light flickers or hums | Incompatible dimmer, loose wiring | Ensure dimmer is LED compatible. Refer to the dimmer list in Section 9.1. Check wiring connections. |
| Incorrect color temperature | CCT switch set incorrectly | Turn off power, remove fixture, and adjust the CCT toggle switch on the junction box. |
8.1 Dimmer Compatibility List
For optimal dimming performance, use one of the following compatible dimmer models:

Figure 7: Compatible Dimmer List.
9. Warranty and Support
CLOUDY BAY offers a 3-year limited warranty on this product, assuring a rated lifetime of 25,000 hours (average 3-5 hours/day). If you experience any issues with your CLOUDY BAY LED Recessed Downlight, please contact customer support for assistance.
For warranty claims or technical support, please refer to the contact information provided on the product packaging or the official CLOUDY BAY website.