Introduction
This manual provides detailed instructions for the safe and efficient operation of your DIGITNOW M513 Record Player. Please read this manual thoroughly before using the product and retain it for future reference. This record player features a belt-drive turntable, external stereo speakers, Bluetooth connectivity, and Vinyl-to-MP3 recording capabilities.
Product Overview
Familiarize yourself with the components and controls of your record player.
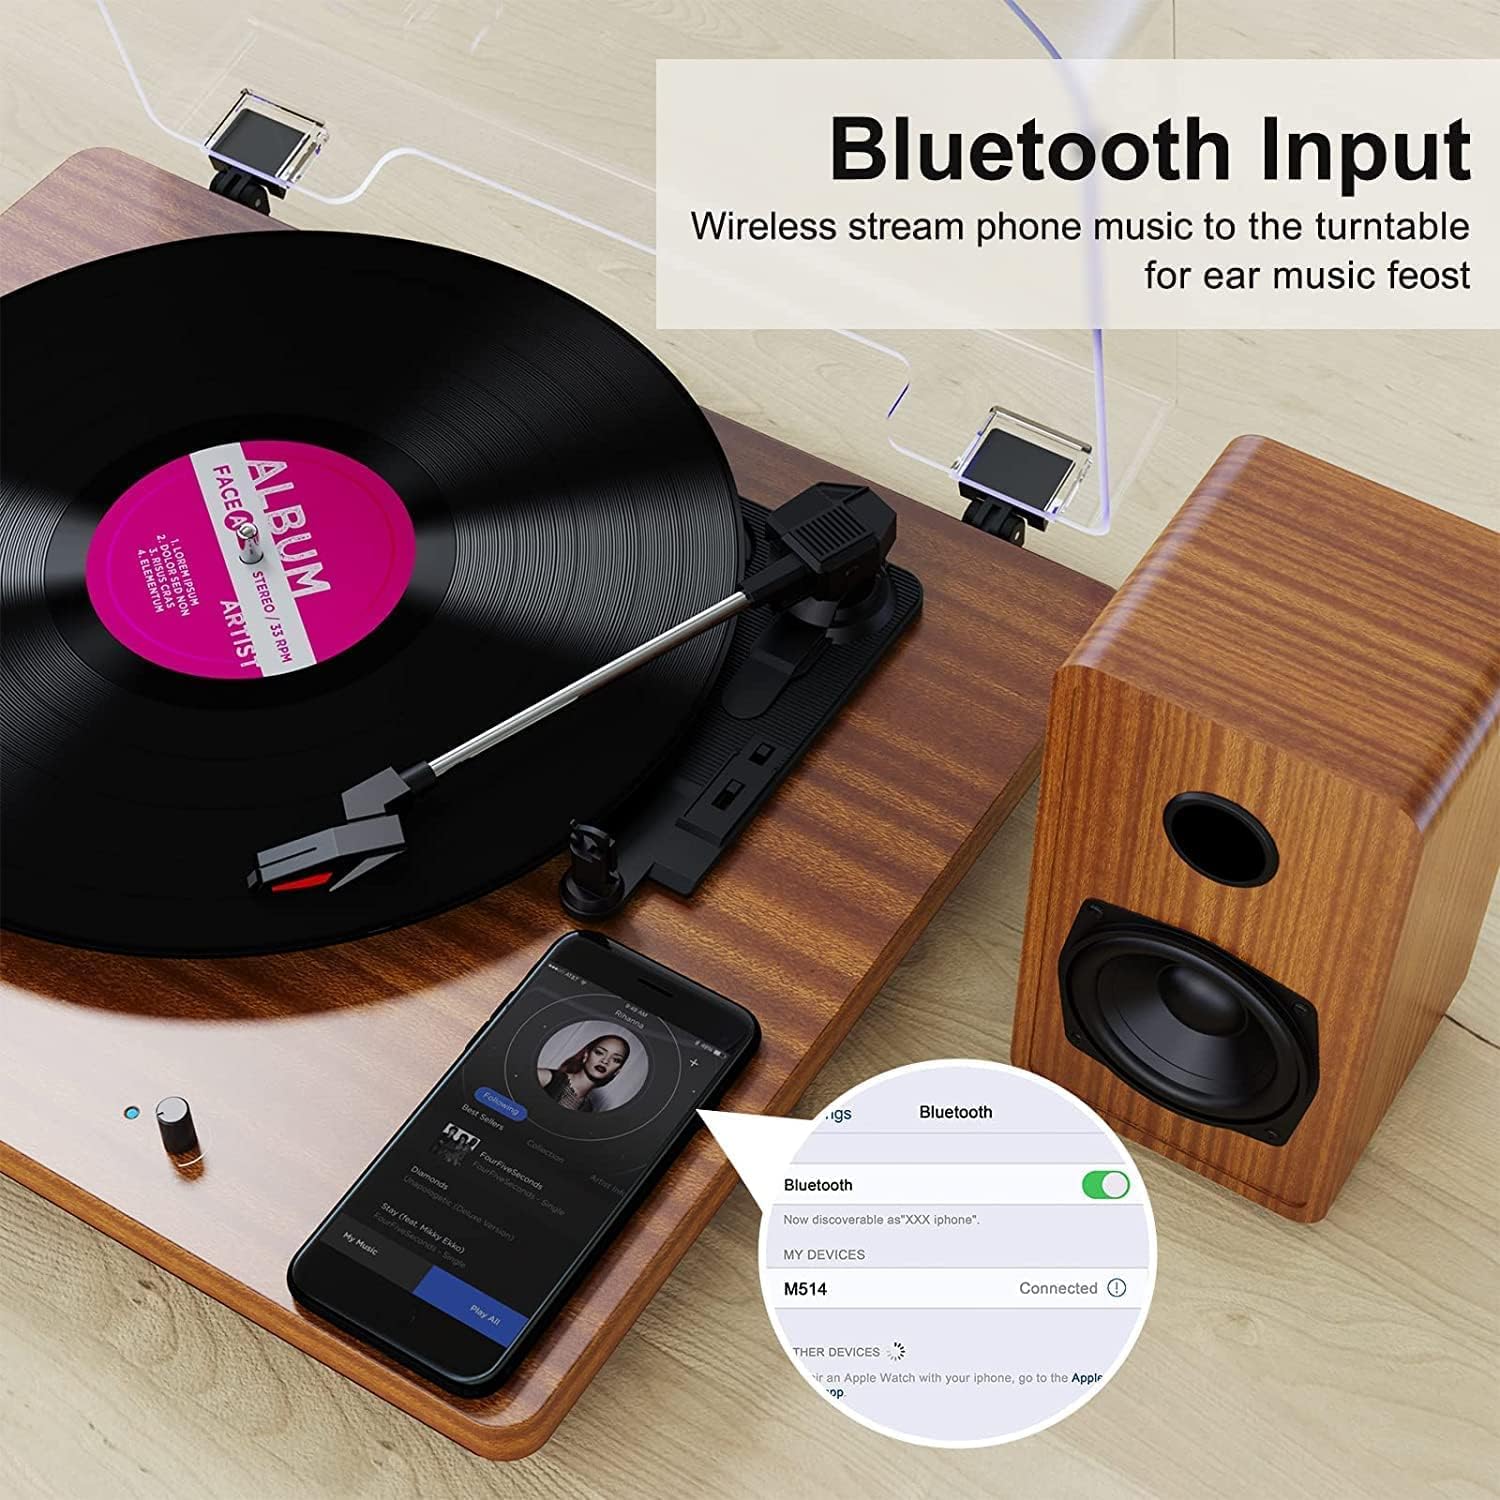
Figure 1: DIGITNOW M513 Record Player with external speakers and Bluetooth connectivity.
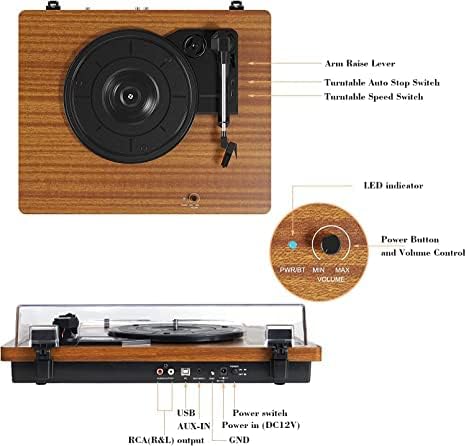
Figure 2: Top and rear panel controls including arm raise lever, auto stop switch, speed switch, power button, volume control, USB, AUX-IN, RCA(R&L) output, power input, and ground.
Key Components:
- Turntable Platter: Where vinyl records are placed.
- Tonearm: Holds the stylus and tracks the record grooves.
- Stylus (Needle): Reads the audio information from the record.
- External Stereo Speakers: Provide audio output.
- Dust Cover: Protects the turntable from dust.
- Control Panel: Includes power, volume, speed selection, and input/output ports.
Setup
- Unpacking: Carefully remove all components from the packaging. Ensure all accessories (dust cover, 45 RPM adapter, RCA output cables, ground wire, USB cable, user manual) are present.
- Placement: Place the record player on a stable, level surface away from direct sunlight, heat sources, and excessive vibration. Position the external speakers for optimal sound distribution.
- Connect Speakers: Connect the provided external stereo speakers to the RCA output ports on the rear of the record player using the RCA cables. Ensure correct left (L) and right (R) connections.
- Power Connection: Connect the DC 12V power adapter to the power input port on the rear of the unit, then plug the adapter into a wall outlet.
- Dust Cover Installation: Attach the dust cover to the hinges at the back of the turntable.
Operating Instructions
Playing Records
- Power On: Turn the Power/Volume knob clockwise to power on the unit. The LED indicator will illuminate.
- Select Speed: Choose the appropriate speed (33, 45, or 78 RPM) using the speed switch located on the top panel. Use the 45 RPM adapter for 7-inch records with large center holes.
- Place Record: Carefully place your vinyl record on the turntable platter.
- Lift Tonearm: Use the arm raise lever to gently lift the tonearm.
- Position Tonearm: Move the tonearm over the desired starting track of the record.
- Lower Tonearm: Slowly lower the tonearm using the arm raise lever. The stylus will make contact with the record, and playback will begin.
- Adjust Volume: Adjust the volume using the Power/Volume knob.
- Auto Stop: The record player features an auto-stop function. When enabled via the Auto Stop switch, the platter will stop spinning automatically when the record finishes. If disabled, the platter will continue to spin.
- End Playback: At the end of the record, or when you wish to stop, use the arm raise lever to lift the tonearm, return it to the tonearm rest, and then lower the lever. Turn the Power/Volume knob counter-clockwise to power off the unit.

Figure 3: Detailed view of the stylus, belt-driven design for smooth music, and 33/45/78 RPM speed options for various record sizes.
Bluetooth Connection
The record player can receive audio wirelessly from your Bluetooth-enabled devices.
- Activate Bluetooth Mode: Ensure the record player is powered on. The unit will automatically enter Bluetooth receiving mode if no record is playing or AUX input is not connected. The LED indicator may change color or blink to indicate Bluetooth mode.
- Enable Bluetooth on Device: On your smartphone or other Bluetooth device, enable Bluetooth and search for available devices.
- Pair Device: Select "DIGITNOW" or a similar name from the list of available devices to pair. Once connected, you will hear a confirmation sound.
- Play Audio: Play music from your device, and it will stream through the record player's speakers.
Video 1: Demonstrates the setup and Bluetooth connection process for the DIGITNOW M513 Record Player, including placing a record and pairing with a smartphone.
Vinyl-to-MP3 Recording
Convert your vinyl records to digital MP3 files via a USB connection to your computer.
- Connect to Computer: Use the provided USB cable to connect the record player's USB port (PC OUT) to a USB port on your Mac or PC.
- Install Software: Refer to the detailed instructions in the included user manual for information on compatible recording software and installation.
- Start Recording: Follow the software's instructions to begin recording audio from your vinyl record to your computer.

Figure 4: Connection diagram illustrating USB for PC recording, AUX-IN for external audio sources like CD players, and RCA OUT for external speakers.
External Audio Connections
- AUX Input: Connect external audio sources (e.g., CD player, smartphone, digital media player) to the AUX-IN port on the rear panel using a 3.5mm audio cable. The record player will play audio from the connected device through its speakers.
- RCA Output: For enhanced or louder sound, connect the RCA(R&L) output ports to an external amplifier or powered speakers using RCA cables.
Maintenance
- Cleaning the Stylus: Gently clean the stylus regularly with a soft brush designed for stylus cleaning, brushing from back to front. Avoid touching the stylus with your fingers.
- Cleaning the Unit: Wipe the record player and dust cover with a soft, dry cloth. Do not use abrasive cleaners or solvents.
- Belt Maintenance: The belt-drive system is designed for durability. If the platter does not spin or spins inconsistently, the drive belt may have slipped during shipping or use. Refer to the full user manual for instructions on how to re-seat or replace the drive belt.
- Record Care: Keep your records clean and free of dust to ensure optimal sound quality and prolong stylus life. Store records vertically in their sleeves.
Troubleshooting
| Problem | Possible Cause | Solution |
|---|---|---|
| No power | Power adapter not connected or outlet not working. | Ensure power adapter is securely plugged into the unit and a working wall outlet. Check the power switch. |
| No sound | Volume too low; speakers not connected; incorrect input mode. | Increase volume. Verify speaker connections. Ensure correct input mode (Phono, Bluetooth, AUX). |
| Skipping or distorted sound | Dirty or damaged record; worn or dirty stylus; unit not level. | Clean record. Clean or replace stylus. Place unit on a level surface. |
| Record plays too fast/slow | Incorrect speed setting. | Adjust the speed switch to 33, 45, or 78 RPM as appropriate for the record. |
| Humming noise | Ground wire not connected; interference from other electronics. | Ensure the ground wire is properly connected (if applicable). Move the unit away from other electronic devices. |
Specifications
- Model: M513
- Brand: DIGITNOW
- Product Dimensions: 15 x 12.87 x 6.22 inches
- Item Weight: 11.77 pounds
- Speeds: 33 1/3, 45, 78 RPM
- Drive Type: Belt-Drive
- Motor Type: DC Motor
- Connectivity: Bluetooth, AUX-IN, RCA Output, USB (for Vinyl-to-MP3 recording)
- Included Components: Dust cover, 45 RPM adapter, RCA output cables, ground wire, USB cable, user manual
- Material: Plastic, Wood
- Special Features: Bluetooth Function, RCA Output, Vinyl-to-MP3 Recording, Auto Stop
Warranty and Support
For warranty information, technical support, or service inquiries, please refer to the contact details provided in the original product packaging or visit the official DIGITNOW website. Keep your purchase receipt as proof of purchase for warranty claims.