1. Introduction
Thank you for choosing the MOLAER Rechargeable LED Headlamp Flashlight, Model 2TD. This manual provides essential information for the safe and efficient use of your new headlamp. Please read it thoroughly before operation and retain it for future reference.
2. Safety Information
- Do not look directly into the LED light. The intense light can cause temporary vision impairment or eye damage.
- Keep the device away from extreme temperatures, direct sunlight, and corrosive liquids.
- Do not attempt to disassemble or modify the headlamp. This may void the warranty and pose a safety risk.
- Ensure the charging port cover is securely closed when not charging to maintain water resistance.
- Dispose of batteries according to local regulations. Do not incinerate.
3. Package Contents
Verify that all items are present in your package:
- MOLAER Rechargeable LED Headlamp Flashlight (2 units)
- USB Charging Cable (2 units)
- User Manual
4. Product Features
- Rechargeable Battery: Equipped with a 1500mAh Li-polymer battery and includes a USB charging cable for convenient recharging.
- Dual Light Modes: Features XPE (spotlight) and COB (floodlight) lighting modes for versatile illumination.
- Adjustable Angle: The lamp head can be rotated 90 degrees to direct light precisely where needed.
- Comfortable and Adjustable Strap: Uses an elastic headband with an adjustable buckle for a secure and comfortable fit.
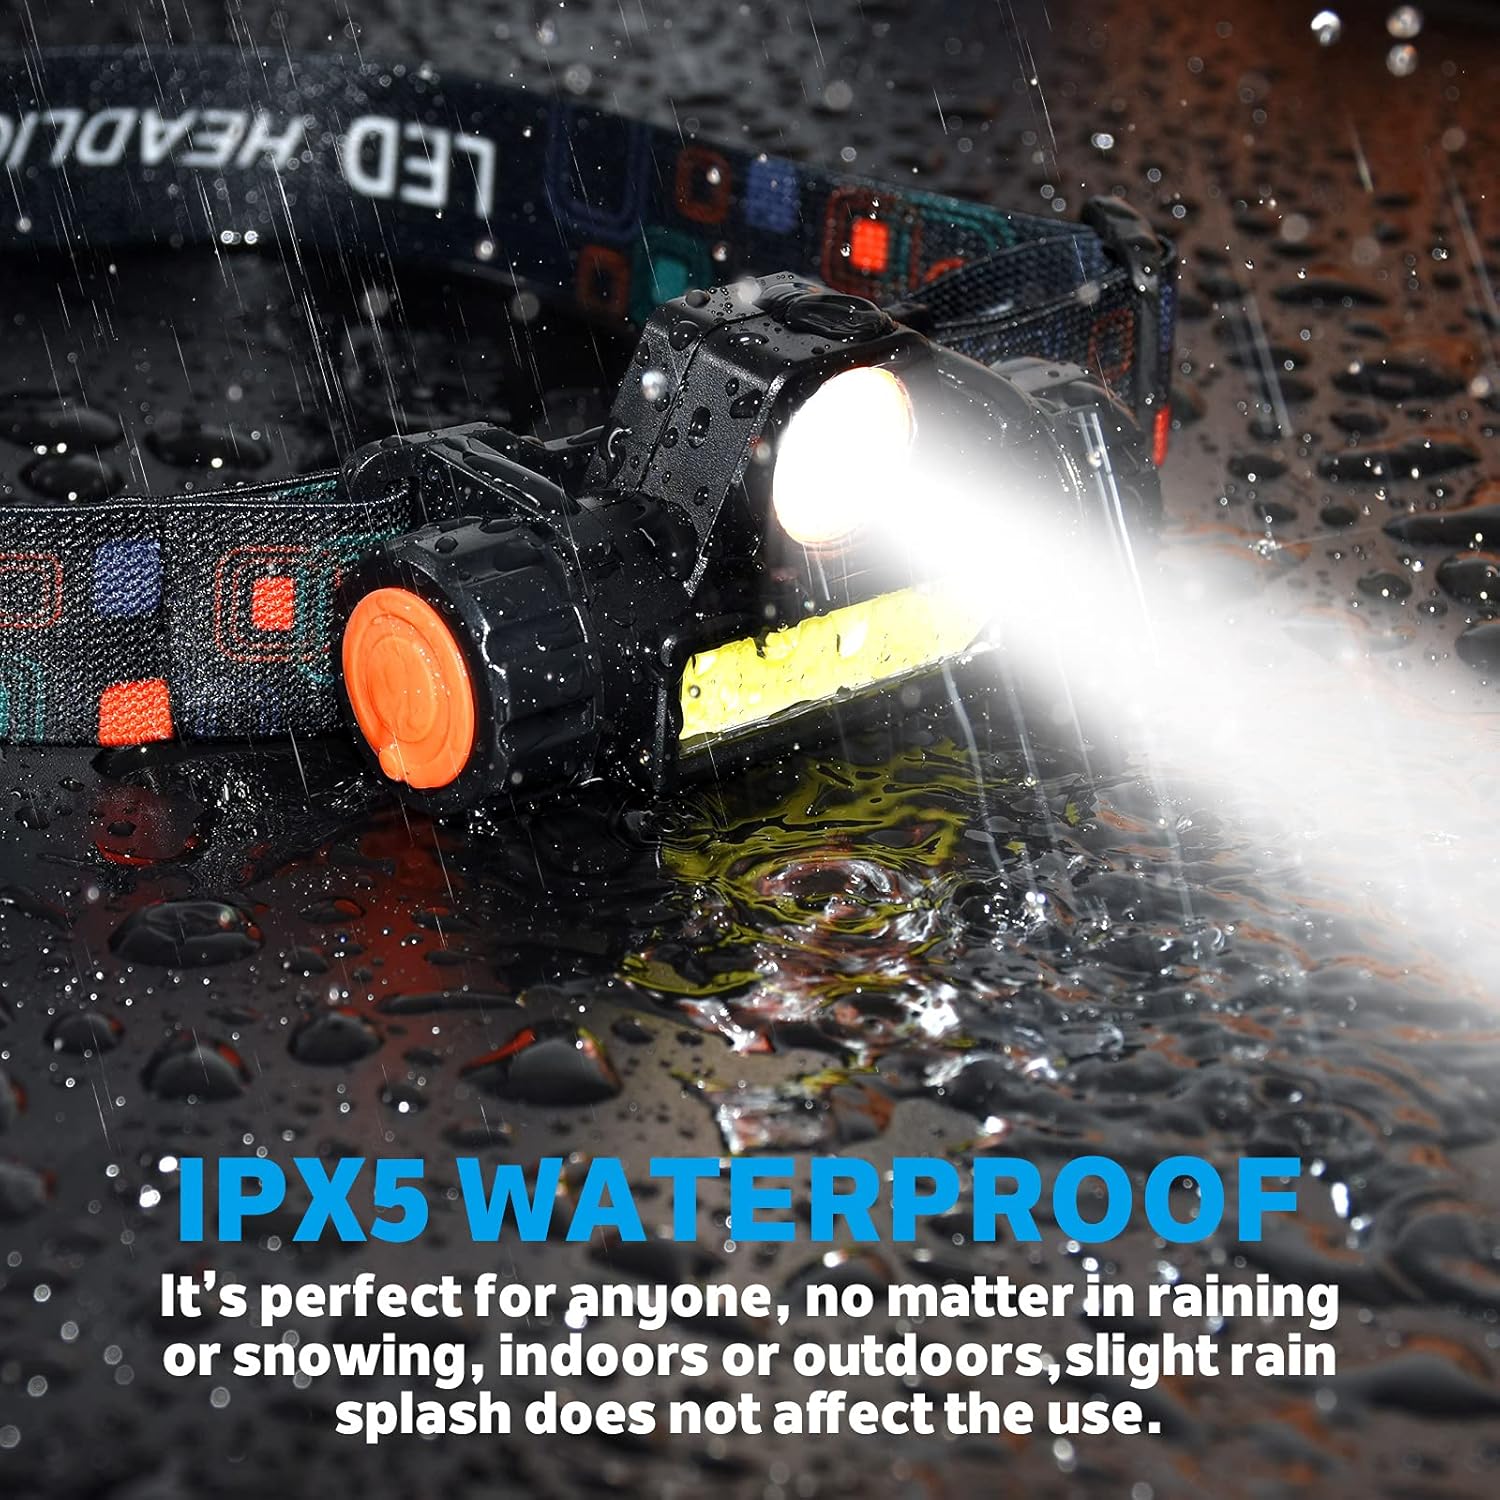
- IPX5 Waterproof: Protected against splashing water from all angles, suitable for various outdoor conditions.
- Magnetic and Detachable: The headlamp body can be detached from the head strap and mounting bracket, functioning as a handheld flashlight with a built-in magnetic base for attachment to metallic surfaces.

The headlamp is designed with an IPX5 waterproof rating, ensuring protection against water splashes from any direction. This feature makes it suitable for use in various weather conditions, including light rain or snow.

The headlamp features a 90-degree tiltable body, allowing users to adjust the light angle. It also includes an adjustable elastic headband for a comfortable fit and a waterproof sealing ring for enhanced durability.
5. Setup
5.1. Charging the Headlamp
Before first use, fully charge the headlamp. The 1500mAh Li-polymer battery is integrated and rechargeable via the included USB cable.
- Locate the Micro USB charging port on the headlamp, typically covered by a rubber flap.
- Open the rubber flap and connect the USB charging cable to the port.
- Connect the other end of the USB cable to a power source such as a power bank, wall charger, computer, or car charger.
- During charging, a red light will flash. Once fully charged, the red light will remain solid.
- After charging, securely close the rubber flap over the charging port to maintain water resistance.
This image illustrates the Micro USB charging port, the red flashing indicator for charging, and the solid red light for a full charge. It also shows various compatible charging methods: power bank, wall charger, computer, and car charging.
5.2. Adjusting the Headband
The elastic headband is adjustable to fit various head sizes comfortably.
- Place the headlamp on your head.
- Use the adjustable buckle on the elastic strap to tighten or loosen the headband until it fits snugly but comfortably.
6. Operating Instructions
6.1. Power On/Off and Mode Selection
The headlamp features a single-button design for easy operation.
- To Power On: Press the switch button once. The headlamp will turn on in the default XPE (spotlight) mode.
- To Change Modes: While the headlamp is on, press the switch button again to cycle through the available lighting modes: XPE (spotlight) and COB (floodlight).
- To Power Off: Press the switch button after cycling through all modes, or hold the button down for a few seconds (if applicable, refer to specific model behavior).

This image illustrates the difference between XPE lighting, which provides a focused spotlight, and COB lighting, which offers a broader floodlight beam.
6.2. Detachable Function and Magnetic Base
The headlamp body can be detached for versatile use.
- To Detach: Gently pull the headlamp body away from the head strap and mounting bracket.
- Magnetic Base: The detached headlamp has a built-in magnetic base. This allows it to be securely attached to metallic surfaces for hands-free lighting in various situations, such as working under a car hood.
- To Reattach: Align the headlamp body with the mounting bracket on the headband and press firmly until it clicks into place.

The image demonstrates the headlamp's magnetic and detachable design, showing it removed from the headband and affixed to a metal surface using its integrated magnet.
7. Maintenance
7.1. Cleaning
- Wipe the headlamp body with a soft, damp cloth. Do not use abrasive cleaners or solvents.
- The elastic headband can be hand-washed with mild soap and water if it becomes dirty. Ensure it is completely dry before reattaching the headlamp.
7.2. Storage
- Store the headlamp in a cool, dry place away from direct sunlight and extreme temperatures.
- For long-term storage, charge the battery to approximately 50% every 3-6 months to prolong battery life.
8. Troubleshooting
If you encounter issues with your MOLAER headlamp, refer to the following common problems and solutions:
- Headlamp does not turn on: Ensure the battery is charged. Connect the headlamp to a power source and check the charging indicator.
- Light is dim or flickers: The battery may be low. Recharge the headlamp fully.
- Headlamp does not charge: Check the USB cable and power source connection. Ensure the charging port is clean and free of debris. Try a different USB cable or power adapter.
- Water ingress: Ensure the charging port cover is fully sealed. If water has entered the device, discontinue use and allow it to dry completely before attempting to use or charge again.
If the problem persists after attempting these solutions, please contact customer support.
9. Specifications
| Model Number | 2TD |
| Brand | MOLAER |
| Power Source | Battery Powered |
| Light Source Type | LED (XPE, COB) |
| Material | ABS, Aluminum |
| Battery Type | 1500mAh Lithium Ion (included) |
| Voltage | 3.7 Volts |
| Item Weight | 3 Ounces (approx. 71g) |
| Water Resistance Level | IPX5 Waterproof |
| Special Features | Spotlight, Floodlight, USB Charging, 90-degree Adjustable Head, Washable and Adjustable Headband, Magnetic Base |
| UPC | 726972491188 |
10. Warranty
This product is covered by a Seller Warranty. For details regarding the warranty period and terms, please refer to the purchase platform or contact the seller directly.
11. Support
For any questions, technical assistance, or warranty claims, please contact MOLAER customer support through the platform where the product was purchased. Please have your order number and product model (2TD) ready when contacting support.