1. Introduction
Thank you for choosing the Liectroux 1-X009A Robot Vacuum Cleaner. This manual provides essential information for the safe operation, maintenance, and troubleshooting of your device. Please read this manual thoroughly before using the product and retain it for future reference.
Important Safety Instructions
- Always operate the robot vacuum on dry surfaces.
- Do not allow children to operate the robot vacuum.
- Keep hair, loose clothing, fingers, and all parts of the body away from openings and moving parts.
- Do not pick up large objects, liquids, burning or smoking materials.
- Ensure the charging dock is placed against a wall on a level surface.
- Unplug the charging dock when not in use for extended periods.
- Only use the original power adapter and charging dock provided with the device.
2. Product Overview
Familiarize yourself with the components of your Liectroux 1-X009A Robot Vacuum Cleaner.
Top View
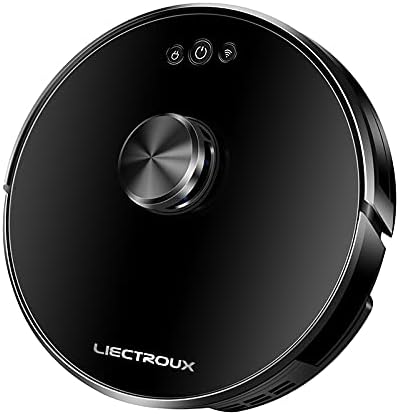
Image 2.1: Top view of the Liectroux 1-X009A Robot Vacuum Cleaner. It features a sleek black circular design with a central metallic knob (likely a navigation sensor) and three touch-sensitive buttons: Power, Start/Pause, and Wi-Fi indicator.
- Central Navigation Module: For intelligent mapping and navigation.
- Power Button: Press to turn on/off.
- Start/Pause Button: Press to start or pause cleaning.
- Wi-Fi Indicator: Shows connection status.
Bottom View

Image 2.2: Bottom view of the Liectroux 1-X009A Robot Vacuum Cleaner, showing the cleaning mechanisms. This includes two rotating side brushes, a central main roller brush, large drive wheels, and a removable mopping pad attachment at the rear.
- Side Brushes (L & R): Sweep debris into the main brush path.
- Main Roller Brush: Collects dirt and dust from the floor.
- Drive Wheels: Allow the robot to move across various surfaces.
- Charging Contacts: Connects to the charging dock.
- Cliff Sensors: Detects drops to prevent falls.
- Mopping Pad Attachment: For wet cleaning.
Dustbin and Water Tank

Image 2.3: Side view of the Liectroux 1-X009A, illustrating the integrated dustbin and water tank. The transparent blue tank shows volume markings (100ml, 200ml, 300ml) for water, indicating its mopping capability.
- Dustbin: Collects dry debris. Capacity: 0.6 Litre.
- Water Tank: Holds water for mopping function.
- Filter: Traps fine dust particles.
3. Setup
3.1 Unboxing and Initial Preparation
- Carefully remove all components from the packaging.
- Remove any protective films or stickers from the robot and charging dock.
- Attach the side brushes by pressing them onto their respective posts on the bottom of the robot until they click into place.
3.2 Placing the Charging Dock
- Place the charging dock against a wall in an open area, ensuring at least 0.5 meters (1.6 feet) of clear space on either side and 1.5 meters (5 feet) in front.
- Connect the power adapter to the charging dock and plug it into a wall outlet.
- Ensure the power indicator on the charging dock illuminates.
3.3 Initial Charging
Place the robot vacuum onto the charging dock, aligning its charging contacts with those on the dock. The robot will begin charging automatically. For first-time use, allow the robot to charge completely (approximately 4-6 hours) before its initial cleaning cycle.
3.4 Connecting to Wi-Fi (App Control)
To utilize advanced features and remote control, download the Liectroux app from your smartphone's app store. Follow the in-app instructions to connect your robot vacuum to your home Wi-Fi network. This typically involves:
- Creating an account.
- Selecting your robot model.
- Putting the robot into pairing mode (usually by pressing and holding the Wi-Fi button).
- Connecting your phone to the robot's temporary Wi-Fi hotspot, then selecting your home Wi-Fi network.
4. Operating the Robot Vacuum
4.1 Starting a Cleaning Cycle
- Manual Start: Press the Start/Pause button on the robot's top panel. The robot will begin cleaning in Auto mode.
- App Start: Open the Liectroux app and select the desired cleaning mode (Auto, Spot, Edge) or initiate a full cleaning cycle.
4.2 Pausing and Resuming
Press the Start/Pause button on the robot or in the app to pause a cleaning cycle. Press it again to resume.
4.3 Returning to Charging Dock
The robot will automatically return to its charging dock when its battery is low or when a cleaning cycle is complete. You can also manually send it back via the app or by pressing and holding the Start/Pause button on the robot (refer to specific model instructions for button functions).
4.4 Mopping Function
To use the mopping function:
- Remove the combined dustbin/water tank.
- Fill the water tank with clean water (do not use cleaning solutions unless specified by the manufacturer).
- Attach a clean mopping pad to the designated slot on the bottom of the water tank.
- Reinsert the combined unit into the robot.
- Start a cleaning cycle. The robot will vacuum and mop simultaneously.
Note: Remove the mopping pad and empty the water tank after each mopping session to prevent mildew and odors.
5. Maintenance
Regular maintenance ensures optimal performance and extends the lifespan of your robot vacuum.
5.1 Emptying the Dustbin
- Press the dustbin release button (refer to your robot's specific design) and pull out the combined dustbin/water tank.
- Open the dustbin cover and empty its contents into a trash bin.
- Tap the dustbin gently to dislodge any stuck debris.
- Reinsert the dustbin/water tank until it clicks into place.
Frequency: After each cleaning cycle or when full.
5.2 Cleaning the Filters
- Remove the dustbin.
- Take out the primary filter and HEPA filter.
- Brush off dust from the filters using a cleaning tool or a soft brush. Do not wash HEPA filters with water unless explicitly stated in the product documentation.
- Ensure filters are completely dry before reinserting.
Frequency: Weekly, or more often if used frequently or in dusty environments. Replace filters every 3-6 months.
5.3 Cleaning the Main Roller Brush
- Turn the robot over.
- Remove the brush guard by pressing the release tabs.
- Lift out the main roller brush.
- Use the provided cleaning tool (if available) or scissors to cut and remove any hair or debris tangled around the brush.
- Reinsert the main brush and secure the brush guard.
Frequency: Weekly.
5.4 Cleaning the Side Brushes
- Gently pull the side brushes upwards to remove them.
- Remove any tangled hair or debris.
- If brushes are bent or damaged, replace them.
- Press the clean brushes back onto their posts.
Frequency: Bi-weekly. Replace every 3-6 months.
5.5 Cleaning Sensors and Charging Contacts
Wipe the cliff sensors (located on the bottom of the robot) and the charging contacts (on both the robot and the charging dock) with a clean, dry cloth. This ensures proper navigation and charging.
Frequency: Monthly.
5.6 Mopping Pad Care
Remove the mopping pad after each use. Wash it with water and mild detergent, then allow it to air dry completely before storing or reusing.
6. Troubleshooting
If your robot vacuum encounters an issue, refer to the following common problems and solutions.
| Problem | Possible Cause | Solution |
|---|---|---|
| Robot does not turn on. | Low battery; Power button not pressed. | Place robot on charging dock; Press and hold the Power button for 3 seconds. |
| Robot does not charge. | Charging contacts dirty; Charging dock not powered. | Clean charging contacts on robot and dock; Ensure charging dock is plugged in and powered. |
| Robot gets stuck frequently. | Obstacles (cables, rugs); Sensors dirty. | Clear obstacles from cleaning path; Clean cliff sensors. |
| Poor cleaning performance. | Dustbin full; Brushes tangled; Filters clogged. | Empty dustbin; Clean main and side brushes; Clean/replace filters. |
| Cannot connect to Wi-Fi. | Incorrect Wi-Fi password; Router issues; Robot not in pairing mode. | Verify password; Restart router; Put robot in pairing mode as per app instructions. |
If the problem persists, please refer to the warranty and support section for further assistance.
7. Specifications
| Feature | Detail |
|---|---|
| Model | 1-X009A |
| Brand | Liectroux |
| Color | Black |
| Dustbin Capacity | 0.6 Litre |
| Power Source | Rechargeable Battery (Wired Charging Dock) |
| Navigation Type | Intelligent Mapping |
| Cleaning Modes | Vacuum, Mop, Vacuum & Mop |
| Connectivity | Wi-Fi (for App Control) |
8. Warranty and Support
For warranty information, please refer to the warranty card included with your product packaging or visit the official Liectroux website. For technical support, troubleshooting assistance beyond this manual, or to order replacement parts, please contact Liectroux customer service through their official channels.
Keep your purchase receipt as proof of purchase for warranty claims.


