Introduction
This manual provides detailed instructions for the operation and maintenance of your iTOMA CKS207 Alarm Clock Radio. Please read this manual thoroughly before using the product to ensure proper function and to maximize your user experience. Keep this manual for future reference.
Product Features
- 15W Ultra Fast Wireless Charging: Conveniently charge compatible smartphones and devices by placing them on the top charging pad.
- Dual Charging Ports: Includes a USB-A port and a Type-C port for wired charging of additional devices.
- Dimmable 1.4-inch Cyan LED Display: Large, clear time display with 5-level dimmer control for optimal visibility day or night.
- Cyan LED Night Light: Built-in 2-level night light for ambient illumination.
- Dual Alarm with 4 Week Modes: Set two independent alarms with options for everyday, single day, weekdays, or weekends.
- FM Radio: Digital FM tuner with memory storage for up to 20 programmable radio stations (87.5-108 MHz).
- Bluetooth Connectivity: Seamlessly stream audio from Bluetooth-enabled devices.
- Sleep Timer & Snooze Function: Features for customizable sleep and temporary alarm pause.
Package Contents
- iTOMA CKS207 Alarm Clock Radio Unit
- AC Power Adapter
- User Manual
Product Layout and Controls

Figure 1: Overall view of the iTOMA CKS207 Alarm Clock Radio with a smartphone wirelessly charging on top and another connected via USB.

Figure 2: Close-up view of the top control panel of the iTOMA CKS207, highlighting buttons for time setting, alarm, snooze, volume, FM/Bluetooth mode, and dimmer.
The iTOMA CKS207 features an intuitive control panel located on the top of the unit. Key buttons include:
- SNOOZE/VOL- / VOL+ Dial: Press for snooze, rotate for volume adjustment.
- ON/OFF Button: Powers the unit on or off.
- DIMMER Button: Adjusts display brightness.
- LED Button: Controls the night light.
- FM Button: Switches to FM radio mode.
- BT Button: Switches to Bluetooth mode.
- AL1 / AL2 Buttons: Set and activate Alarm 1 and Alarm 2.
- CLOCK SET Button: Enters time setting mode.
- SLEEP/TIME ZONE Button: Activates sleep timer or adjusts time zone.
- TUNE- / TUNE+ Buttons: Adjusts radio frequency or navigates settings.
- FM MEM./BT PAIR Button: Saves FM presets or initiates Bluetooth pairing.
Setup
- Power Connection: Connect the supplied AC power adapter to the DC IN jack on the back of the unit, then plug the adapter into a standard wall outlet. The unit will power on and the display will light up.
- Backup Battery (Optional): The unit requires 1 Lithium Metal battery (not included) for backup. Install the battery in the compartment on the bottom of the unit. This battery preserves time and alarm settings during a power outage.
Operating Instructions
Setting the Time
- Press and hold the CLOCK SET button. The hour digits will flash.
- Rotate the SNOOZE/VOL dial to adjust the hour. Press CLOCK SET to confirm.
- The minute digits will flash. Rotate the SNOOZE/VOL dial to adjust the minutes. Press CLOCK SET to confirm.
- Continue to set the year, month, and day using the SNOOZE/VOL dial and CLOCK SET button.
- To switch between 12/24-hour format, press the TUNE+ or TUNE- buttons during time setting.
Setting Alarms (AL1/AL2)

Figure 3: The iTOMA CKS207 supports dual alarms for flexible scheduling.
- Press and hold the AL1 or AL2 button. The alarm hour digits will flash.
- Rotate the SNOOZE/VOL dial to set the desired alarm hour. Press the respective AL button to confirm.
- The alarm minute digits will flash. Rotate the SNOOZE/VOL dial to set the desired alarm minutes. Press the respective AL button to confirm.
- Select the alarm source (FM radio or buzzer) by rotating the SNOOZE/VOL dial. Press the respective AL button to confirm.
- Select the alarm week mode (Every Day, Single Day, Weekdays, Weekends) by rotating the SNOOZE/VOL dial. Press the respective AL button to confirm.
- To activate/deactivate an alarm, briefly press the AL1 or AL2 button. An alarm icon will appear/disappear on the display.
Using the FM Radio
- Press the FM button to switch to FM radio mode.
- To manually tune, press the TUNE+ or TUNE- buttons.
- To auto-scan for stations, press and hold the TUNE+ or TUNE- buttons. The radio will scan and stop at the next strong station.
- To save a preset: Tune to the desired station, then press and hold the FM MEM./BT PAIR button until the preset number flashes. Rotate the SNOOZE/VOL dial to select a preset number (1-20), then press FM MEM./BT PAIR again to save.
- To recall a preset: Briefly press the FM MEM./BT PAIR button, then rotate the SNOOZE/VOL dial to select the desired preset.
Bluetooth Pairing and Playback

Figure 4: Bluetooth connectivity allows wireless audio streaming from your smartphone.
- Press the BT button to switch to Bluetooth mode. The Bluetooth indicator on the display will flash.
- On your Bluetooth-enabled device, search for "iTOMA CKS207" in the Bluetooth settings and select it to pair.
- Once paired, the Bluetooth indicator will stop flashing and remain solid. You can now stream audio from your device to the clock radio.
- Rotate the SNOOZE/VOL dial to adjust the playback volume.
Wireless and Wired Charging
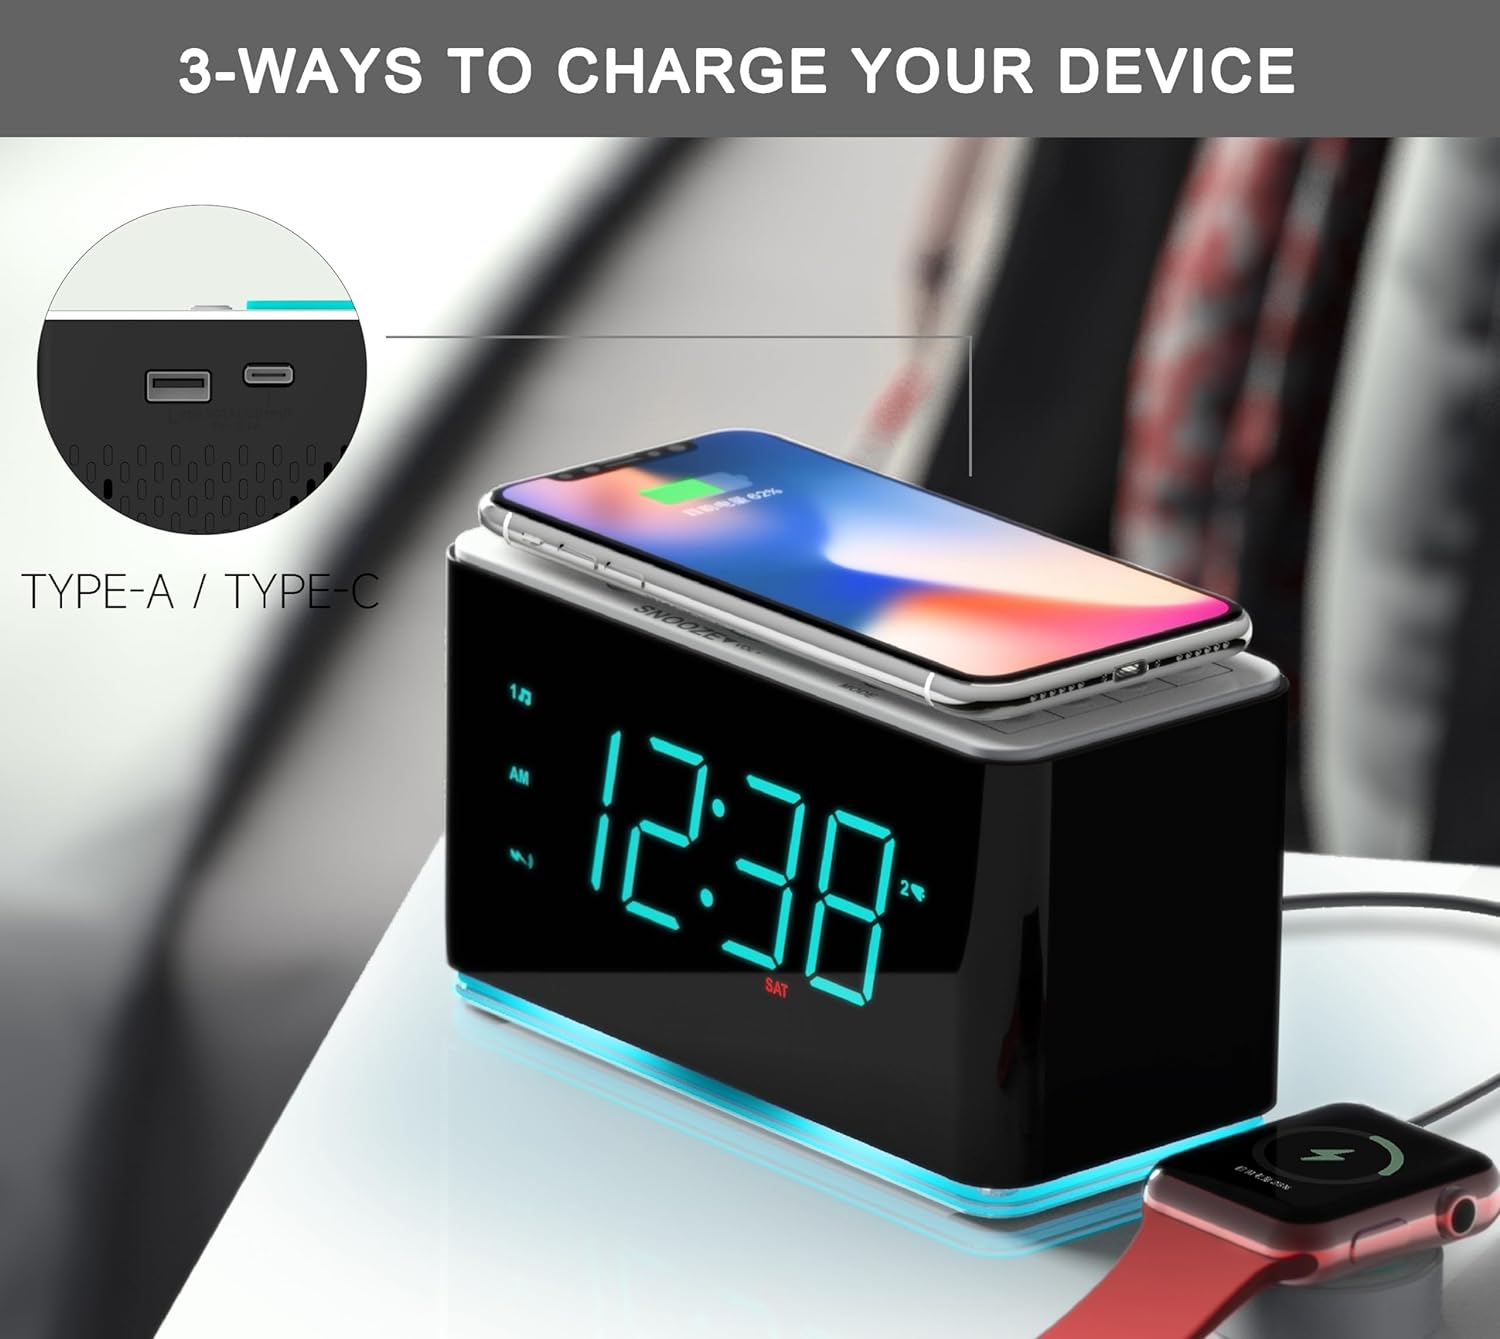
Figure 5: The iTOMA CKS207 offers versatile charging options for multiple devices.
- Wireless Charging: Place your Qi-compatible smartphone or device centered on the wireless charging pad located on top of the unit. The charging indicator will illuminate to confirm charging.
- USB-A and Type-C Charging: Connect your device's charging cable to the USB-A or Type-C port on the side of the unit. Charging will begin automatically.
Display Dimmer and Night Light

Figure 6: Adjust the display brightness to your preference with the dimmer function.
- Dimmer: Press the DIMMER button repeatedly to cycle through 5 levels of display brightness (Bright, Dim, Invisible, Off).
- Night Light: Press the LED button repeatedly to cycle through 2 levels of night light brightness or turn it off.
Sleep Timer
Press the SLEEP/TIME ZONE button repeatedly to set the sleep timer duration (e.g., 15, 30, 60, 90 minutes, or OFF). The unit will automatically turn off after the selected time.
Snooze Function
When an alarm sounds, press the SNOOZE/VOL dial to temporarily silence the alarm for approximately 9 minutes. The alarm will sound again after the snooze period. To cancel the alarm completely, press the ON/OFF button.
Maintenance
- Cleaning: Disconnect the power adapter before cleaning. Use a soft, dry cloth to wipe the unit. Do not use liquid cleaners or abrasive materials.
- Storage: If storing the unit for an extended period, disconnect it from power and remove any backup batteries. Store in a cool, dry place.
- Environment: Avoid exposing the unit to extreme temperatures, direct sunlight, dust, or moisture.
Troubleshooting
| Problem | Possible Cause | Solution |
|---|---|---|
| Unit does not power on. | Power adapter not connected or faulty. | Ensure the power adapter is securely connected to the unit and a working power outlet. |
| Display is dim or off. | Dimmer setting is too low or off. | Press the DIMMER button to adjust brightness. |
| Alarm does not sound. | Alarm is not activated or set incorrectly. | Ensure the alarm is set and activated (alarm icon visible). Check alarm volume. |
| Poor FM radio reception. | Antenna not extended or interference. | Extend the FM wire antenna fully. Reposition the unit to reduce interference. |
| Wireless charging not working. | Device not Qi-compatible or not positioned correctly. | Ensure your device supports Qi wireless charging. Reposition the device centrally on the charging pad. Remove thick phone cases. |
| Bluetooth pairing fails. | Device too far or not in pairing mode. | Ensure the unit is in Bluetooth pairing mode (flashing BT icon). Keep devices within range (approx. 10 meters). |
Specifications
| Feature | Detail |
|---|---|
| Brand | iTOMA |
| Model | CKS207 |
| Display Type | LED (Cyan) |
| Wireless Charging Output | 15W |
| Wired Charging Ports | USB-A, USB-C |
| FM Frequency Range | 87.5-108 MHz |
| Bluetooth Version | Not specified (assumed standard) |
| Power Source | Corded Electric |
| Backup Battery | 1 Lithium Metal battery (required, not included) |
| Product Dimensions | 7.5 x 3.81 x 9 cm |
| Material Type | Plastic |
Warranty and Support
iTOMA products are designed for reliability and performance. For any issues or questions not covered in this manual, please refer to the official user guide or contact iTOMA customer support.
Official User Guide (PDF): Download Here


