
Teka WMT 10610 WH
Teka WMT 10610 WH HomeCare Series Washing Machine
User Instruction Manual
1. Introduction
This manual provides essential information for the safe and efficient operation of your Teka WMT 10610 WH HomeCare Series washing machine. Please read these instructions carefully before installation and use, and keep them for future reference. This appliance is designed for domestic use only, offering a 6 kg capacity and a variety of washing programs to suit different fabric types and soil levels.
2. Safety Information
Always adhere to the following safety precautions to prevent personal injury or damage to the appliance.
- Electrical Safety: Ensure the power supply matches the rating on the appliance's label. Do not use extension cords or multiple socket adapters. Always unplug the appliance before cleaning or maintenance.
- Water Connection: Connect the water inlet hose to a cold water tap. Ensure all connections are tight to prevent leaks.
- Installation: The appliance must be installed on a firm, level surface. Ensure adequate ventilation around the machine. Do not install in areas prone to freezing temperatures.
- Child Safety: Keep children and pets away from the appliance during operation. Packaging materials can be dangerous for children.
- General Use: Do not wash items that are soiled with flammable substances. Do not open the detergent drawer or door forcefully during operation.
3. Product Overview
The Teka WMT 10610 WH washing machine features a user-friendly design with a digital display and intuitive controls.

Figure 3.1: Front view of the Teka WMT 10610 WH washing machine, showcasing its clean white design and central control panel.
3.1. Main Components
- Control Panel: Located at the top front, featuring a program selector dial, digital display, and function buttons.
- Detergent Drawer: Pull-out compartment for detergent and fabric softener.
- Door: Front-loading door for accessing the drum.
- Drum: Stainless steel drum where laundry is washed.
- Filter Cover: Located at the bottom front, covering the drain pump filter.
3.2. Control Panel

Figure 3.2: Detailed view of the control panel, showing the program dial, digital display, and touch controls for various functions.
The control panel allows you to select programs, adjust settings, and monitor the washing cycle.
- Program Selector Dial: Used to choose from 15 different washing programs.
- Digital Display: Shows remaining time, selected temperature, spin speed, and error codes.
- Temperature Button: Adjusts the wash temperature.
- Spin Speed Button: Modifies the spin speed.
- Delayed Start Button: Sets a delay for the program to begin.
- Start/Pause Button: Initiates or pauses the selected program.
3.3. Washing Drum

Figure 3.3: Interior view of the stainless steel washing drum, designed for effective and gentle cleaning.
The drum is designed to handle up to 6 kg of laundry, providing ample space for daily washing needs.
4. Setup and Installation
Proper installation is crucial for the performance and longevity of your washing machine.
4.1. Unpacking
- Remove all packaging materials, including the polystyrene base and any protective films.
- Carefully remove the transport bolts located at the rear of the machine. Keep these bolts for future transport if needed.
4.2. Location and Leveling
Place the washing machine on a solid, level floor. Adjust the leveling feet at the bottom of the machine until it is perfectly stable and level. This prevents excessive vibration and noise during operation.

Figure 4.1: General dimensions of the washing machine: 85 cm (height) x 60 cm (width) x 60 cm (depth).
4.3. Water Connection
- Connect the supplied inlet hose to the cold water tap and to the inlet valve on the back of the machine. Ensure the connections are secure to prevent leaks.
- Position the drain hose into a standpipe or over the edge of a sink, ensuring it is securely fixed to prevent displacement during draining.
4.4. Electrical Connection
Plug the power cord into a grounded electrical outlet. Ensure the outlet is easily accessible and provides the correct voltage and current as specified on the appliance's rating label.
4.5. First Use
Before the first wash, run an empty cycle (e.g., a quick wash program) without laundry or detergent to clean the drum and internal components.
5. Operating Instructions
Follow these steps for effective and efficient washing.
5.1. Loading Laundry
- Sort laundry by fabric type, color, and soil level.
- Open the washing machine door and load laundry loosely into the drum, ensuring not to overload. The maximum capacity is 6 kg.
- Close the door firmly until it clicks.

Figure 5.1: The washing machine's 6 kg capacity allows for larger loads, and the delayed programming feature offers flexibility for your schedule.
5.2. Adding Detergent and Additives
Pull out the detergent drawer and add the appropriate amount of detergent and fabric softener to their respective compartments. Refer to the detergent packaging for dosage recommendations.
5.3. Program Selection
Turn the Program Selector Dial to choose one of the 15 available washing programs. The digital display will show the default temperature and spin speed for the selected program.

Figure 5.2: The appliance features Fuzzy Logic for optimized washing and 15 distinct programs to cater to various laundry needs.
The Fuzzy Logic system automatically optimizes water, energy, and detergent consumption based on the load size and fabric type, ensuring efficient and personalized cleaning.
5.4. Adjusting Settings
Use the Temperature and Spin Speed buttons to modify these settings if desired. The digital display will update accordingly.
5.5. Delayed Start (Optional)
Press the Delayed Start button repeatedly to set a delay time for the program to begin. This allows you to schedule the wash cycle to finish at a convenient time.
5.6. Starting the Program
Press the Start/Pause button to begin the selected washing program. The display will show the remaining time.
5.7. End of Program
Once the program is complete, the machine will signal with an audible alert or a message on the display. The door will unlock after a short delay. Unload the laundry promptly.
6. Maintenance and Cleaning
Regular maintenance ensures optimal performance and extends the life of your appliance.
6.1. Cleaning the Detergent Drawer
Periodically remove the detergent drawer and rinse it under running water to remove any detergent residue or mold buildup. Clean the housing of the drawer as well.
6.2. Cleaning the Drum
Run a maintenance wash (e.g., a hot cycle with no laundry and a descaling agent or washing machine cleaner) every few months to prevent odors and limescale buildup.
6.3. Cleaning the Drain Pump Filter
The drain pump filter should be cleaned regularly to prevent blockages. Locate the filter cover at the bottom front of the machine, open it, and carefully unscrew the filter. Drain any residual water into a shallow container, clean the filter under running water, and reinsert it securely.
6.4. Cleaning the Exterior
Wipe the exterior surfaces of the washing machine with a soft, damp cloth. Do not use abrasive cleaners or solvents.
7. Troubleshooting
Before contacting customer service, try the following solutions for common issues.
| Problem | Possible Cause | Solution |
|---|---|---|
| Machine does not start | No power supply; Door not closed properly; Program not selected. | Check power plug and fuse; Ensure door is firmly closed; Select a program and press Start/Pause. |
| Water not entering machine | Water tap closed; Inlet hose kinked or blocked. | Open water tap; Straighten hose or clean filter at hose connection. |
| Water not draining | Drain hose kinked or blocked; Drain pump filter blocked. | Straighten hose; Clean drain pump filter (refer to Maintenance section). |
| Excessive vibration/noise | Machine not level; Transport bolts not removed; Uneven load. | Adjust leveling feet; Remove transport bolts; Redistribute laundry inside the drum. |
| Error code on display | Specific malfunction. | Refer to the full user manual for specific error code meanings and solutions. If persistent, contact service. |
8. Specifications
Technical details for the Teka WMT 10610 WH washing machine.
| Feature | Detail |
|---|---|
| Model Name | WMT 10610 WH |
| Product Model Number | 113920005 |
| Capacity | 6 Kilograms |
| Dimensions (H x W x D) | 85 x 60 x 60 cm |
| Weight | 50 Kilograms |
| Control Type | Tactile (Touch) |
| Loading Type | Front Load |
| Color | White |
| Special Feature | Portable |
| Energy Efficiency Rating | D (New European Energy Label) |
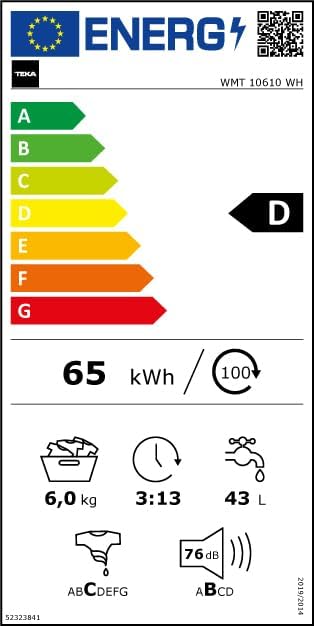
Figure 8.1: Simplified energy efficiency label, indicating a 'D' rating for the Teka WMT 10610 WH.

Figure 8.2: Detailed European energy efficiency label, providing comprehensive information on energy consumption, water usage, and noise levels.
9. Warranty and Support
Your Teka WMT 10610 WH washing machine comes with a 3-year warranty. For warranty claims or technical support, please refer to the contact information provided with your purchase documentation or visit the official Teka website. Ensure you have your product model number (113920005) and purchase details available when contacting support.
Related documentsWMT 10610 WH


Ask a question about this manual
Ask about setup, troubleshooting, compatibility, parts, safety, or missing instructions. Manuals+ will review the question and use this page’s manual context to help answer it.