
maXpeedingrods AI53
Contents
maXpeedingrods AI53 Adjustable Coilover Suspension System User Manual
Model: AI53
1. Introduction
This manual provides essential information for the installation, adjustment, and maintenance of your maXpeedingrods AI53 Adjustable Coilover Suspension System. This system is designed to enhance vehicle handling and performance through adjustable ride height and damping.
Please read this manual thoroughly before installation and operation to ensure proper function and safety.
2. Important Safety Information
WARNING: Improper installation or adjustment of suspension components can lead to loss of vehicle control, serious injury, or death. Professional installation by a qualified mechanic is strongly recommended.
- Always use appropriate safety equipment, including eye protection and gloves.
- Ensure the vehicle is securely supported on jack stands on a level surface before beginning any work. Never rely solely on a jack.
- Do not modify any components of the coilover system.
- After installation, perform a full wheel alignment by a qualified technician.
- Regularly inspect all suspension components for wear, damage, or loose fasteners.
- Refer to your vehicle's service manual for specific torque specifications for all fasteners.
3. Package Contents
Verify that all components are present and undamaged before beginning installation.
- Front Coilover Assemblies (2 units)
- Rear Coilover Assemblies (2 units)
- Adjustment Wrenches (for ride height)
- Damping Adjustment Knobs/Tools
4. Vehicle Compatibility
This maXpeedingrods AI53 Coilover Suspension System is designed for the following BMW 3 Series (E46) models:
- BMW 320i (2001-2005)
- BMW 323i (1998-2000)
- BMW 325i / 325xi (2001-2005)
- BMW 328i (1998-2000)
- BMW 330i (2001-2006)
- BMW M3 (2001-2006)
Note: This system is specifically designed for BMW 3 Series E46 chassis only.
5. Technical Specifications
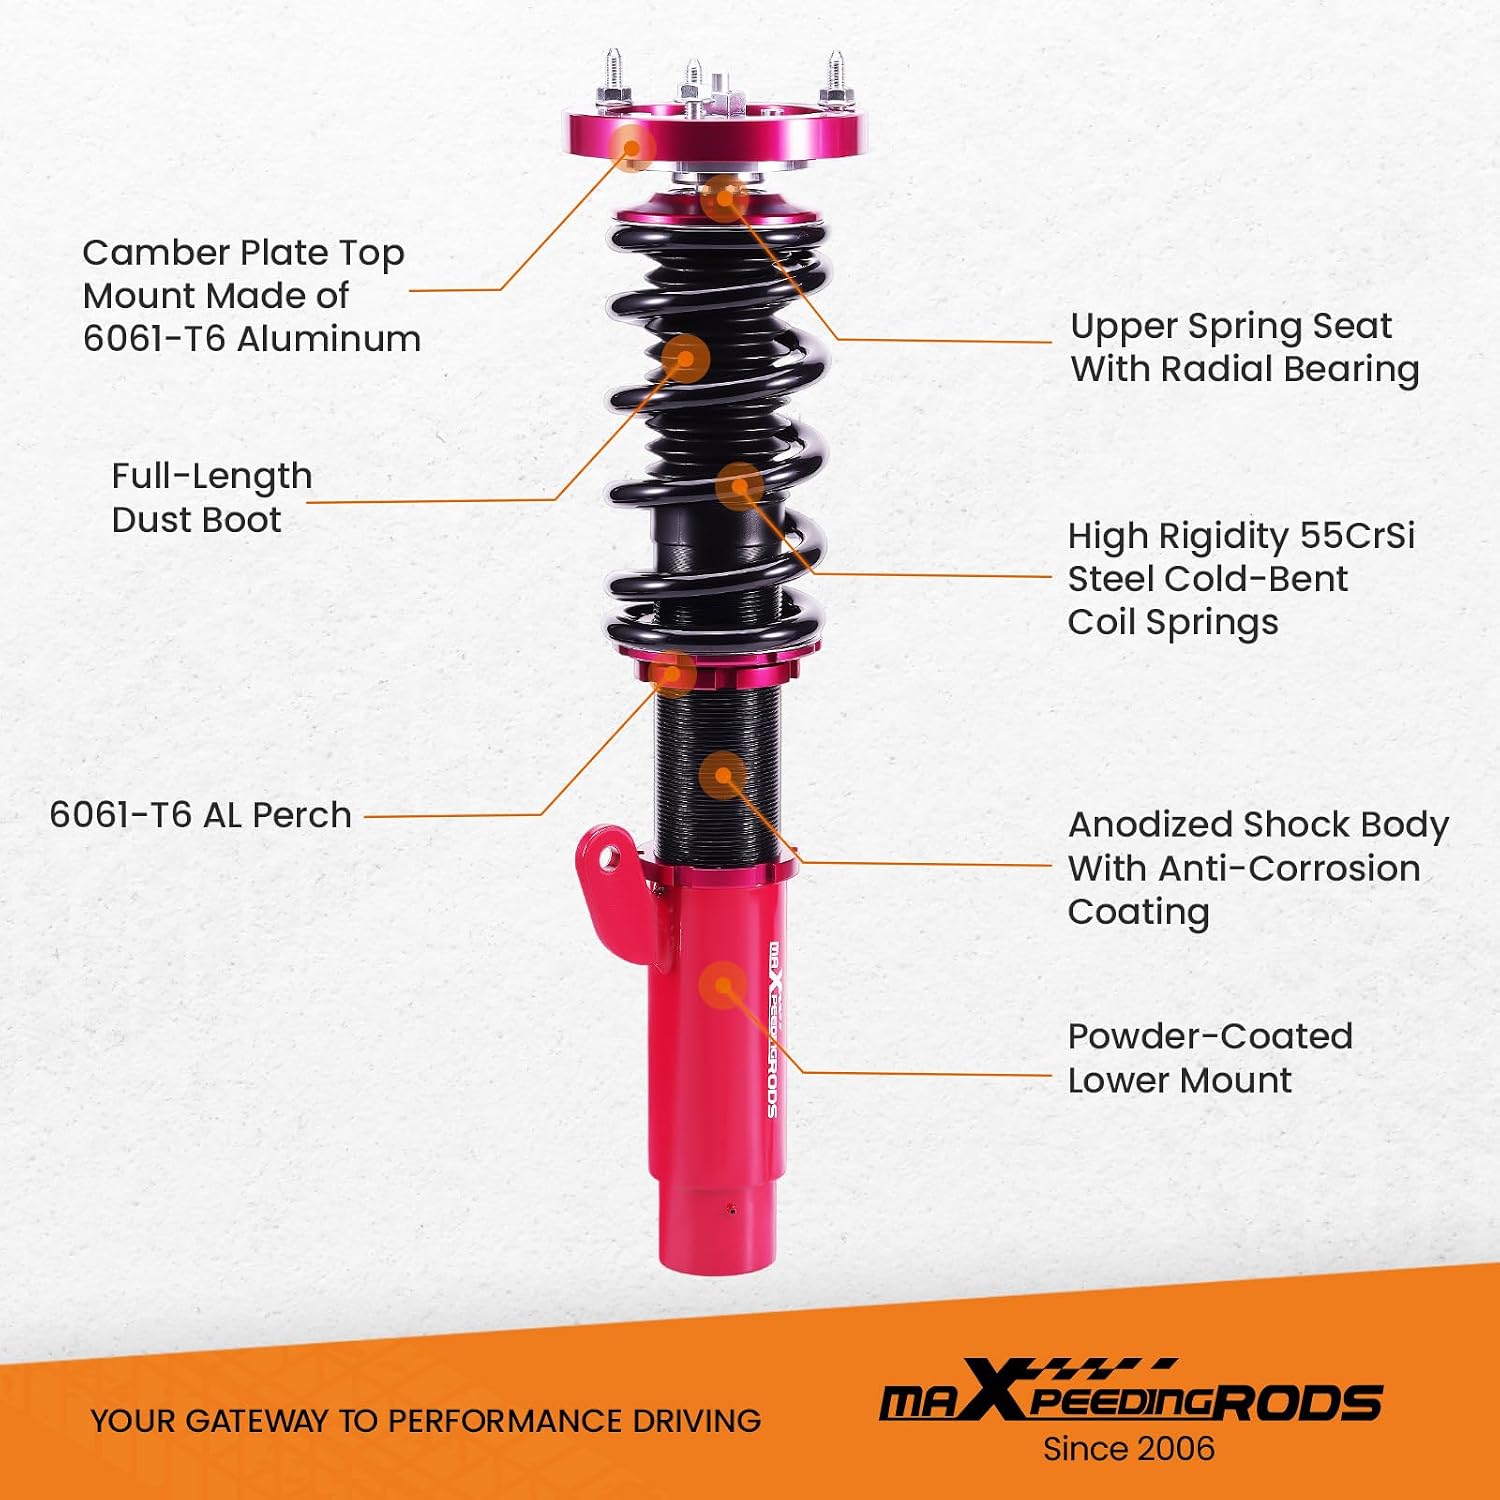
Image 1: Detailed view of coilover components, including camber plate, upper spring seat, dust boot, coil springs, perch, shock body, and lower mount.
| Feature | Specification |
|---|---|
| Model Number | AI53 |
| Front Spring Rate | 8 kg/mm |
| Rear Spring Rate | 7 kg/mm |
| Damping Adjustment | 24-step adjustable rebound/compression |
| Ride Height Adjustment | Yes, full-length adjustable |
| Camber Plate | Adjustable (front) |
| Material | Aluminum components, 55CrSi steel springs |
| Shock Body Finish | Anodized with anti-corrosion coating |
| Lower Mount Finish | Powder-coated |
6. Installation (Setup)
Installation of coilovers requires specialized tools and mechanical knowledge. If you are not confident in your abilities, seek professional installation.
General Installation Steps:
- Vehicle Preparation: Park the vehicle on a level surface. Engage the parking brake. Loosen wheel lug nuts. Lift the vehicle safely using a hydraulic jack and secure it with jack stands at appropriate lift points. Remove wheels.
- Remove OEM Suspension: Carefully disconnect brake lines, ABS sensors, sway bar links, and any other components attached to the existing strut/shock assembly. Unbolt the upper and lower mounting points of the OEM suspension. Remove the old components.
- Prepare New Coilovers: Before installation, set the initial ride height and damping settings to a neutral position (e.g., mid-range for height, 12 clicks for damping) as a starting point. Ensure all locking collars are snug but not overtightened.
- Install New Coilovers: Install the new coilover assemblies, ensuring proper orientation. Secure the upper and lower mounting bolts. Reconnect all disconnected components (brake lines, ABS sensors, sway bar links, etc.). Ensure no lines are pinched or stretched.
- Initial Adjustments: With the vehicle still on jack stands, make preliminary ride height adjustments. Ensure both sides of an axle are set equally.
- Lower Vehicle: Carefully lower the vehicle to the ground. Torque wheel lug nuts to factory specifications.
- Settling and Final Adjustments: Drive the vehicle for a short distance (e.g., 10-20 miles) to allow the suspension to settle. Re-check ride height and make fine adjustments as needed.
- Wheel Alignment: A professional wheel alignment is mandatory after coilover installation to ensure proper handling, tire wear, and safety.
7. Operation and Adjustments
7.1 Ride Height Adjustment

Image 2: Illustration of independent ride height and spring tension settings.
The AI53 coilovers feature full-length ride height adjustment, allowing you to lower or raise your vehicle. This adjustment is made by rotating the lower mount on the threaded shock body.
- Loosen Locking Collars: Using the provided adjustment wrenches, loosen the locking collars located above and below the lower mount.
- Adjust Height: Rotate the lower mount to raise or lower the vehicle. Turning it clockwise will lower the vehicle, and counter-clockwise will raise it.
- Secure Locking Collars: Once the desired height is achieved, tighten the locking collars firmly against the lower mount to prevent it from rotating during operation.
- Even Adjustment: Always adjust both sides of an axle (front or rear) to the same height to maintain vehicle balance.
- Re-check: After driving, re-check the ride height and locking collars.
Note: Significant changes in ride height may require another wheel alignment.
7.2 Damping Adjustment
The AI53 system offers 24 levels of damping adjustment, allowing you to fine-tune the ride comfort and handling characteristics. The damping adjustment knob is typically located at the top of the front coilovers and the bottom of the rear coilovers.
- Locate Adjuster: Find the damping adjustment knob. For front coilovers, it's usually on the top hat. For rear coilovers, it might be at the bottom of the shock body.
- Adjust Setting: Turn the knob clockwise for a firmer ride (more damping) and counter-clockwise for a softer ride (less damping). Each click represents a step in adjustment.
- Even Adjustment: Always adjust both coilovers on an axle to the same damping setting.
- Testing: Make small adjustments (e.g., 2-4 clicks at a time) and test drive the vehicle to feel the difference.
General Guidelines:
- Softer Settings (fewer clicks from full soft): More comfortable ride, suitable for daily driving or rough roads.
- Firmer Settings (more clicks from full soft): Improved handling, reduced body roll, suitable for spirited driving or track use.
7.3 Camber Adjustment (Front Only)

Image 3: Adjustable camber plates provide precise handling.
The front coilovers are equipped with adjustable camber plates, allowing for fine-tuning of the wheel's camber angle. This adjustment should ideally be performed by a professional during a wheel alignment.
- Loosen Top Hat Bolts: Loosen the bolts securing the top hat to the vehicle's chassis.
- Adjust Camber: Slide the top hat assembly to achieve the desired camber angle.
- Tighten Bolts: Once adjusted, securely tighten the top hat bolts.
- Professional Alignment: Camber adjustments significantly impact handling and tire wear. Always follow up with a professional wheel alignment.
8. Maintenance

Image 4: Full-length dust boot protects the rod and piston from contaminants.
Regular inspection and maintenance will prolong the life and performance of your coilover system.
- Regular Inspection: Periodically (e.g., every 6 months or 5,000 miles), inspect all coilover components for signs of wear, damage, leaks, or corrosion. Check for loose bolts, especially the upper and lower mounting bolts and locking collars.
- Cleaning: Keep the coilovers clean, especially the threaded bodies and dust boots. Dirt and debris can cause premature wear or hinder adjustments. Use mild soap and water, then rinse thoroughly.
- Lubrication: If operating in harsh environments (e.g., road salt), periodically clean and apply a thin layer of anti-seize lubricant to the threaded bodies to prevent corrosion and ensure smooth height adjustments. Avoid getting lubricant on rubber components.
- Dust Boots: Ensure the dust boots are intact and properly seated to protect the shock shaft from contaminants. Replace if torn or damaged.
9. Troubleshooting
| Symptom | Possible Cause | Solution |
|---|---|---|
| Clunking/Rattling Noise | Loose mounting bolts, loose locking collars, worn spherical bearings (if applicable), sway bar end links hitting components. | Check and re-torque all mounting bolts. Ensure locking collars are tight. Inspect bearings. Check for clearance issues with other suspension components. |
| Uneven Ride Height | Incorrect height adjustment, suspension not settled, binding components. | Re-measure and adjust height on both sides of the axle. Drive the vehicle to settle suspension. Inspect for any binding. |
| Poor Handling/Unstable Ride | Incorrect damping settings, improper wheel alignment, loose components. | Adjust damping settings. Get a professional wheel alignment. Check all fasteners. |
| Squeaking Noise | Dry bushings, dirt in spring seats, spring binding. | Clean spring seats. Inspect bushings for wear and lubricate if necessary (use appropriate lubricant for rubber). |
If troubleshooting steps do not resolve the issue, contact maXpeedingrods customer support or consult a qualified mechanic.
10. Warranty and Support
For warranty information, please refer to the documentation provided with your purchase or visit the official maXpeedingrods website. If you require technical assistance or have questions regarding your AI53 coilover system, please contact maXpeedingrods customer support directly.
Keep your purchase receipt as proof of purchase for any warranty claims.
Documents and downloads
Ask a question about this manual
Ask about setup, troubleshooting, compatibility, parts, safety, or missing instructions. Manuals+ will review the question and use this page’s manual context to help answer it.