1. Introduction
This manual provides detailed instructions for the proper use and maintenance of your RunCam ScopeCam2 4K Zoom Action Camera with a 25mm lens. Please read this manual thoroughly before operating the device to ensure optimal performance and longevity.
The RunCam ScopeCam2 4K is designed for capturing high-quality video in various action-oriented environments. Key features include:
- Ultra HD 4K Resolution for clear video recording.
- Instant-on Record Switch with vibration indication for easy operation.
- IP64 Waterproof and Shock Resistant aluminum body.
- Built-in 1400mAh rechargeable battery supporting up to 160 minutes of continuous 4K30fps recording.
- Compatibility with standard NATO/Picatinny rails for mounting.

Figure 1: RunCam ScopeCam2 4K Zoom Action Camera (25mm Lens).
2. Product Overview
2.1 Camera Components
Familiarize yourself with the various parts of your ScopeCam2 4K camera:
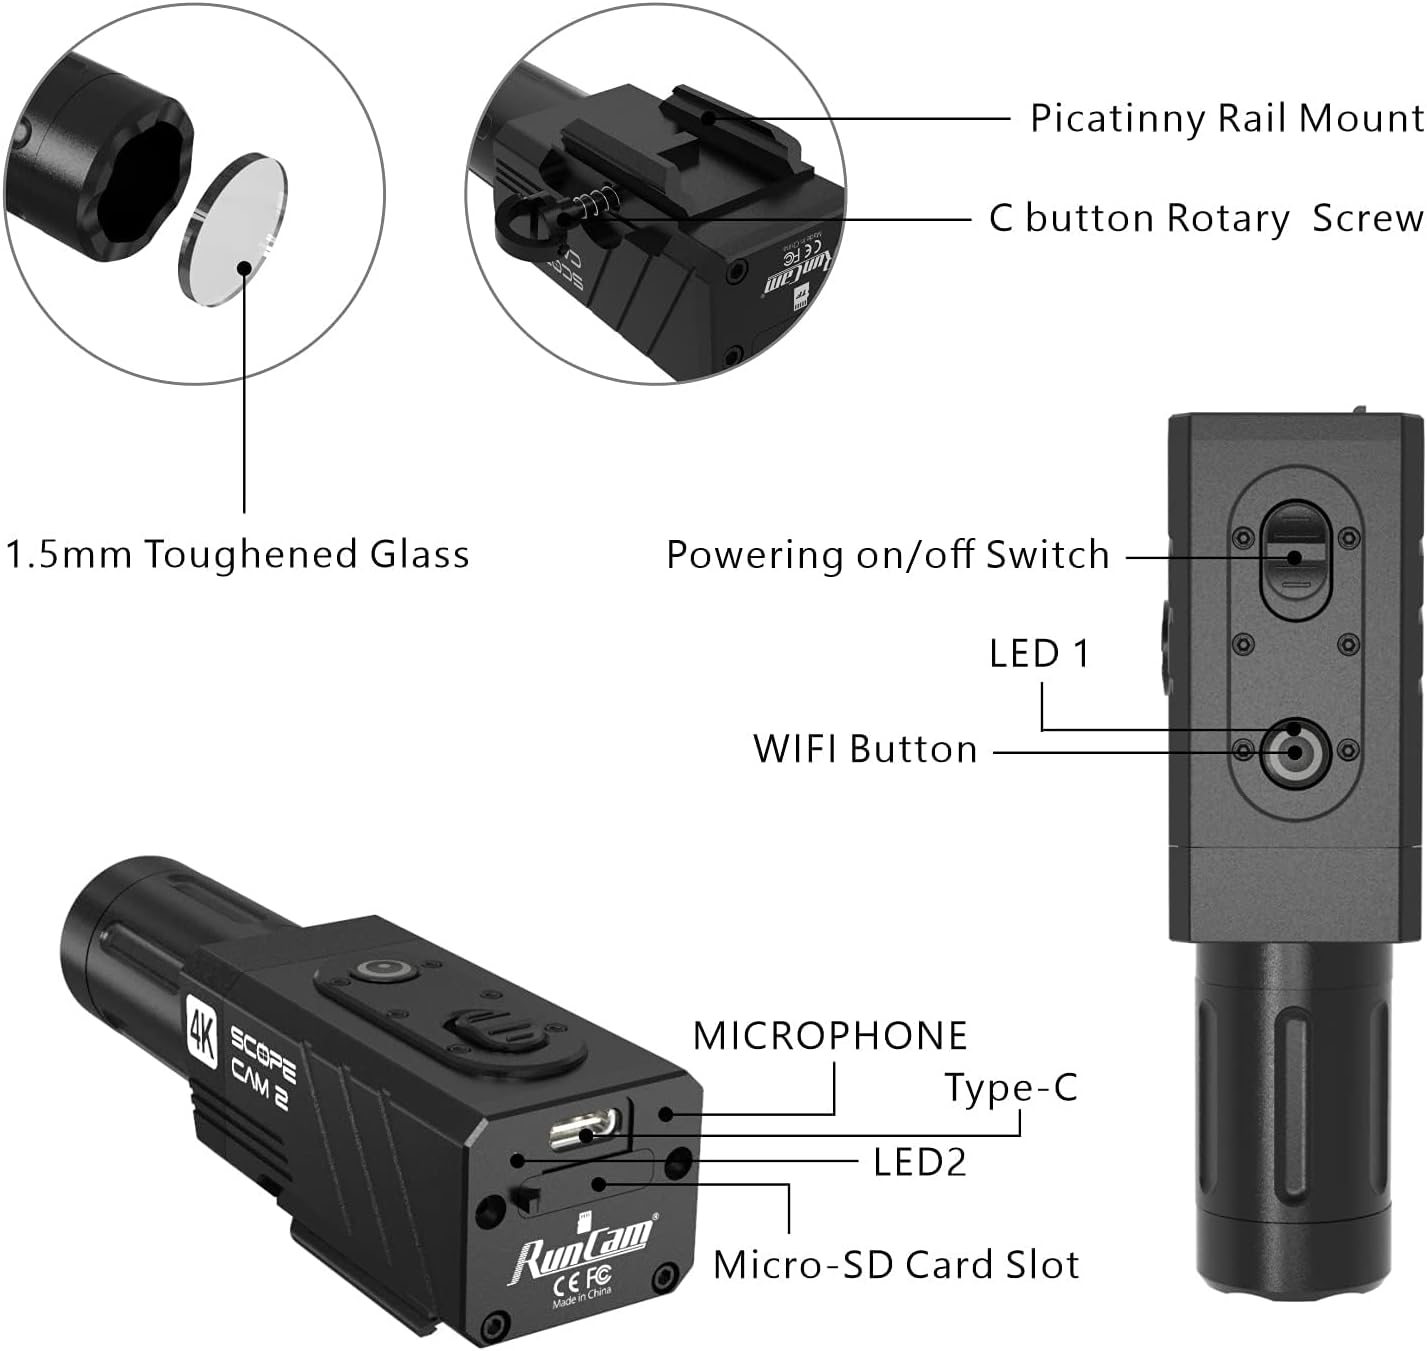
Figure 2: Detailed view of the camera's external features and ports.
- Picatinny Rail Mount: For attaching the camera to compatible rails.
- C button Rotary Screw: Secures the camera to the mount.
- 1.5mm Toughened Glass: Protective lens cover.
- Powering on/off Switch: Controls the camera's power state.
- LED 1: Status indicator light.
- WiFi Button: Activates/deactivates Wi-Fi for app connection.
- Microphone: Captures audio.
- Type-C Port: For charging and data transfer.
- LED 2: Additional status indicator light.
- Micro-SD Card Slot: For inserting the memory card.
2.2 Package Contents
The standard package includes the following items:
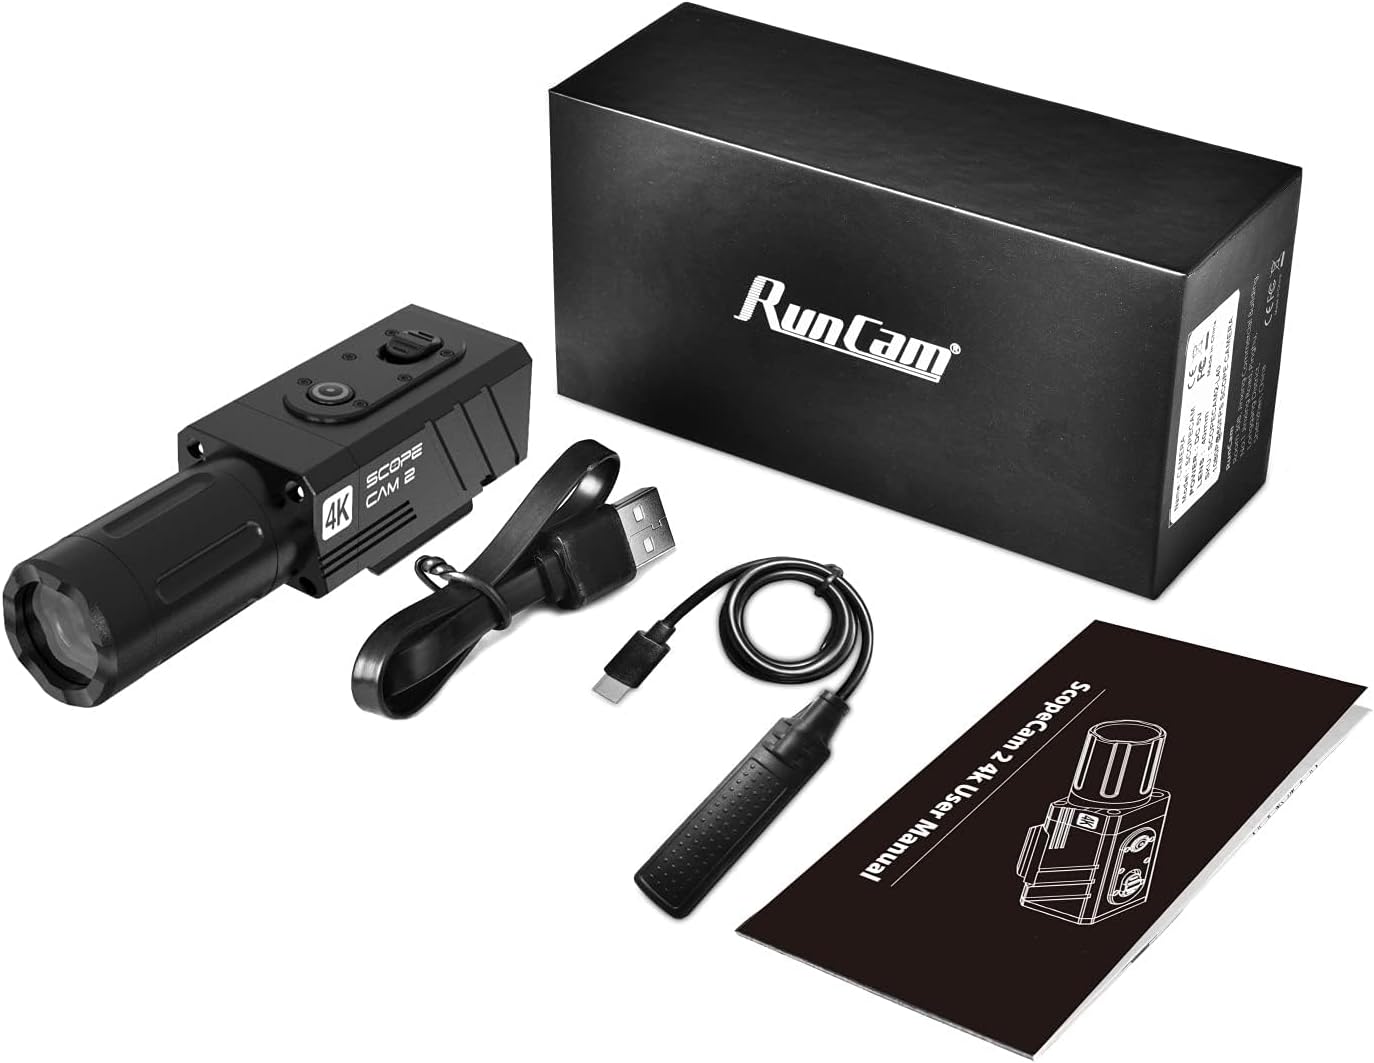
Figure 3: Items included in the product box.
- RunCam ScopeCam2 4K Camera (25mm Lens)
- USB Type-C Cable
- Recording Switch Cable
- User Manual
3. Setup
3.1 Charging the Battery
- Connect the provided USB Type-C cable to the camera's Type-C port.
- Connect the other end of the USB cable to a 5V USB power adapter (not included) or a computer USB port.
- The LED indicator will show charging status. A full charge provides up to 160 minutes of 4K30fps recording.
3.2 Inserting a Micro SD Card
A Micro SD card (not included) is required for recording. Ensure the card is Class 10 or higher for optimal performance.
- Locate the Micro-SD Card Slot on the side of the camera.
- Gently insert the Micro SD card into the slot with the contacts facing down until it clicks into place.
- To remove, push the card in again until it springs out.
3.3 Mounting the Camera
The ScopeCam2 4K features an integrated Picatinny rail mount for secure attachment.

Figure 4: Camera mounted on a Picatinny rail.
- Align the camera's Picatinny rail mount with a compatible rail on your equipment.
- Slide the camera onto the rail.
- Tighten the C button Rotary Screw to secure the camera firmly in place.
3.4 Lens Rotation
The lens can be rotated 90-270 degrees to accommodate various mounting orientations.

Figure 5: Lens rotation procedure.
- Remove the lens cap.
- Carefully remove the fixing screws of the lens mount.
- Rotate the lens assembly 90 degrees to the left or right as needed.
- Reinstall the screws and the lens cap.
4. Operation
4.1 Power On/Off
- To power on, slide the Powering on/off Switch to the 'On' position. The LED indicator will illuminate.
- To power off, slide the Powering on/off Switch to the 'Off' position. The LED indicator will turn off.
4.2 Recording Video
The camera features an instant-on record switch for quick activation.
Figure 6: The instant-on record switch.
- To start recording, slide the record button. The camera will vibrate to indicate recording has begun.
- To stop recording, pull the record button. The camera will vibrate again to confirm recording has stopped.
4.3 Pre-Recording Function
The pre-recording function captures footage before you press the record button, ensuring you don't miss critical moments. This function is only available when using the recording switch cable.
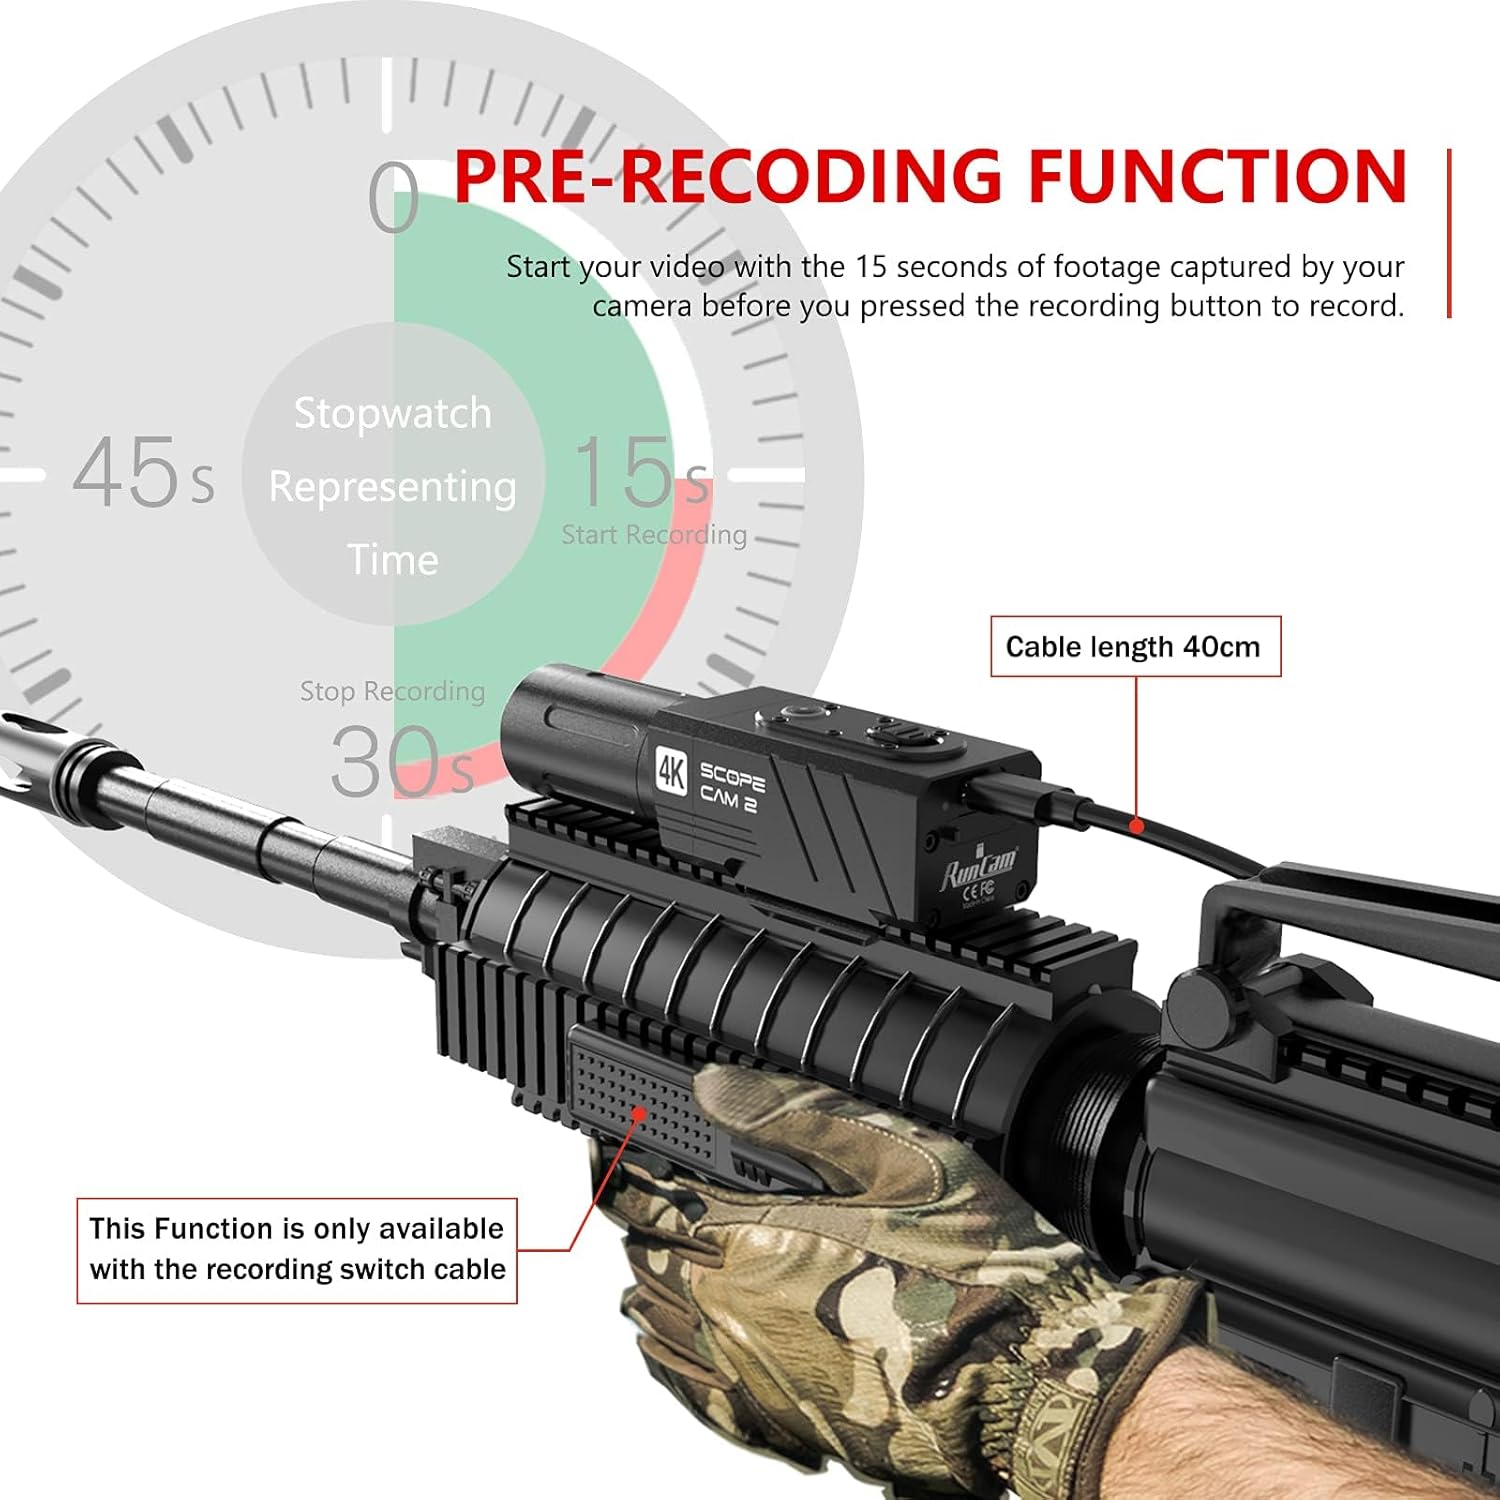
Figure 7: Pre-recording function overview.
- When the camera is powered on and the recording switch cable is connected, the camera continuously buffers video.
- Upon pressing the record button, the camera saves the buffered footage (typically 15 seconds) along with the new recording.
4.4 Wi-Fi and App Connection
Connect your camera to a smartphone for video preview, settings adjustment, and easy sharing.

Figure 8: Smartphone app interface for camera control.
- Press the WiFi Button on the camera to activate Wi-Fi. The LED indicator will change to show Wi-Fi is active.
- On your smartphone, download and install the RunCam Legacy app from your app store.
- Connect your smartphone to the camera's Wi-Fi network (SSID and password typically found on the camera or in the app).
- Open the RunCam Legacy app to access live preview, adjust settings, and manage recordings.
4.5 Digital Zoom
The camera supports 1X-4X digital zoom, allowing you to adjust the field of view.
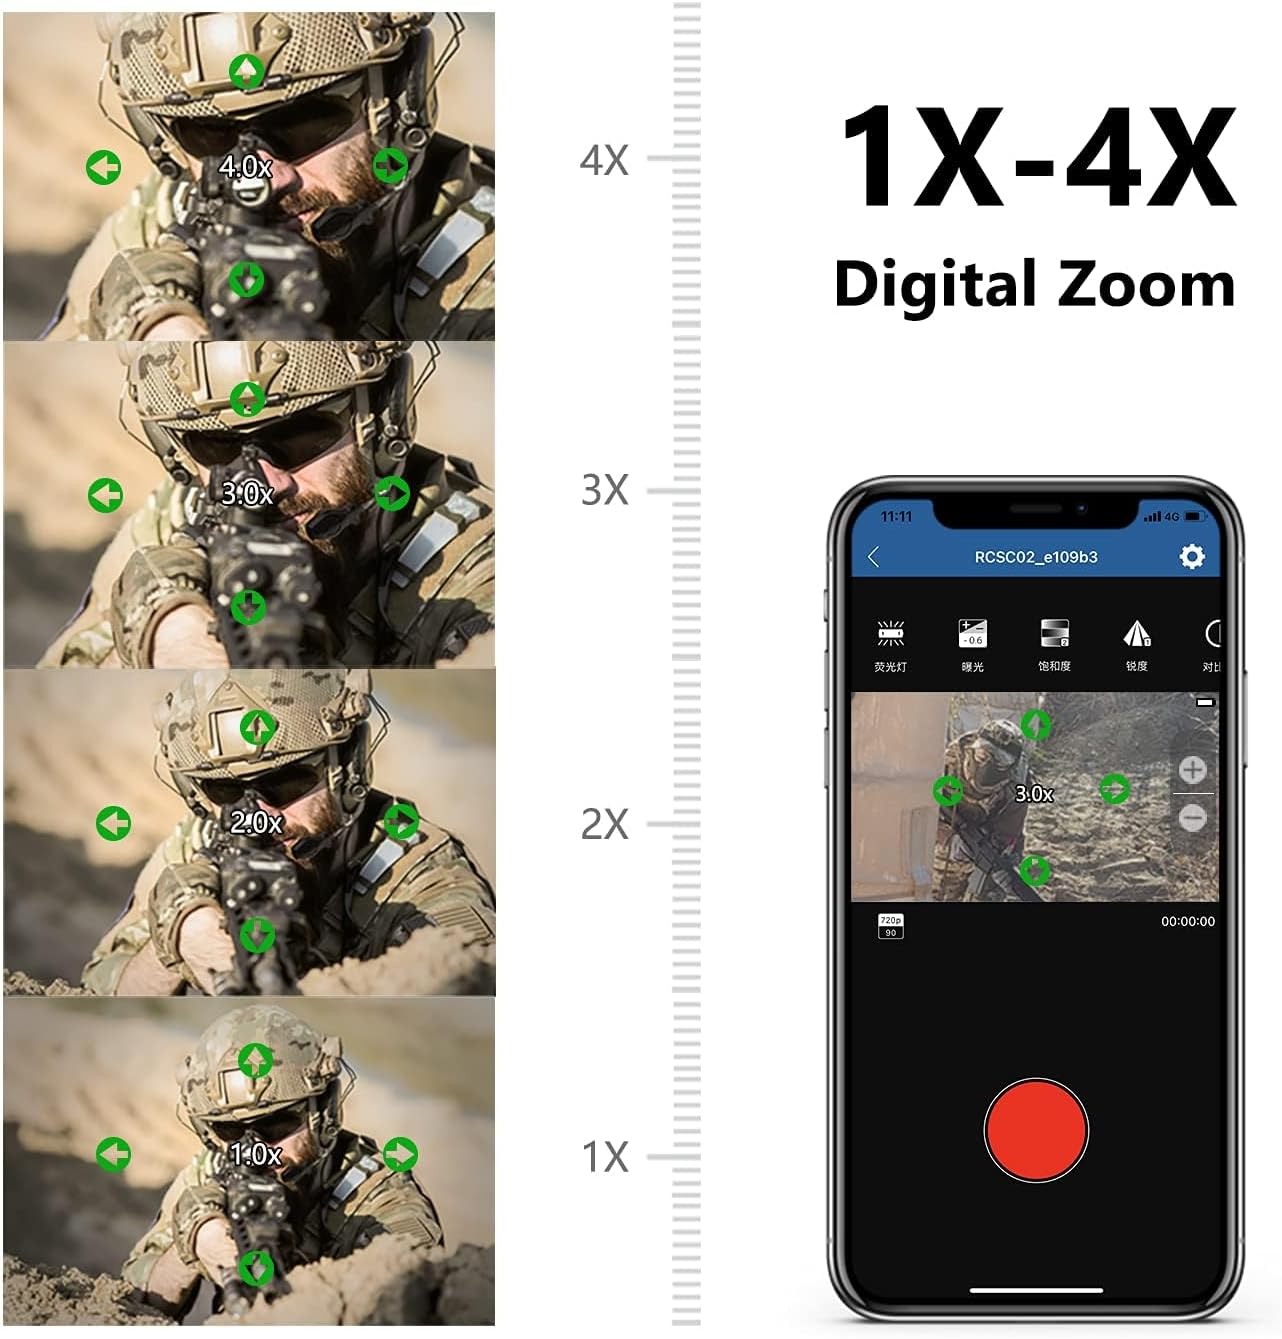
Figure 9: Digital zoom capabilities.
- Digital zoom settings can be adjusted via the RunCam Legacy smartphone app.
- Select your desired zoom level (1X, 2X, 3X, 4X) within the app's settings.
5. Maintenance
5.1 Cleaning
- Use a soft, dry cloth to clean the camera body.
- For the lens, use a specialized lens cleaning cloth and solution to avoid scratches.
- Do not use harsh chemicals or abrasive materials.
5.2 Waterproofing
The camera has an IP64 waterproof rating, protecting it from splashes and dust. It is not designed for submersion.
- Ensure all ports (Type-C, Micro-SD slot) are properly sealed before exposure to moisture.
- Avoid prolonged exposure to heavy rain or direct water jets.
5.3 Storage
- Store the camera in a cool, dry place away from direct sunlight.
- Remove the Micro SD card if storing for extended periods.
- Charge the battery periodically (every 3-6 months) to maintain battery health if not in regular use.
6. Troubleshooting
- Camera not powering on: Ensure the battery is charged. Connect to a power source and check the charging indicator.
- Recording issues: Verify that a Micro SD card is inserted correctly and has sufficient free space. Ensure the card is Class 10 or higher. Try formatting the SD card (via the app or a computer) if issues persist.
- App connection problems: Ensure Wi-Fi is enabled on the camera and your smartphone. Confirm you have downloaded the RunCam Legacy app, not other RunCam apps. Restart both the camera and your smartphone, then attempt to reconnect.
- Video files unreadable: This can sometimes occur due to improper shutdown or SD card issues. Ensure the camera is powered off correctly after recording. Try formatting the SD card.
- No audio in recordings: Check if the microphone port is obstructed. Note that some camera configurations or settings might affect audio capture.
7. Specifications
| Feature | Specification |
|---|---|
| Brand | RunCam |
| Model Number | ScopeCam2 |
| Video Capture Resolution | 4K |
| Item Weight | 5.1 ounces |
| Product Dimensions | 3.66 x 1.26 x 1.42 inches |
| Batteries | 1 Lithium Ion battery (included) |
| Special Features | Waterproof (IP64) |
| Flash Memory Type | Micro SD |
| Video Capture Format | MP4 |
| Supported Audio Format | AAC, MP3 |
| Connectivity Technology | USB, Wi-Fi |
8. Warranty and Support
For detailed warranty information, please refer to the official RunCam website or the warranty card included with your product. If you encounter any issues not covered in this manual, please contact RunCam customer support.
An electronic version of this user manual is available for download:


