1. Introduction
Thank you for choosing the Crunch SA-2100.4 Smash Series 4-Channel Class AB Amplifier. This amplifier is designed to deliver powerful and clear audio performance for your car audio system. Its robust design includes a heat sink to ensure optimal cooling and reliable operation. This manual provides essential information for the proper installation, operation, and maintenance of your new amplifier.

Figure 1.1: Crunch SA-2100.4 Amplifier and included accessories, including the amplifier unit, wiring kit, and a phone holder.
2. Important Safety Information
Please read all instructions carefully before installing and operating your amplifier. Failure to follow these guidelines may result in damage to the amplifier, vehicle, or personal injury.
- Professional Installation Recommended: Due to the complexity of car audio systems, professional installation is highly recommended.
- Power Source: Ensure the vehicle's battery is disconnected before making any power connections to prevent electrical shorts.
- Ventilation: Install the amplifier in a location that allows for adequate air circulation to prevent overheating. Do not block cooling fins.
- Wiring: Use appropriate gauge wiring for power, ground, and speaker connections as specified in this manual. Improper wiring can cause fire or damage.
- Moisture: Keep the amplifier away from moisture and water.
- Mounting: Securely mount the amplifier to prevent it from becoming a projectile in the event of a sudden stop or collision.
3. Package Contents
Upon unpacking, please verify that all items listed below are present and in good condition:
- Crunch SA-2100.4 4-Channel Class AB Amplifier
- Power and Speaker Wiring Kit (as part of the bundle)
- Gravity Magnet Phone Holder (as part of the bundle)
- User Manual (this document)
4. Key Features
The Crunch SA-2100.4 amplifier boasts the following features:
- Power Output:
- 4 channels x 85 watts at 2 ohms
- 4 channels x 65 watts at 4 ohms
- 2 channels x 130 watts (mono bridged) at 4 ohms
- Operating Modes: Operates in 4-channel stereo, dual stereo bridged, stereo + bridged mono, or dual bridged mono configurations.
- Crossover: Fully adjustable variable electronic crossover: 12 dB per octave.
- Heat Sink: Efficient heat sink design for optimal thermal management.
- Class AB Topology: Delivers a balance of sound quality and efficiency.
5. Installation and Setup
Proper installation is crucial for the performance and longevity of your amplifier. It is highly recommended to have this amplifier installed by a qualified car audio professional.
5.1 Mounting Location
Choose a mounting location that is dry, well-ventilated, and secure. Avoid mounting the amplifier directly on carpet or in enclosed spaces that restrict airflow. Ensure the amplifier is mounted firmly to prevent movement.
5.2 Wiring Connections
Before making any connections, disconnect the vehicle's negative battery terminal.
5.2.1 Power and Ground Connections

Figure 5.1: Rear panel of the SA-2100.4 amplifier, highlighting the power input, ground, remote turn-on, and speaker output terminals.
- Power (+12V): Connect a 4-gauge power cable directly from the positive terminal of the vehicle's battery to the +12V terminal on the amplifier. Install an in-line fuse holder (included in the kit) within 18 inches (45 cm) of the battery.
- Ground (GND): Connect a 4-gauge ground cable from the GND terminal on the amplifier to a clean, unpainted metal surface on the vehicle's chassis. Ensure a solid, low-resistance connection.
- Remote (REM): Connect a remote turn-on wire from your head unit's remote output to the REM terminal on the amplifier. This wire turns the amplifier on and off with your head unit.
5.2.2 Speaker Connections
Connect your speakers to the "SPEAKER OUTPUT" terminals. The SA-2100.4 is a 4-channel amplifier, allowing for various speaker configurations (stereo, bridged mono). Refer to the diagram on the amplifier's rear panel for correct polarity and bridging options.
- Stereo Mode: Connect each speaker to its respective channel (CH1, CH2, CH3, CH4) ensuring correct positive (+) and negative (-) polarity.
- Bridged Mono Mode: For higher power output to subwoofers or single speakers, bridge channels as indicated on the amplifier (e.g., CH1/CH2 bridged, CH3/CH4 bridged). Connect the speaker to the designated bridged terminals.
5.2.3 RCA Input Connections
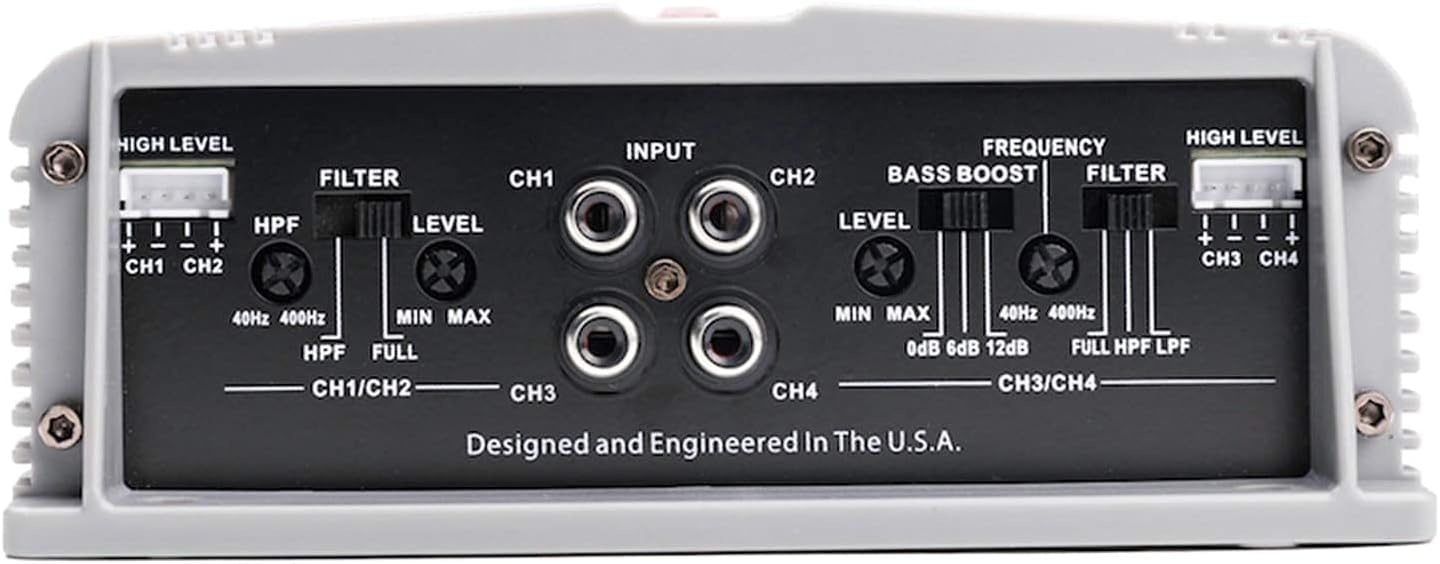
Figure 5.2: Front panel of the SA-2100.4 amplifier, displaying RCA input jacks, gain level controls, bass boost, and crossover frequency adjustments.
Connect RCA cables from your head unit's pre-amp outputs to the "INPUT" RCA jacks on the amplifier. For 4-channel operation, connect all four RCA inputs (CH1, CH2, CH3, CH4). For 2-channel input to drive all 4 channels, some head units may require Y-splitters, or the amplifier may have an internal summing feature (refer to specific amplifier details if available).
6. Operation and Adjustments
Once installed, you can fine-tune the amplifier's settings for optimal sound performance.
6.1 Gain Level Adjustment
The "LEVEL" controls (CH1/CH2 and CH3/CH4) adjust the input sensitivity of the amplifier. Start with the level set to minimum (MIN). Play a familiar piece of music at about 75% of your head unit's maximum volume. Slowly increase the amplifier's gain level until you hear distortion, then back off slightly. This ensures the amplifier is receiving a strong, clean signal without clipping.
6.2 Crossover Settings
The SA-2100.4 features a fully adjustable variable electronic crossover (12 dB per octave) for each channel pair (CH1/CH2 and CH3/CH4). This allows you to filter out unwanted frequencies from your speakers.
- HPF (High Pass Filter): Used for full-range speakers or tweeters. This setting allows frequencies above the set point to pass through. Adjust between 40Hz and 400Hz.
- LPF (Low Pass Filter): Used primarily for subwoofers. This setting allows frequencies below the set point to pass through. Adjust between 40Hz and 400Hz.
- FULL: Bypasses the crossover, allowing the full frequency range to pass through.
Set the crossover according to the type of speakers connected to each channel. For example, if connecting full-range speakers, you might use HPF to remove low bass frequencies they cannot reproduce efficiently. If connecting subwoofers, use LPF.
6.3 Bass Boost
The "BASS BOOST" control (CH3/CH4) allows you to increase the bass output at a specific frequency (typically around 45Hz). This can be adjusted from 0dB to 12dB. Use this feature sparingly, as excessive bass boost can lead to distortion and potential speaker damage.
7. Care and Maintenance
To ensure the long life and optimal performance of your Crunch amplifier, follow these simple maintenance guidelines:
- Cleaning: Use a soft, dry cloth to wipe down the amplifier's exterior. Do not use harsh chemicals or abrasive cleaners.
- Ventilation: Periodically check that the cooling fins are free from dust and debris. Ensure nothing is obstructing airflow around the amplifier.
- Connections: Occasionally check all wiring connections to ensure they are secure and free from corrosion.
- Environment: Avoid exposing the amplifier to extreme temperatures, direct sunlight, or excessive moisture.
8. Troubleshooting
If you experience problems with your amplifier, refer to the following common issues and solutions before contacting support.
| Problem | Possible Cause | Solution |
|---|---|---|
| No Power / Amplifier Not Turning On |
|
|
| No Sound Output |
|
|
| Distorted Sound |
|
|
| Amplifier Overheating / Protection Mode |
|
|
9. Specifications
Technical specifications for the Crunch SA-2100.4 Amplifier:
| Model Number | SA-2100.4 (Internal: f2e861bb-528a-4ada-a6fa-699222d7f542) |
| Brand | Crunch |
| Channels | 4-Channel |
| Amplifier Class | Class AB |
| Power Output (RMS) |
|
| Crossover | Variable Electronic, 12 dB per Octave (HPF/LPF: 40Hz - 400Hz) |
| Bass Boost | 0dB - 12dB (on CH3/CH4) |
| Noise Level | 12 dB |
| Item Weight | 10 pounds (approx. 4.54 kg) |
| Package Dimensions | 9 x 8 x 7 inches (approx. 22.86 x 20.32 x 17.78 cm) |
| Manufacturer | CRUNCH AUDIO |
| Date First Available | May 16, 2021 |
| UPC | 789591810075 |
10. Warranty and Support
Crunch amplifiers are designed for reliability and performance. For specific warranty terms and conditions, please refer to the warranty card included with your product or visit the official Crunch Audio website. Keep your proof of purchase for warranty claims.
For technical support, troubleshooting assistance beyond this manual, or warranty inquiries, please contact Crunch Audio customer service through their official website or authorized dealer.
Official Brand Store: Visit the Crunch Store on Amazon


