Introduction
This manual provides detailed instructions for the setup, operation, and maintenance of your EVTSCAN Underwater Fishing Camera. Please read this manual thoroughly before using the product to ensure proper function and longevity. This device is designed to enhance your fishing experience by providing clear underwater visibility.
Package Contents
Verify that all items listed below are included in your package:
- 1 x Case and Monitor
- 1 x Camera And Cable
- 1 x Battery (Power Control Box)
- 1 x Charger
- 1 x Float
- 1 x Installation Kit
- 1 x Cover
- 1 x Bandage
- 1 x Sun Visor
- 1 x User Manual (this document)

Image 1: Complete EVTSCAN Underwater Fishing Camera kit, including the monitor, camera, cables, and power adapter, neatly arranged within its protective case.
Product Features
The EVTSCAN Underwater Fishing Camera offers the following key features:
- Durable Cable: Cold-resistant, waterproof, and pull-resistant cables for extended use.
- Advanced Illumination: Features 15 white LEDs and 15 infrared lamps. Offers four LED modes (White LED on, IR LED on, all LED on, all LED off) with adjustable brightness for optimal image quality in various conditions.
- Integrated Design: Exquisite aluminum box design for easy transport and storage, requiring no assembly. All accessories fit securely within the case.
- Extended Cable Length: Includes a 30-meter camera extension cable, designed to be cold-resistant, waterproof, and pull-resistant.
- High-Visibility Monitor: Equipped with a 9-inch TFT color monitor and a sun-visor for clear viewing even in bright outdoor sunlight.

Image 2: Detailed view of the underwater camera unit, highlighting the array of 15 white LEDs and 15 infrared lamps surrounding the lens, designed for enhanced visibility.
Setup Instructions
- Charge the Battery: Before first use, fully charge the battery using the provided charger. Connect the charger to the power control box and a standard electrical outlet. The battery indicator lights on the power control box will show charging status.
- Connect the Camera: Connect the camera cable to the designated input on the power control box. Ensure a secure connection.
- Connect the Monitor: Connect the monitor's video input cable to the corresponding output on the power control box.
- Mount the Sun Visor: Attach the sun visor to the monitor for improved visibility in bright conditions.
- Prepare the Camera for Deployment: Attach the float to the camera cable at the desired depth to control the camera's position in the water. Use the installation kit to secure the camera if needed.
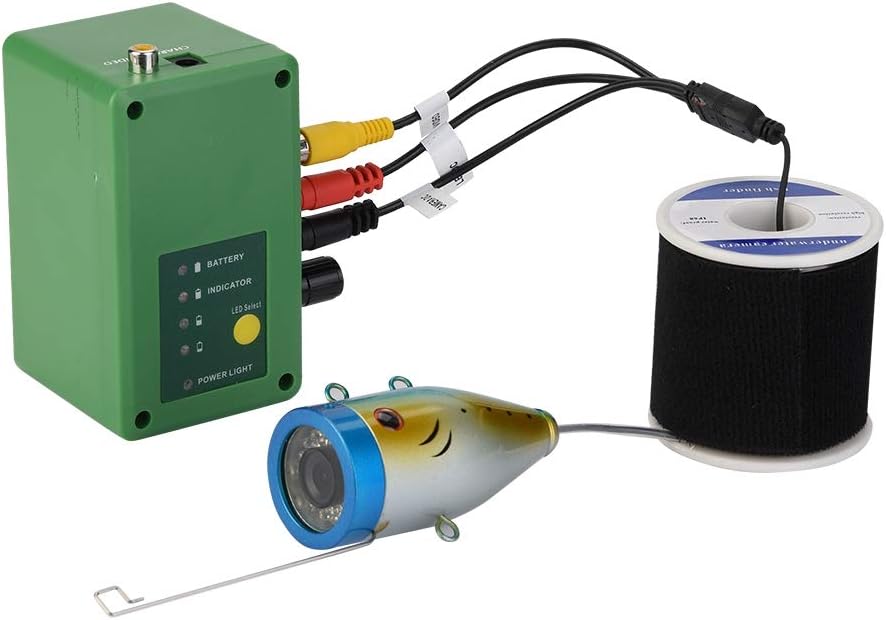
Image 3: Illustration of the connection points: the camera cable connecting to the power control box, and the power control box connecting to the monitor via video cables.
Operating Instructions
- Power On: Press the power button on the power control box to turn on the system. The monitor will display the live camera feed.
- Deploy the Camera: Carefully lower the camera into the water to the desired depth. Adjust the float as necessary to maintain the camera's position and orientation.
- Adjust LED Lighting: Use the controls on the power control box or monitor (if available) to cycle through the four LED modes (White LED on, IR LED on, all LED on, all LED off) and adjust brightness. This allows for optimal visibility in varying light conditions underwater.
- Monitor Viewing: Observe the underwater environment on the 9-inch TFT color monitor. The sun visor helps reduce glare for clearer viewing.
- Power Off: When finished, retrieve the camera from the water. Press and hold the power button on the power control box to turn off the system.

Image 4: The 9-inch monitor displaying a vibrant underwater scene, demonstrating the camera's clear imaging capabilities.
Maintenance
- Cleaning: After each use, gently wipe the camera lens and monitor screen with a soft, damp cloth. Ensure all components are dry before storage.
- Storage: Store the camera system in its protective aluminum case in a cool, dry place away from direct sunlight.
- Battery Care: To prolong battery life, avoid fully discharging the battery frequently. Recharge the battery periodically if not used for extended periods.
- Cable Inspection: Regularly inspect the camera cable for any signs of wear, cuts, or damage. Replace if necessary to maintain waterproof integrity.
Troubleshooting
| Problem | Possible Cause | Solution |
|---|---|---|
| No image on monitor |
|
|
| Poor image quality |
|
|
| Short battery life |
|
|
Specifications
| Feature | Detail |
|---|---|
| Display Size | 9 inches |
| Display Resolution | 1204*600 |
| Monitor Input Voltage | 12V DC |
| Image Sensor | CMOS Sensor |
| Waterproof Rating | IP68 (Camera) |
| Viewing Angle | 90 Degrees |
| Visible Distance (Clear Water) | 1-3 meters |
| Night Vision | 15 white LEDs, 15 infrared lamps |
| Camera Resolution | 1000TVL |
| Camera Material | Aluminum alloy |
| Battery Capacity | 4400AH |
| Battery Standby Time | Approximately 8 hours |
| Camera Cable Length | 30 meters |
| Product Dimensions | Approx. 38.5 x 90mm (Camera) / 0.39 x 0.39 x 0.39 inches (Overall Product) |
| Item Weight | 2.4 Kilograms (5.28 pounds) |
Warranty and Support
For warranty information or technical support, please refer to the contact details provided with your purchase documentation or visit the official EVTSCAN website. Keep your purchase receipt as proof of purchase for warranty claims.