
1. Important Safety Instructions
Please read and understand all safety instructions before operating the paint sprayer. Failure to follow these instructions may result in electric shock, fire, and/or serious injury.
- Trigger Operation: Always press the trigger firmly to ensure proper paint flow and prevent spraying only air, which can lead to inconsistent results.
- Continuous Operation: Avoid continuous long-duration operation to prevent motor overheating and potential damage. Allow the unit to cool down periodically during extended use.
- Small Item Spraying: When spraying small items such as chairs or small cabinets, it is recommended to use a small flow mode to prevent paint splashes and drips, ensuring a smoother finish.
- Material Compatibility: Ensure that the paint or coating material is compatible with the sprayer and properly thinned according to manufacturer recommendations.
- Personal Protective Equipment: Always wear appropriate personal protective equipment, including safety glasses, gloves, and a respirator, to protect against paint fumes and overspray.
- Ventilation: Use the sprayer in a well-ventilated area to prevent the buildup of flammable vapors.
- Cleaning: Always clean the sprayer thoroughly after each use to prevent clogging and ensure optimal performance for future projects.
2. Product Overview and Components
The Prostormer 750W HVLP Electric Paint Sprayer is designed for efficient and easy home painting. It features a powerful motor, a large container, and multiple nozzle sizes for various applications.

Figure 2.1: Product Information and Key Specifications

Figure 2.2: Exploded view of the paint sprayer components, including the main unit, spray attachment, container, and nozzles.
Included Components:
- 1 x Prostormer Electric Paint Sprayer (Main Unit)
- 1 x 1200ml Detachable Container
- 4 x Nozzles (Φ1.5mm, Φ1.8mm, Φ2.2mm, Φ2.6mm)
- 1 x Funnel
- 1 x Cleaning Needle
- 1 x Cleaning Brush
- 1 x User Manual (this document)
3. Setup
Proper assembly and preparation are crucial for optimal performance.
3.1 Assembling the Spray Gun
- Attach the spray attachment to the main motor unit. Ensure it clicks securely into place.
- Select the appropriate nozzle for your paint material and desired spray pattern. The nozzles are color-coded for easy identification (e.g., 1.5mm, 1.8mm, 2.2mm, 2.6mm).
- Insert the chosen nozzle into the spray attachment and secure it with the union nut.
- Attach the 1200ml container to the spray attachment by screwing it on until it is hand-tight.
Video 3.1: Detailed unboxing and assembly guide for the Prostormer Paint Sprayer, demonstrating how to attach components and select nozzles.
3.2 Preparing Coating Material
Most paints and coating materials require thinning to achieve the optimal viscosity for spraying. Use the included funnel to check viscosity.
- Consult your paint manufacturer's instructions for specific thinning ratios.
- A common starting point for latex paint is to mix approximately 150 ml of water with 850 ml of paint, then shake well. Adjust as needed.
- Use the funnel to test the thinned material. If the material flows smoothly through the funnel without clumping or excessive dripping, it is ready for use.
- Fill the 1200ml container with the prepared coating material.
4. Operating Instructions
Follow these steps for effective and safe operation of your paint sprayer.
4.1 Adjusting Flow Rate
The flow control knob, located near the trigger, allows you to adjust the paint output. Turn the knob to increase or decrease the flow rate to match your project's requirements and the viscosity of the material.
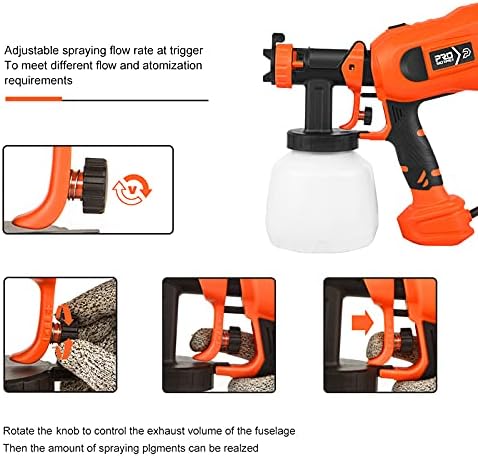
Figure 4.1: Adjusting the flow control knob to regulate paint output.
4.2 Adjusting Spray Pattern
The air cap on the front of the spray gun can be rotated to select one of three spray patterns: horizontal, vertical, or circular. This allows for versatility across different surfaces and project types.
- Horizontal: Ideal for wide surfaces.
- Vertical: Suitable for up-and-down movements on taller surfaces.
- Circular: Best for small areas, corners, and edges.

Figure 4.2: Visual representation of the three adjustable spray patterns.
4.3 Spraying Technique
- Hold the spray gun at a consistent distance (typically 6-12 inches) from the surface.
- Move the gun in smooth, even strokes, overlapping each pass by about 50% to ensure uniform coverage.
- Avoid tilting the gun excessively, as this can affect paint pickup from the container.
- Always press the trigger firmly to initiate spray. Releasing the trigger will stop the paint flow.
Video 4.3: Demonstration of the Prostormer Paint Sprayer in use, showcasing various spray patterns and application techniques.
5. Maintenance
Regular cleaning and maintenance will extend the life of your paint sprayer and ensure consistent performance.
5.1 Cleaning After Use
- Empty any remaining paint from the container back into its original can.
- Fill the container with an appropriate cleaning solution (water for water-based paints, mineral spirits for oil-based paints).
- Spray the cleaning solution through the gun until it runs clear.
- Disassemble the spray attachment, including the nozzle, air cap, and union nut.
- Use the provided cleaning brush and needle to thoroughly clean all components, removing any paint residue. Pay special attention to the nozzle and air cap holes.
- Wipe down the exterior of the main unit with a damp cloth.
- Allow all components to dry completely before reassembling and storing the sprayer.
6. Troubleshooting
If you encounter issues with your paint sprayer, refer to the table below for common problems and solutions.
| Problem | Possible Cause | Solution |
|---|---|---|
| Sprayer only emits air, no paint | Trigger not fully depressed; paint too thick; clogged nozzle/pickup tube. | Press trigger firmly; thin paint; clean nozzle/pickup tube. |
| Inconsistent spray pattern or spitting | Paint too thick; incorrect nozzle size; air cap/nozzle clogged; low paint level. | Thin paint; select appropriate nozzle; clean components; refill container. |
| Motor overheating | Prolonged continuous operation; blocked air vents. | Allow unit to cool; clean air vents. |
| Paint leaks from spray gun | Loose connections; damaged O-rings/seals. | Tighten all connections; inspect and replace damaged seals. |
7. Specifications
| Feature | Specification |
|---|---|
| Brand | Prostormer |
| Model Number | PRO-PSASG1000D |
| Power | 750 Watts |
| Voltage | 120V |
| Frequency | 60Hz |
| Container Volume | 1200ml |
| Maximum Pressure | 18kPa |
| Nozzle Diameter Options | Φ1.5mm, Φ1.8mm, Φ2.2mm, Φ2.6mm |
| Power Source | Corded Electric |
8. Warranty and Support
For warranty information or technical support, please refer to the contact details provided with your product packaging or visit the official Prostormer website. Keep your purchase receipt as proof of purchase.
Always follow manufacturer guidelines for safe handling, usage, maintenance, and disposal of the product.