1. Introduction
This manual provides essential instructions for the safe and efficient operation, installation, and maintenance of your CAMPLUX Portable Propane Water Heater, Model BW264P120. This unit is designed to provide instant hot water for various outdoor and off-grid applications, including camping, RVs, remote cabins, and tiny houses. Please read this manual thoroughly before use and retain it for future reference.
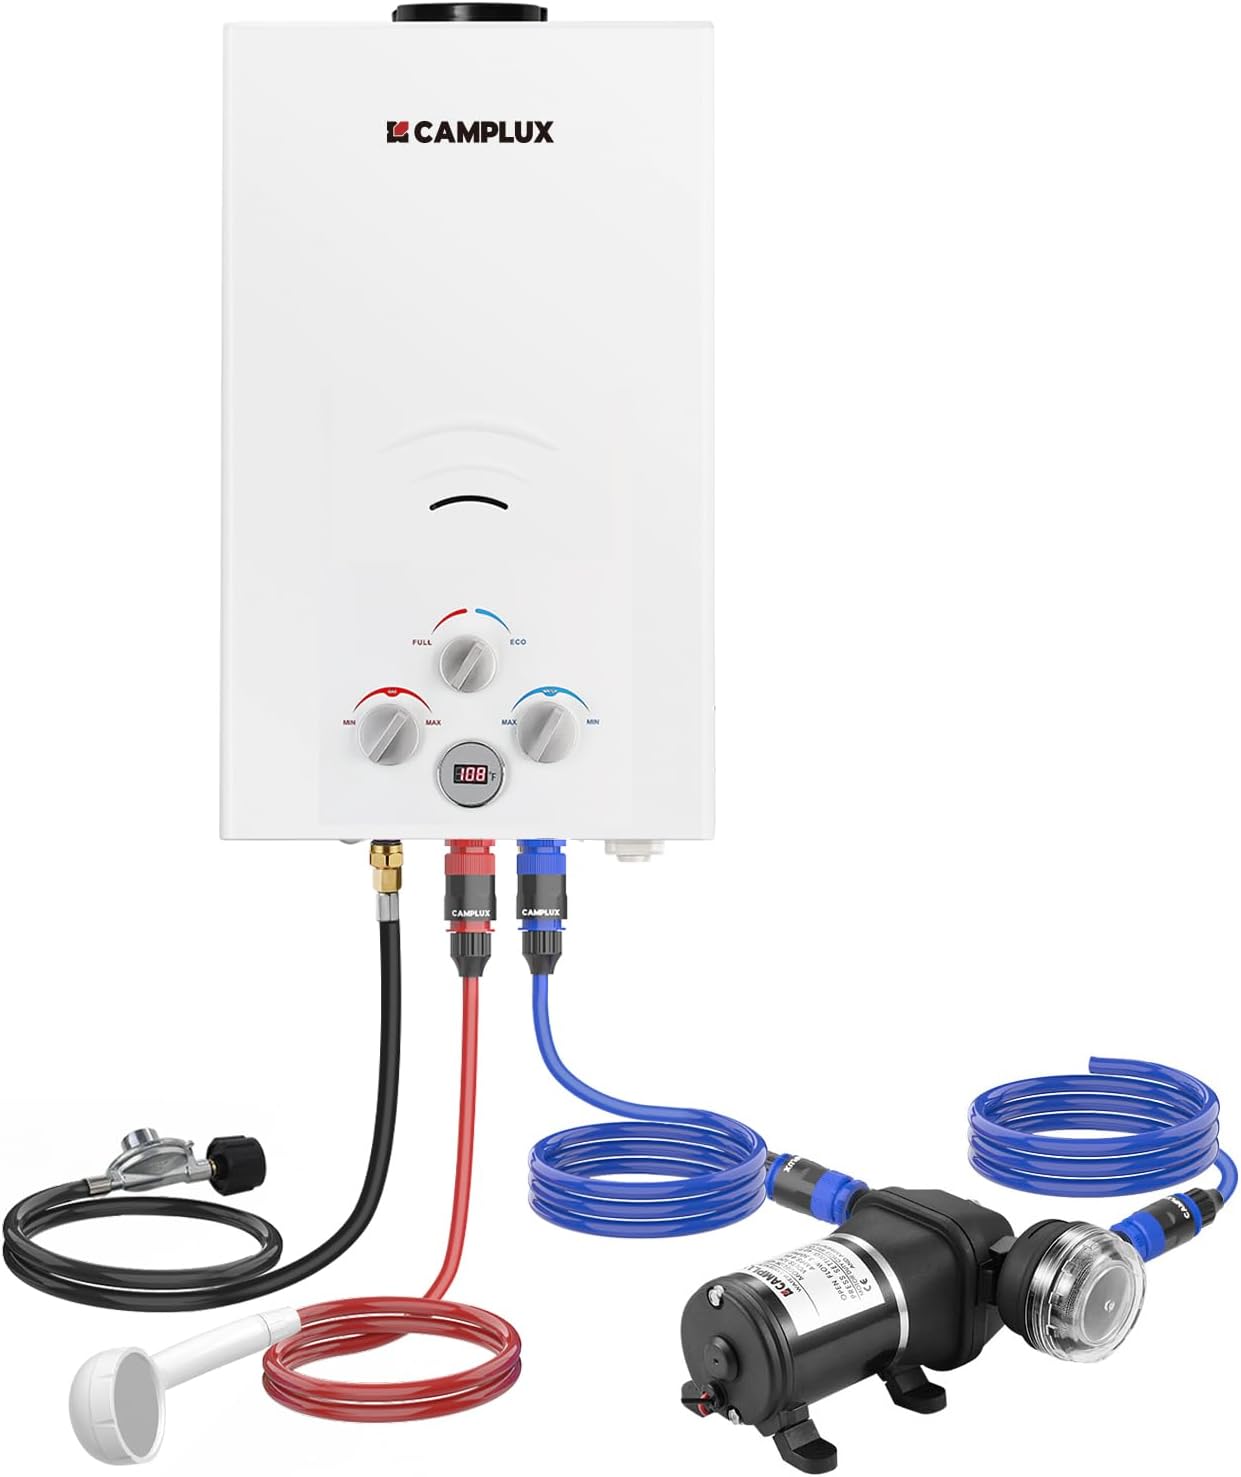
Image 1.1: The CAMPLUX Portable Propane Water Heater BW264P120 shown with its included accessories, including the water pump, shower head, and gas regulator.

Image 1.2: The water heater is suitable for a wide range of outdoor applications, providing hot water for camping, road trips, and cabins.
2. Safety Information
WARNING: Failure to follow these instructions could result in fire, explosion, property damage, personal injury, or death.
- This appliance is for outdoor use only. Do not operate indoors.
- Ensure proper ventilation during operation.
- Always check for gas leaks after connecting the propane tank. Use a soapy water solution on connections; bubbles indicate a leak.
- The unit meets CSA safety standards and includes 6-in-1 safety protections: Overheat Protection, Dry Combustion Protection, Anti-Frozen Protection, Low Water Flow Protection, Flame Failure Protection, and High Water Pressure Protection.
- The internal microprocessor automatically shuts down the machine if the water temperature reaches 185 °F (85 °C).
- In cold climates, drain the water heater completely to prevent freeze damage. Open the drain valve and disconnect water lines. Store the unit in a warm, dry place when not in use.
- Fully disconnect gas and water lines when the unit is idle for extended periods.
- Do not obstruct the exhaust vent or air intake openings.
3. Package Contents
Verify that all items listed below are included in your package:
- 1x CAMPLUX 2.64 GPM Tankless Water Heater
- 1x 5 Feet Pre-installed Gas Regulator
- 1x 5 Feet Shower Head Kit
- 1x 3.3 GPM Water Pump & Pipe Strainer
- 1x 6.6 Feet Extension Hose with Quick Connection
- 1x Hardware Pack (for mounting)
- 1x User Manual (this document)

Image 3.1: Visual representation of all components included in the product package.
4. Setup Instructions
Follow these steps to properly set up your portable propane water heater:
4.1 Wall-mounted Installation
Drive nails or screws into a suitable outdoor wall or sturdy vertical surface. Hang the appliance securely using the integrated mounting points on the back of the unit.

Image 4.1: Securely hang the water heater on a wall using appropriate fasteners.
4.2 Connect Water Inlet
Connect the water pump to the water inlet of the heater. Ensure the pipe strainer is attached to the pump's intake hose to filter impurities from your water source (e.g., river water, bucket water). The pump offers two connection options: a cigarette socket lead and an alligator clip lead for direct link to a 12V DC power source.

Image 4.2: Connect the water pump to the heater's water inlet and place the pump's intake in your water source.
4.3 Connect Pump Power
Connect the water pump to a 12V DC power source using either the cigarette lighter cable or the alligator clip cable. Ensure a secure connection.

Image 4.3: Power the water pump using either the cigarette socket or alligator clips to a 12V DC source.
4.4 Connect Water Outlet
Connect the shower head kit to the water outlet of the heater. Ensure the gasket is properly seated and tighten the fitting to prevent leaks.

Image 4.4: Attach the shower head kit to the water outlet, ensuring a tight seal with the gasket.
4.5 Connect Gas Supply
Connect the pre-installed gas regulator hose to a 20lb propane tank. Hand-tighten the connection, then use a wrench to ensure it is secure. After connection, perform a leak check using soapy water on all gas connections. If bubbles appear, tighten the connection further or replace the seal if damaged.

Image 4.5: Connect the gas regulator to your propane tank and check for leaks.
4.6 Insert 2D Batteries
Locate the battery compartment on the unit. Insert two D-cell batteries, ensuring correct polarity (+/-) as indicated inside the compartment. These batteries power the ignition system.

Image 4.6: Insert two D-cell batteries into the designated compartment, observing correct polarity.
5. Operating Instructions
Once the unit is set up, follow these steps to operate your water heater:
- Ensure the propane tank valve is open.
- Turn on the 12V DC power supply to the water pump.
- Open the water flow at the shower head. The heater will automatically ignite when water flow is detected (minimum 3.6 PSI required).
- Adjust the water temperature using the control knobs on the front panel. The unit features an LED display for temperature readout.
- The heater has two modes: FULL and ECO. Use FULL mode for maximum heat output, especially in colder conditions. ECO mode uses fewer burners for energy efficiency in warmer conditions.
- To turn off, close the water flow at the shower head. The heater will automatically shut down. Close the propane tank valve when finished.
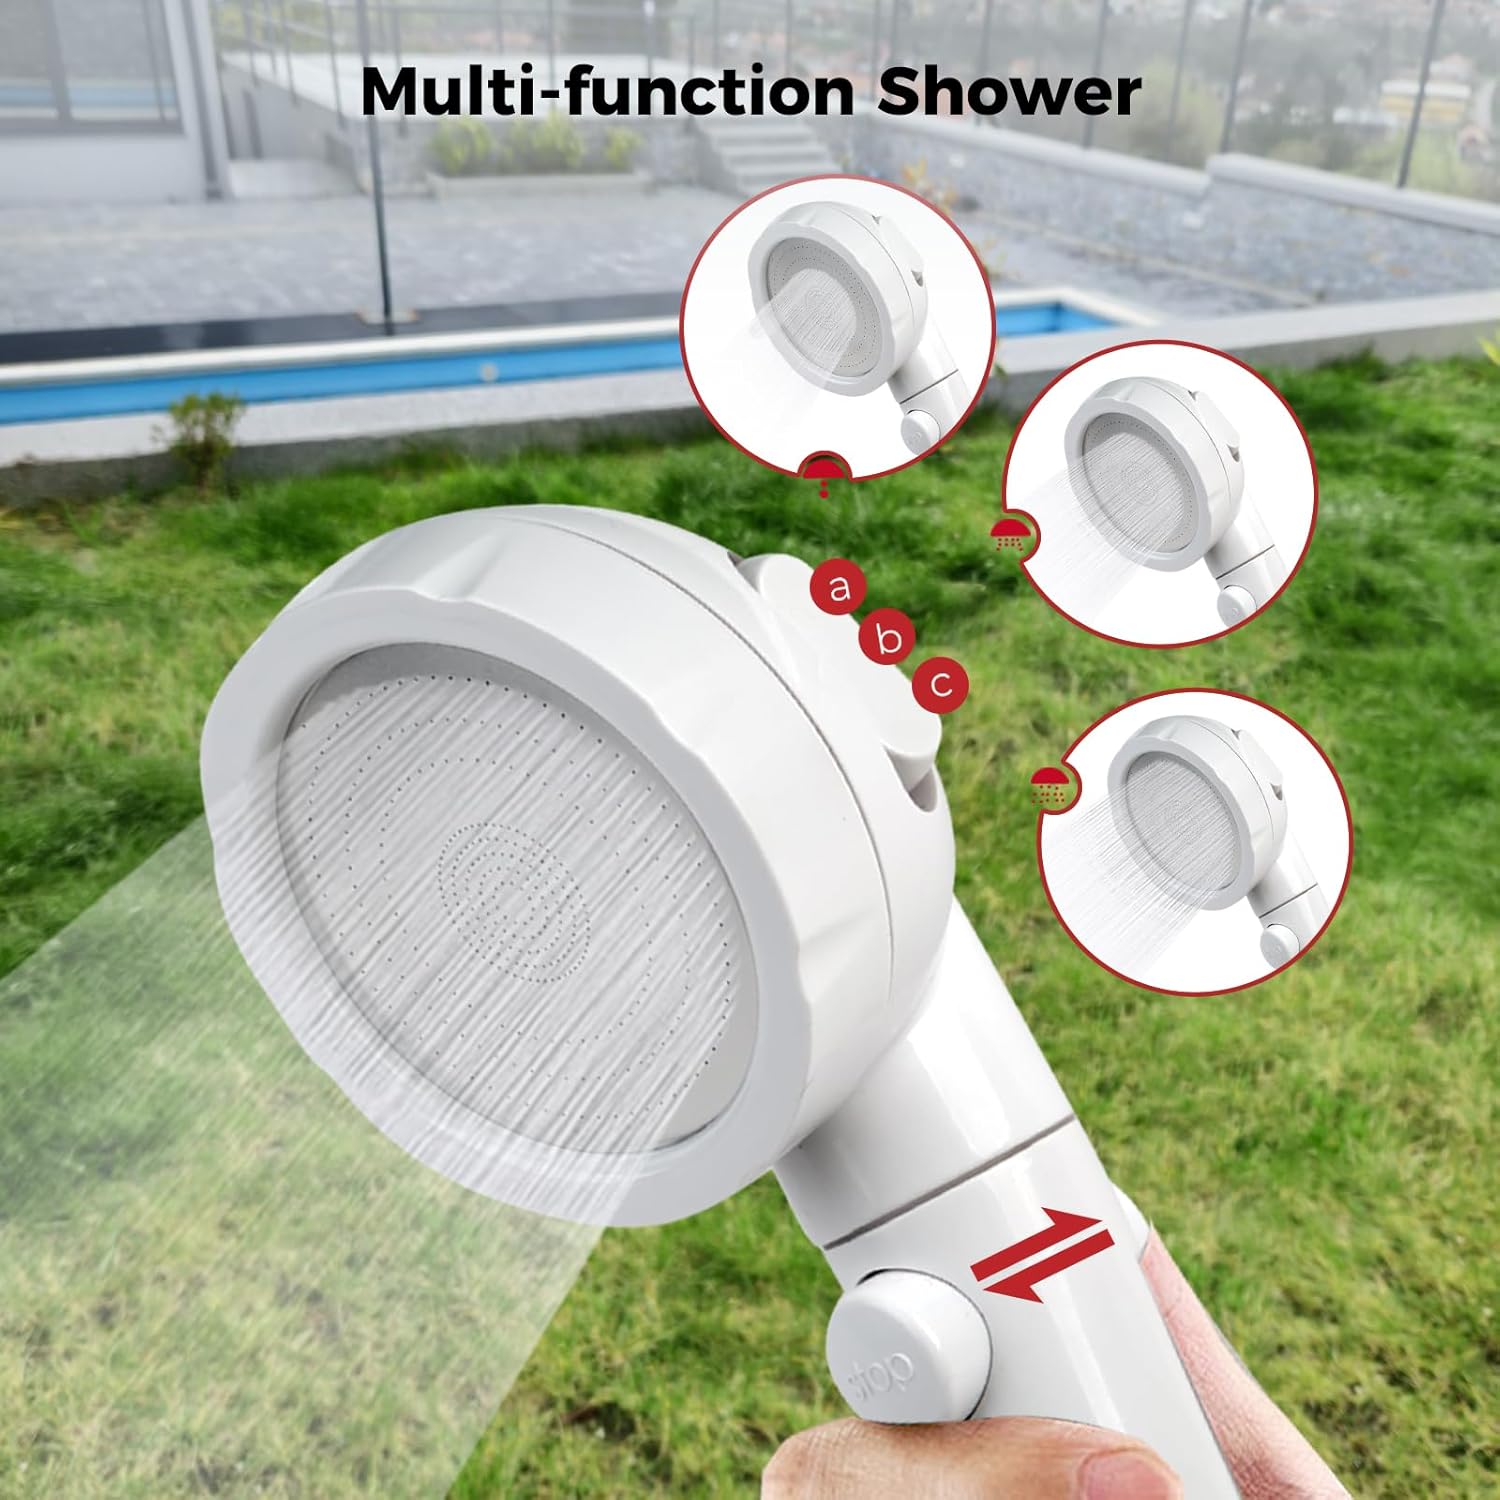
Image 5.1: The multi-function shower head allows for various spray patterns and includes a stop button for convenience.
6. Maintenance
- Freeze Prevention: In cold climates, it is crucial to drain the water heater completely after each use to prevent freeze damage. Open the drain valve and disconnect all water lines. Store the unit in a warm, dry place when not in use.
- Cleaning: Periodically clean the exterior of the unit with a damp cloth. Do not use abrasive cleaners or solvents.
- Pipe Strainer: Regularly check and clean the pipe strainer to ensure optimal water flow and prevent impurities from entering the heater.
- Gas Connections: Inspect gas connections periodically for wear or damage. Replace any worn components immediately.
7. Troubleshooting
If you encounter issues with your CAMPLUX water heater, consider the following common solutions:
| Problem | Possible Cause | Solution |
|---|---|---|
| No hot water / Unit does not ignite | No gas supply, low water pressure, dead batteries, faulty ignition. | Ensure propane tank is open and full. Check water pressure (min 3.6 PSI). Replace D-cell batteries. Verify gas connections are secure. |
| Water not hot enough | Incorrect temperature setting, high water flow, cold ambient temperature. | Adjust temperature knob to MAX. Reduce water flow. Switch to FULL mode if in ECO mode. |
| Water leaks | Loose connections, damaged gaskets/hoses. | Tighten all water connections. Inspect gaskets and hoses for damage and replace if necessary. |
| Unit shuts off unexpectedly | Overheat protection activated, low water flow, flame failure. | Check water flow and pressure. Ensure exhaust is not blocked. Allow unit to cool if overheated. |
If troubleshooting steps do not resolve the issue, please contact CAMPLUX customer support for assistance.
8. Specifications
Key technical specifications for the CAMPLUX Portable Propane Water Heater BW264P120:
- Brand: CAMPLUX ENJOY OUTDOOR LIFE
- Model Number: BW264P120
- Product Dimensions: 13" W x 21.7" H
- Item Weight: 18 pounds
- Color: White
- Maximum Flow Rate: 2.64 Gallons Per Minute (GPM)
- Heat Output: 68,000 British Thermal Units (BTU)
- Maximum Temperature: 176 °F (80 °C)
- Minimum Water Pressure Start: 3.6 PSI
- Maximum Operating Pressure: 110 PSI
- Voltage: 12 Volts (DC) for pump
- Batteries Required: Yes (2x D-cell for ignition)
- Special Features: Anti-Freezing Protection, Dry Combustion Protection, LED Display, Overheat Protection
- Mounting Type: Wall
- Usage: Outdoor Use

Image 8.1: Overview of the water heater's performance specifications.
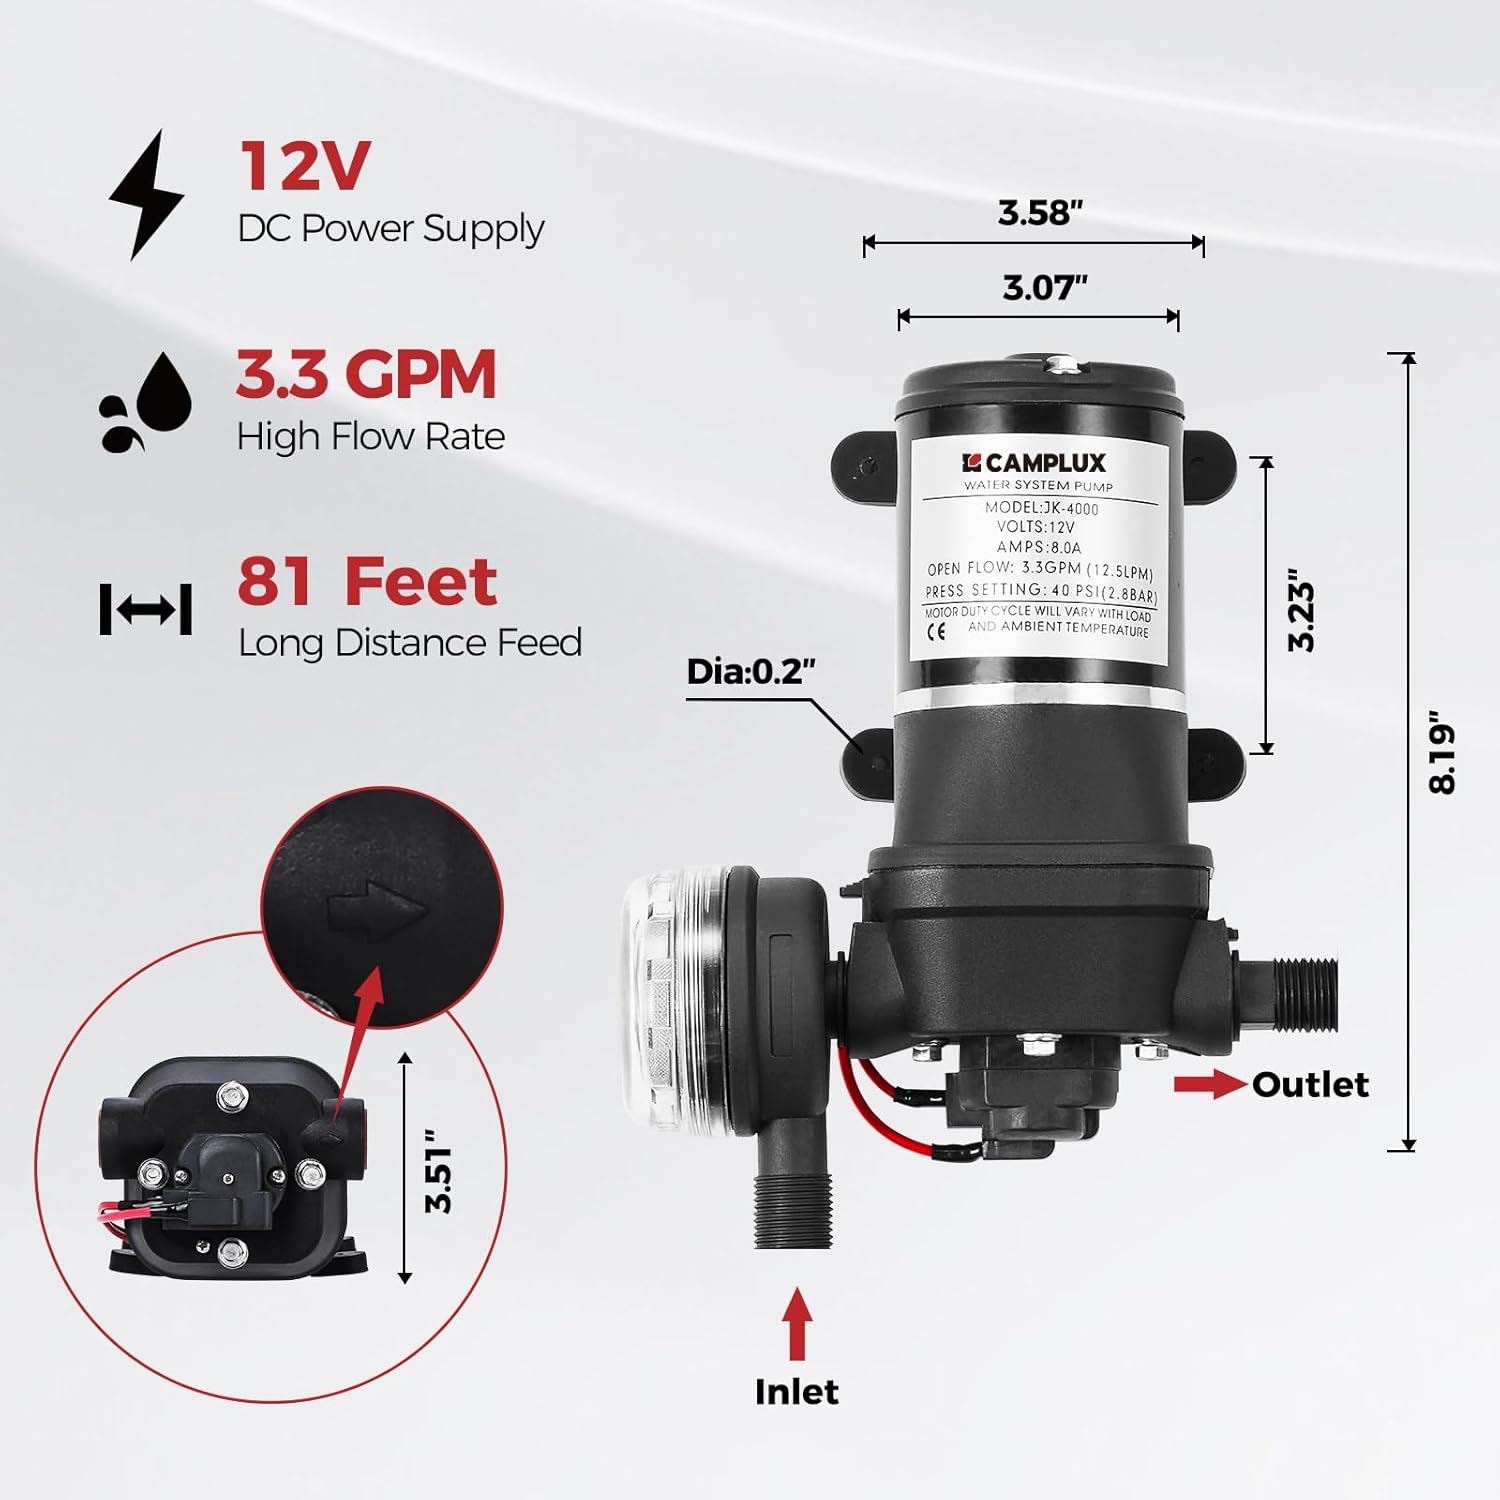
Image 8.2: Detailed specifications and dimensions of the included 3.3 GPM water pump.
9. Warranty and Support
- Warranty: The CAMPLUX Portable Propane Water Heater BW264P120 comes with a 1-Year Warranty from the date of purchase. Please retain your proof of purchase for warranty claims.
- Technical Support: For dedicated technical support and assistance, please contact CAMPLUX directly. You can reach us via Amazon messaging or call our hotline at (844) 538-7475. Our team is committed to ensuring a seamless experience with your water heating product.