Introduction
Thank you for choosing the Explore Scientific Travel Alarm Clock. This compact and versatile device is designed to provide accurate timekeeping, alarm functions, and indoor temperature readings, making it an ideal companion for travel or home use. Its radio-controlled feature ensures precise time synchronization, while the clear digital display offers easy readability.

Figure 1: Front view of the Explore Scientific Travel Alarm Clock. The display shows 12:38 PM, December 28, Saturday, and 78.5°F.
Key Features
- Radio-Controlled Time: Time is automatically set via DCF radio signal for precise accuracy.
- Indoor Temperature Display: Shows temperature in Celsius or Fahrenheit.
- Comprehensive Display: Clearly displays time, date, and day of the week.
- Dual Alarms with Snooze: Two independent alarms with a convenient snooze function.
- Multi-Language Day Display: Day of the week display available in 7 languages.
- Blue Backlight: Provides illumination for easy viewing in low light conditions.
- Low Battery Indicator: Alerts you when batteries need replacement.
- Portable Design: Compact and ideal for travel.
Package Contents
Please check the package contents to ensure all items are present:
- Explore Scientific Travel Alarm Clock (RDC1008)
- 2x AAA Batteries
- Instruction Manual (this document)
Setup
1. Battery Installation
The clock requires 2x AAA batteries for operation. These are included in the package.
- Locate the battery compartment cover on the back of the unit.
- Slide the cover downwards to open the compartment.
- Insert 2x AAA batteries, ensuring the correct polarity (+ and -) as indicated inside the compartment.
- Replace the battery compartment cover by sliding it upwards until it clicks into place.
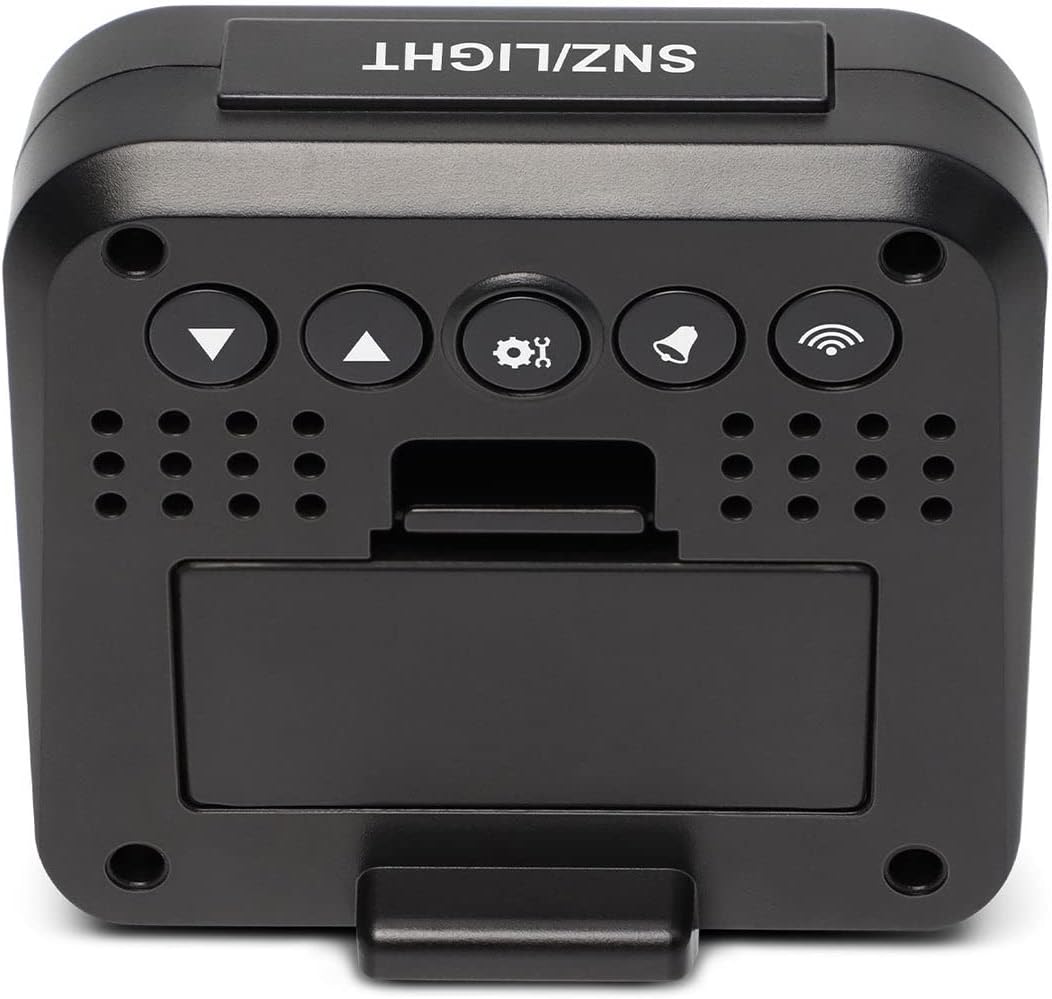
Figure 2: Back view of the clock, highlighting the battery compartment and control buttons.
2. Initial Power-On and Radio Signal Reception
Upon battery installation, the clock will power on and automatically begin searching for the DCF radio time signal. This process may take several minutes to an hour, depending on your location and signal strength. During this time, the radio signal icon (📶) will flash on the display.
- Place the clock near a window for optimal signal reception.
- Avoid placing it near electronic devices that may cause interference.
- Once the signal is successfully received, the time will be set automatically, and the radio signal icon will appear solid.
Operating Instructions
Button Overview
Refer to Figure 2 for the location of the buttons on the back of the clock:
- SNZ/LIGHT Button (Top): Activates snooze during an alarm, or illuminates the backlight.
- ▼ (Down) Button: Decreases values, navigates menus.
- ▲ (Up) Button: Increases values, navigates menus.
- ⚙ (SET) Button: Enters settings mode, confirms selections.
- 🔔 (ALARM) Button: Enters alarm setting mode, activates/deactivates alarms.
- 📶 (WAVE) Button: Manually initiates radio signal search.
1. Manual Time and Date Setting
While the clock primarily relies on the radio signal, you can manually set the time and date if needed (e.g., outside signal range or for specific time zones).
- Press and hold the ⚙ (SET) button for approximately 3 seconds to enter time setting mode. The hour digits will flash.
- Use the ▲ (Up) or ▼ (Down) buttons to adjust the hour.
- Press ⚙ (SET) again to confirm the hour and move to minutes. Adjust minutes using ▲ (Up) or ▼ (Down).
- Continue pressing ⚙ (SET) to cycle through and set the year, month, date, and 12/24 hour format.
- Press ⚙ (SET) one last time to exit setting mode, or wait 15 seconds for it to automatically exit.
2. Setting Alarms (Alarm 1 and Alarm 2)
The clock features two independent alarms.
- Press the 🔔 (ALARM) button once to view Alarm 1 time. Press it again to view Alarm 2 time.
- While viewing the desired alarm (e.g., Alarm 1), press and hold the 🔔 (ALARM) button for 3 seconds. The alarm hour will flash.
- Use ▲ (Up) or ▼ (Down) to adjust the alarm hour. Press 🔔 (ALARM) to confirm and move to minutes.
- Adjust alarm minutes using ▲ (Up) or ▼ (Down). Press 🔔 (ALARM) to confirm and exit.
- To activate or deactivate an alarm, press the 🔔 (ALARM) button repeatedly until the corresponding alarm icon (SNZ1 or SNZ2) appears or disappears on the display.
3. Snooze Function
When an alarm sounds, press the large SNZ/LIGHT button on top of the clock to activate the snooze function. The alarm will temporarily stop and sound again after approximately 5 minutes.
To stop the alarm completely, press any other button on the back of the clock.
4. Temperature Display (°C/°F)
The clock displays indoor temperature. To switch between Celsius (°C) and Fahrenheit (°F):
- In normal time display mode, press the ▼ (Down) button. The temperature unit will toggle between °C and °F.
5. Backlight
Press the large SNZ/LIGHT button on top of the clock to briefly illuminate the display backlight for easy viewing in dark conditions.
6. Day of the Week Language Setting
The day of the week can be displayed in 7 languages.
- In normal time display mode, press the ▲ (Up) button repeatedly to cycle through the available languages for the day of the week display.
Maintenance
Battery Replacement
When the low battery indicator appears on the display, it is time to replace the batteries. Follow the "Battery Installation" steps in the Setup section to replace the 2x AAA batteries.
Cleaning
To clean the clock, use a soft, dry cloth. Do not use abrasive cleaners or solvents, as these may damage the display or casing.
Troubleshooting
| Problem | Possible Cause | Solution |
|---|---|---|
| Display is blank or dim. | Batteries are low or incorrectly installed. | Replace batteries with new 2x AAA batteries, ensuring correct polarity. |
| Clock does not set time automatically or time is incorrect. | Poor DCF radio signal reception; interference; incorrect time zone setting. |
|
| Alarm does not sound. | Alarm is not activated. | Ensure the alarm icon (SNZ1 or SNZ2) is visible on the display. Re-set the alarm time. |
| Temperature reading seems inaccurate. | Clock is placed near a heat source or vent. | Move the clock to a location with stable ambient temperature. |
Specifications
| Feature | Detail |
|---|---|
| Brand | Explore Scientific |
| Model Number | RDC1008 |
| Display Type | Digital |
| Power Source | 2x AAA batteries (included) |
| Special Features | Alarm, Radio-Controlled, Snooze, Indoor Temperature |
| Temperature Units | °C / °F |
| Day of Week Languages | 7 languages |
| Backlight | Blue |
| Material | Acrylonitrile Butadiene Styrene |
| Mounting Type | Tabletop |
Warranty and Support
Explore Scientific products are designed for quality and reliability. For warranty information and technical support, please refer to the warranty card included with your product or visit the official Explore Scientific website. Please have your model number (RDC1008) and purchase details ready when contacting support.
Website: explorescientific.com


