
Acer A317-52
Acer Aspire 3 Laptop (Model A317-52) User Manual
Your guide to setting up, operating, and maintaining your Acer Aspire 3 Laptop.
1. Introduction
This manual provides essential information for the proper use and care of your Acer Aspire 3 Laptop, Model A317-52. Please read this guide thoroughly to ensure optimal performance and longevity of your device. This laptop features a 17.3-inch HD+ display, an Intel Core i5-1035G processor, 20GB DDR4 RAM, a combination of 128GB SSD and 1TB HDD storage, and a built-in DVD-Writer, running on Windows 10.
2. Package Contents
Verify that all items are present in your product packaging:
- Acer Aspire 3 Laptop (Model A317-52)
- AC Power Adapter and Power Cord
- Quick Start Guide (if included)
- Warranty Information (if included)
3. Product Overview
Familiarize yourself with the physical components and layout of your Acer Aspire 3 Laptop.
3.1. Front View (Open)

Figure 3.1: The Acer Aspire 3 Laptop shown open, revealing the 17.3-inch display, full-size keyboard with numeric keypad, and touchpad. The screen displays the Windows 10 operating system interface.
3.2. Rear View (Closed)

Figure 3.2: The Acer Aspire 3 Laptop viewed from the rear, with the lid closed. The Acer logo is centrally placed on the lid, highlighting the laptop's sleek, black design.
3.3. Angled View (Open)

Figure 3.3: An angled perspective of the Acer Aspire 3 Laptop, open and ready for use. This view emphasizes the screen's size and the full keyboard layout, including the numeric pad.
3.4. Left Side Ports
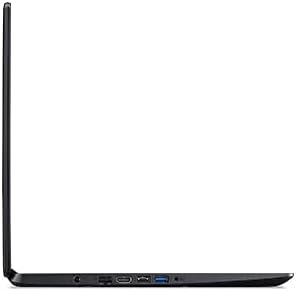
Figure 3.4: The left side of the Acer Aspire 3 Laptop, featuring various connectivity ports. These typically include the power input, Ethernet port, HDMI output, USB 3.0 ports, and a USB 2.0 port.
3.5. Right Side Ports and Optical Drive
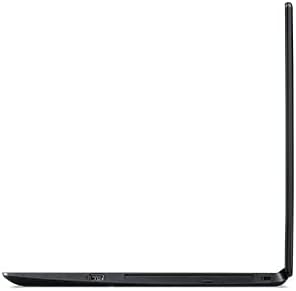
Figure 3.5: The right side of the Acer Aspire 3 Laptop, showcasing additional ports and the integrated DVD-Writer. This side typically includes a USB 2.0 port, the DVD-Writer tray, and a headphone/microphone combo jack.
4. Setup Instructions
4.1. Initial Power-On
- Connect Power: Plug the AC adapter into the laptop's power input port (typically on the left side) and then into a power outlet.
- Open Laptop: Carefully open the laptop lid.
- Power On: Press the power button, usually located above the keyboard or on the side. The power indicator light will illuminate.
- Initial Windows Setup: Follow the on-screen instructions to complete the Windows 10 setup process. This includes selecting your region, language, connecting to a Wi-Fi network, and creating a user account.
4.2. Connecting to a Network
- Wi-Fi: During initial setup or later, click the Wi-Fi icon in the taskbar, select your network, enter the password, and click Connect.
- Ethernet (Wired): Connect an Ethernet cable from your router or modem to the Ethernet port on the laptop (typically on the left side). The connection should be established automatically.
5. Operating Instructions
5.1. Using the Keyboard and Touchpad
- The laptop features a full-size keyboard with a dedicated numeric keypad for efficient data entry.
- The touchpad supports multi-touch gestures for navigation, scrolling, and zooming. Refer to Windows settings for customization.
5.2. Connecting External Devices
- USB Devices: Connect USB flash drives, external hard drives, mice, or keyboards to the available USB 2.0 or USB 3.0 ports.
- External Display: Use the HDMI port to connect an external monitor or projector. Press Windows key + P to select display mode.
- Bluetooth Devices: Enable Bluetooth in Windows settings to pair with wireless headphones, speakers, or other Bluetooth-enabled devices.
5.3. Using the DVD-Writer
Your Acer Aspire 3 includes an integrated DVD-Writer for reading and writing optical discs.
- Open Tray: Press the eject button on the DVD-Writer drive (located on the right side of the laptop) to open the disc tray.
- Insert Disc: Place a CD or DVD onto the tray with the label side facing up.
- Close Tray: Gently push the tray back into the laptop until it clicks shut.
- Access Content: Windows will typically prompt you to choose an action for the disc. If not, open "This PC" and double-click the DVD/CD drive icon.
6. Maintenance
6.1. Cleaning Your Laptop
- Screen: Use a soft, lint-free cloth slightly dampened with water or a screen cleaner. Avoid harsh chemicals.
- Keyboard and Casing: Use a soft cloth. For stubborn dirt, a slightly damp cloth with mild soap solution can be used, ensuring no liquid enters openings.
- Ports: Use compressed air to gently clear dust from ports and vents.
6.2. Battery Care
- Avoid fully discharging the battery frequently.
- Store the laptop in a cool, dry place if not used for extended periods.
- Use only the original Acer AC adapter.
6.3. Software Updates
Regularly update your Windows operating system and device drivers to ensure security and optimal performance. Access Windows Update via Settings > Update & Security.
7. Troubleshooting
This section addresses common issues you might encounter with your laptop.
| Problem | Possible Solution |
|---|---|
| Laptop does not power on. | Ensure the AC adapter is securely connected to both the laptop and a working power outlet. Check if the power outlet is functional. Try pressing and holding the power button for 10-15 seconds. |
| Screen is blank or black. | Check if the laptop is powered on. Try adjusting the screen brightness using function keys (e.g., Fn + F5/F6). Connect an external monitor to check if the display output works. |
| Wi-Fi connection issues. | Ensure Wi-Fi is enabled in Windows settings. Restart your router/modem. Check for updated Wi-Fi drivers. |
| DVD-Writer not reading discs. | Ensure the disc is clean and free of scratches. Try a different disc. Check device manager for driver issues related to the optical drive. |
| Laptop is slow or unresponsive. | Close unnecessary applications. Check Task Manager for processes consuming high CPU/RAM. Run a virus scan. Ensure sufficient free space on the primary drive. |
For more complex issues, refer to the Acer support website or contact customer service.
8. Specifications
Key technical specifications for the Acer Aspire 3 Laptop (Model A317-52):
- Model: A317-52
- Display: 17.3 Inches, HD+ (1600 x 900 pixels)
- Processor: Intel Core i5-1035G1 (10th Gen, Quad-Core, 1.0 GHz up to 3.6 GHz)
- RAM: 20 GB DDR4
- Storage: 128 GB SSD + 1 TB HDD
- Graphics: Integrated Intel UHD Graphics
- Optical Drive: DVD-Writer
- Operating System: Windows 10 Home
- Wireless Connectivity: Bluetooth, Wi-Fi
- Ports: 1x USB 3.0, 2x USB 2.0, HDMI, Ethernet, Headphone/Microphone Combo Jack, Power Input
- Dimensions (LxWxH): Approximately 23 x 1 x 12 inches
- Weight: Approximately 2.3 pounds
9. Warranty and Support
Your Acer Aspire 3 Laptop is covered by a limited warranty. Please refer to the warranty card included in your package or visit the official Acer support website for detailed terms and conditions.
For technical assistance, driver downloads, or service inquiries, please visit the Acer support website or contact their customer service department. Have your laptop's serial number and model number (A317-52) ready when contacting support.
Acer Support Website: www.acer.com/support
Ask a question about this manual
Ask about setup, troubleshooting, compatibility, parts, safety, or missing instructions. Manuals+ will review the question and use this page’s manual context to help answer it.