1. Introduction
Thank you for choosing the Bonsenkitchen Slow Juicer. This appliance is designed to extract juice from fruits and vegetables efficiently, preserving maximum nutrients through its cold press masticating technology. This manual provides essential information for the safe and effective use, maintenance, and troubleshooting of your juicer. Please read it thoroughly before first use and keep it for future reference.
2. Important Safety Instructions
When using electrical appliances, basic safety precautions should always be followed to reduce the risk of fire, electric shock, and injury to persons, including the following:
- Read all instructions before operating the juicer.
- Do not immerse the motor base in water or other liquids.
- Ensure the appliance is properly assembled before operation.
- Always unplug the juicer from the outlet when not in use, before assembling or disassembling parts, and before cleaning.
- Keep hands and utensils away from moving parts during operation to prevent injury. Never use fingers to push food into the feed chute. Always use the provided pushing rod.
- Do not operate any appliance with a damaged cord or plug, or after the appliance malfunctions or has been damaged in any manner.
- This appliance is for household use only. Do not use outdoors.
- Ensure the power switch is in the 'OFF' position before plugging or unplugging the cord.
- The juicer is equipped with BPA-free components for your safety.
3. Package Contents
Please check the package contents upon unboxing. If any parts are missing or damaged, contact customer support.
- Main Body (Motor Base)
- Juicing Body
- Spiral Pusher (Auger)
- Juice Strainer (Filter)
- Squeezer (End Cap)
- Tray
- Pushing Rod
- Juice Cup
- Residue Cup
- Cleaning Brush
4. Parts Diagram
Familiarize yourself with the components of your Bonsenkitchen Slow Juicer.

Image: Exploded view of the Bonsenkitchen Slow Juicer showing all its components with corresponding numbers and names for easy identification.
- Main body (Motor Base)
- Power switch
- Button (Release button for juicing body)
- Juicing body
- Spiral pusher (Auger)
- Juice strainer (Filter)
- Squeezer (End Cap)
- Juice cup
- Residue cup
- Tray (Feed chute tray)
- Pushing rod
- Non-slip feet
5. Setup and Assembly
Follow these steps to assemble your juicer before first use.
- Place the main body (motor base) on a stable, flat surface.
- Align the juicing body with the motor base and rotate it clockwise until it locks into place. You may hear a click.
- Insert the spiral pusher (auger) into the juicing body.
- Place the juice strainer (filter) over the auger.
- Attach the squeezer (end cap) to the front of the juicing body and rotate it clockwise until it is securely fastened.
- Place the tray on top of the feed chute.
- Position the juice cup under the juice outlet and the residue cup under the pulp outlet.
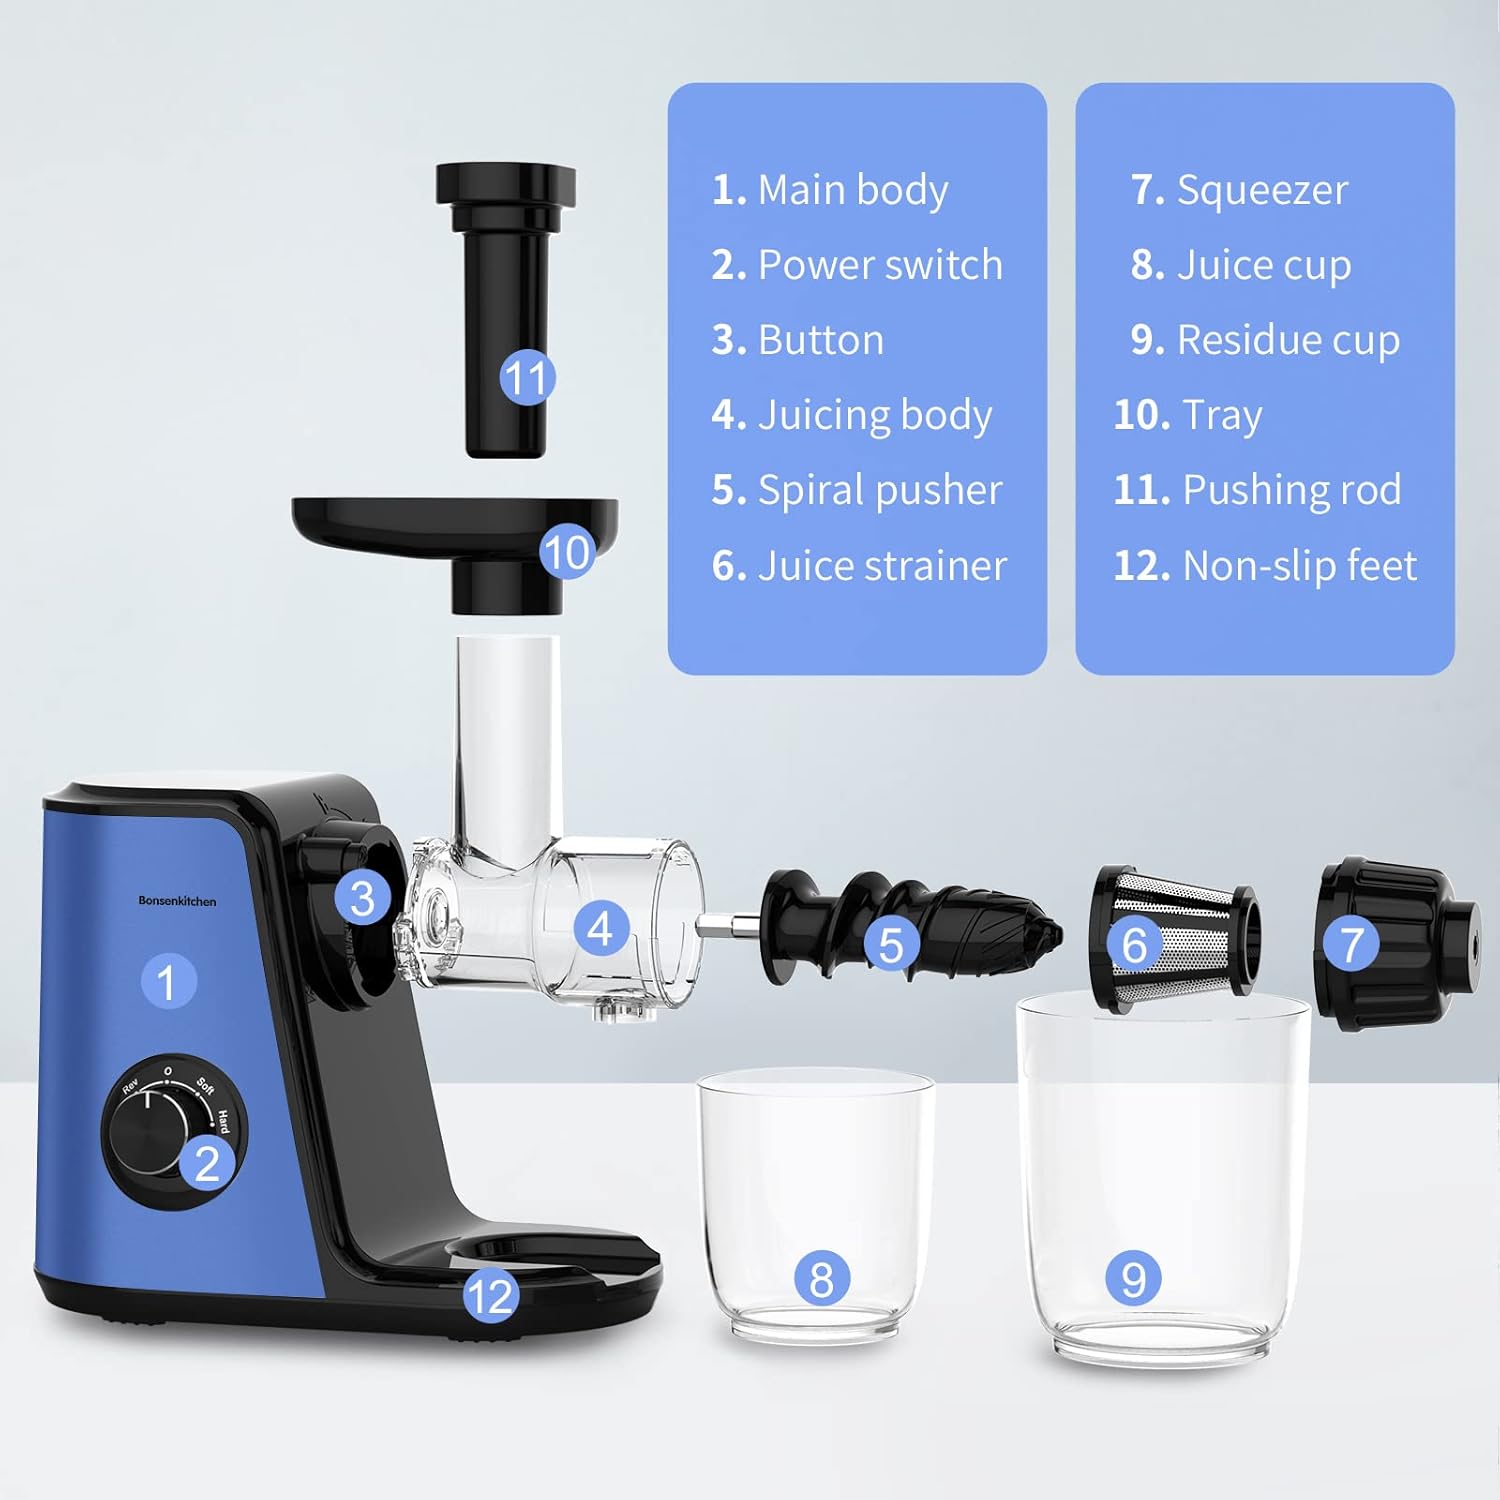
Image: The juicer features a one-touch assembly design, allowing for quick and easy setup and disassembly.
6. Operating Instructions
6.1. Food Preparation
- Wash all fruits and vegetables thoroughly.
- Cut ingredients into pieces small enough to fit into the feed chute.
- Remove hard pits from fruits (e.g., peaches, cherries, mangoes).
- Peel citrus fruits (oranges, lemons, grapefruits) as their peels can impart a bitter taste.
- For fibrous vegetables like celery or wheatgrass, cut them into short segments (approx. 1-2 inches) to prevent clogging.
6.2. Juicing Process
- Ensure the juicer is correctly assembled and the juice and residue cups are in place.
- Plug the power cord into a suitable electrical outlet.
- Turn the power switch to the desired speed setting:
Soft Mode: Ideal for soft fruits and leafy greens like oranges, grapes, watermelon, and spinach.
Hard Mode: Suitable for hard vegetables and fruits such as carrots, apples, ginger, and celery. - Gradually feed the prepared ingredients into the feed chute. Use the pushing rod to gently guide the food down. Do not force food into the chute.
- The juicer will extract juice into the juice cup and separate pulp into the residue cup.
- If the juicer becomes clogged or stops, turn the switch to the 'REV' (Reverse) Function for a few seconds to clear the blockage, then switch back to 'OFF' and then to the desired speed.
- After juicing, turn the power switch to 'OFF' and unplug the appliance.
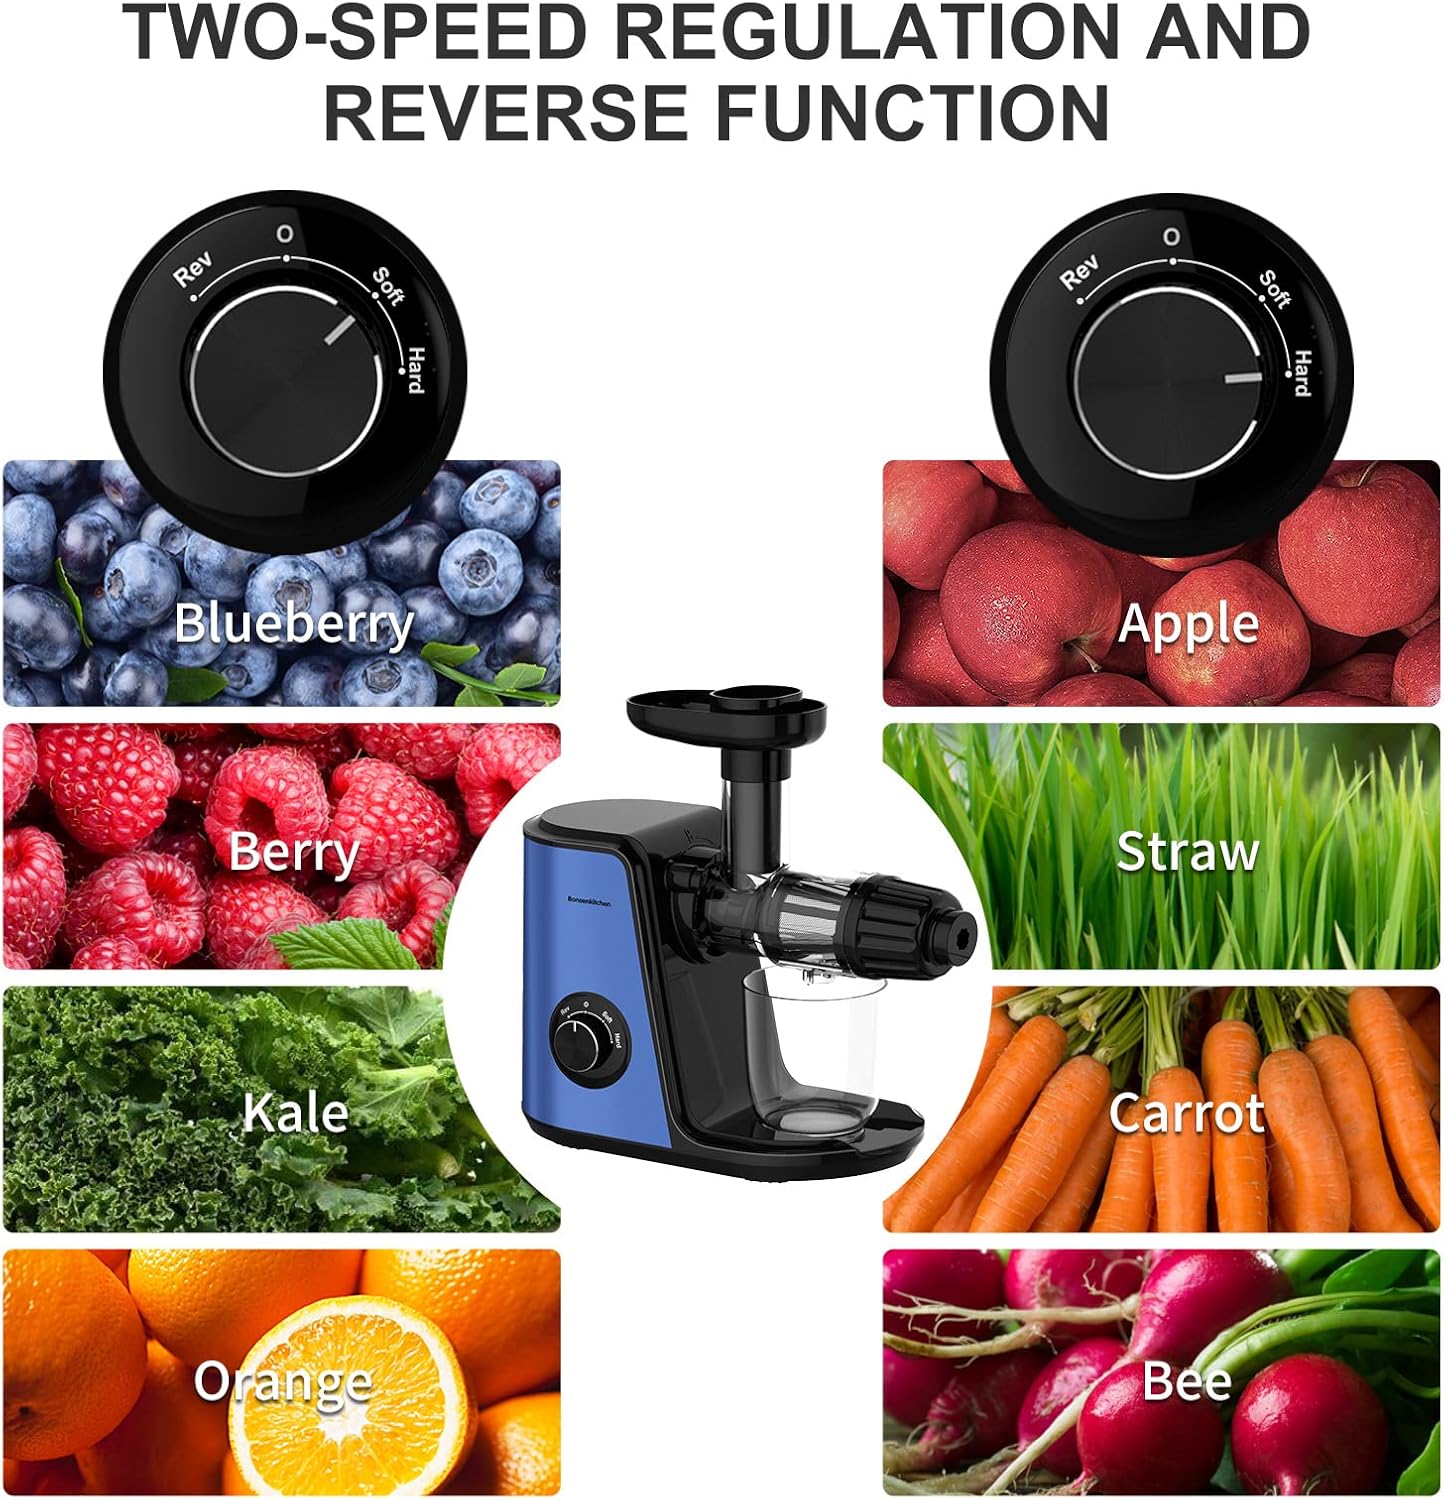
Image: The juicer features a two-speed regulation dial for 'Soft' and 'Hard' ingredients, along with a 'Reverse' function to prevent clogging.

Image: Visual comparison highlighting the higher juice yield and reduced oxidation achieved by the Bonsenkitchen Slow Juicer compared to a traditional centrifugal juicer.

Image: The Bonsenkitchen Slow Juicer operates with a low decibel motor, ensuring quiet operation.
7. Cleaning and Maintenance
Regular cleaning ensures optimal performance and extends the life of your juicer.
- Unplug the juicer from the power outlet before cleaning.
- Disassemble the juicing components by pressing the release button and rotating the juicing body counter-clockwise. Remove the squeezer, juice strainer, and spiral pusher.
- Rinse all detachable parts under running water immediately after use to prevent pulp from drying and sticking.
- Use the provided cleaning brush to remove any stubborn pulp from the juice strainer and other components.
- All detachable parts are dishwasher-safe (top rack recommended). The main body (motor base) should only be wiped with a damp cloth; never immerse it in water.
- Allow all parts to dry completely before reassembling or storing.

Image: The juicer's detachable parts are easy to clean under running water or in a dishwasher, with a cleaning brush included for convenience.
8. Troubleshooting
Refer to this section for common issues and their solutions.
| Problem | Possible Cause | Solution |
|---|---|---|
| Juicer does not turn on. | Not plugged in; not assembled correctly; power outage. | Check power cord connection; ensure all parts are locked into place; check power supply. |
| Juicer stops during operation or gets clogged. | Too much food fed at once; hard ingredients causing blockage. | Turn to 'REV' (Reverse) function for a few seconds, then switch off and restart. Cut ingredients into smaller pieces. |
| Low juice yield or wet pulp. | Ingredients not suitable for slow juicing; improper assembly of squeezer. | Ensure squeezer is tightly fastened. Some very soft fruits may naturally yield wetter pulp. |
| Loud noise during operation. | Improper assembly; foreign object inside. | Disassemble and reassemble all parts correctly. Check for any foreign objects. |
9. Product Specifications
| Feature | Detail |
|---|---|
| Brand | Bonsenkitchen |
| Model | MJ8901 |
| Color | Blue |
| Special Feature | BPA Free, Quiet Motor, Reverse Function |
| Product Dimensions | 7"D x 15"W x 15"H |
| Finish Type | Glossy |
| Recommended Uses | Celery, Fruits, Ginger, Oranges, Vegetables, Wheatgrass |
| Product Care Instructions | Dishwasher Safe (detachable parts) |
| Capacity | 0.4 Liters (Juice Cup) |
| Power Source | Corded Electric |
| Blade Material | Stainless Steel |
| Voltage | 120 Volts |
| Number of Speeds | 2 (Soft/Hard) |
| Item Weight | 8 pounds |
| Certifications | UL, ETL |
10. Warranty and Customer Support
The Bonsenkitchen Slow Juicer comes with a 12-month manufacturer warranty and lifetime technical support. This warranty covers defects in materials and workmanship under normal use.
For warranty claims, technical assistance, or any questions regarding your product, please contact Bonsenkitchen customer support through the retailer's platform or the official Bonsenkitchen website. Please have your model number (MJ8901) and purchase information ready.