1. Introduction
This manual provides essential instructions for the safe and efficient operation of your Projector Super 8MM AUTOLOAD Film Projector. Please read this manual thoroughly before use and retain it for future reference.
2. Safety Information
Always observe the following safety precautions:
- Ensure the projector is placed on a stable, level surface.
- Do not expose the projector to moisture or extreme temperatures.
- Unplug the projector from the power outlet before cleaning or performing maintenance.
- Do not attempt to open the projector casing or perform repairs yourself. Refer to qualified service personnel.
- Keep away from children and pets.
- Use only the specified lamp type for replacement.
3. Package Contents
Verify that all items are present:
- Projector Super 8MM AUTOLOAD Film Projector
- Power Cord
- Take-up Reel
- Projection Lamp (pre-installed or included)
4. Product Overview
Familiarize yourself with the main components of your projector.

Figure 4.1: Front view of the Projector Super 8MM AUTOLOAD Film Projector, showing the film path, lens, and a take-up reel placed in front.
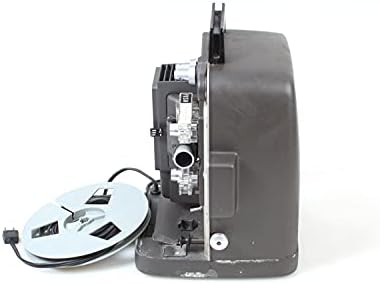
Figure 4.2: Side view of the Projector Super 8MM AUTOLOAD Film Projector, highlighting the film loading mechanism and power cord connection.
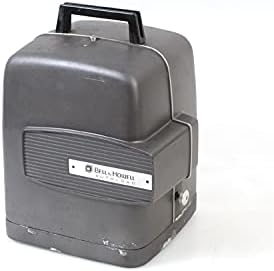
Figure 4.3: The Projector Super 8MM AUTOLOAD Film Projector with its protective cover in place, ready for storage or transport.
5. Setup
5.1 Unpacking and Placement
- Carefully remove the projector from its packaging.
- Place the projector on a firm, level surface.
- Ensure adequate ventilation around the projector to prevent overheating.
- Position the projector at an appropriate distance from the projection screen to achieve the desired image size.
5.2 Power Connection
- Connect the power cord to the projector's power input.
- Plug the other end of the power cord into a suitable electrical outlet.
5.3 Film Loading (AUTOLOAD System)
- Ensure the projector is turned off.
- Place an empty take-up reel onto the take-up spindle.
- Thread the leader of your Super 8MM film into the film gate opening. The AUTOLOAD system will automatically pull the film through the projector mechanism.
- Once the film leader emerges from the other side, attach it to the take-up reel.
- Ensure the film is properly seated in all guides and sprockets.
6. Operating Instructions
6.1 Powering On and Projection
- Turn the power switch to the "ON" position. The projection lamp should illuminate, and the motor should start.
- Adjust the focus knob (usually located near the lens) until the image on the screen is sharp and clear.
6.2 Playback Controls
- Forward/Reverse: Use the directional switch to play the film forward or rewind it.
- Speed Control: If available, adjust the speed control knob to change the projection speed (e.g., 18 frames per second or 24 frames per second).
- Frame Adjustment: Some projectors have a frame adjustment lever to align the film frame vertically on the screen.
6.3 Powering Off
- Once projection is complete, turn the power switch to the "OFF" position.
- Allow the projector to cool down before handling or storing.
7. Maintenance
7.1 Cleaning the Projector
- Lens: Gently wipe the projector lens with a soft, lint-free cloth or lens cleaning paper. Use a lens cleaning solution sparingly if necessary.
- Film Path: Use a soft brush or compressed air to remove dust and film debris from the film gate, sprockets, and guides.
- Exterior: Wipe the exterior of the projector with a damp cloth. Do not use abrasive cleaners or solvents.
7.2 Lamp Replacement
- Ensure the projector is unplugged and completely cool.
- Locate the lamp access panel (refer to your specific model's diagram if available).
- Carefully open the panel and remove the old lamp. Avoid touching the new lamp bulb with bare hands, as oils can reduce its lifespan. Use a cloth or glove.
- Insert the new lamp, ensuring it is seated correctly.
- Close the lamp access panel securely.
8. Troubleshooting
| Problem | Possible Cause | Solution |
|---|---|---|
| No power | Power cord not connected; outlet not working; fuse blown | Check power cord connection; test outlet; check projector fuse (if accessible and user-serviceable) |
| No image on screen | Lamp burned out; lens cap on; film not loaded correctly | Replace lamp; remove lens cap; re-load film |
| Image is blurry | Focus not adjusted; lens dirty | Adjust focus knob; clean lens |
| Film jams | Improper film loading; damaged film; dirty film path | Re-load film carefully; inspect film for damage; clean film path |
9. Specifications
- Brand: Projector
- Model: Super 8MM AUTOLOAD
- Film Type: Super 8MM
- Connectivity Technology: Film
- Display Resolution: 960 x 540
- Special Feature: Portable
- Recommended Uses: Home Cinema
- Package Dimensions: 16 x 12 x 12 inches
- ASIN: B093RD38ZF
- Date First Available: November 9, 2021
10. Warranty and Support
This product is listed as "DISCONTINUED" and is likely a vintage item. Therefore, standard manufacturer warranty and direct support may not be available. For technical assistance or parts, please consult specialized vintage electronics repair services or online communities dedicated to Super 8MM projectors.
For further information, you may refer to the product's original listing or contact the seller if purchased recently.


