1. Introduction
This manual provides detailed instructions for the installation, operation, and maintenance of your PowMr 80A PWM Solar Charge Controller, Model L80. This controller is designed to manage the power flow from your solar panels to your battery bank and DC loads, ensuring efficient and safe charging. It supports 12V and 24V DC input systems and features an LCD display for monitoring system status, a 5V USB output, and adjustable charge/discharge parameters.
2. Product Features
- PWM Charging: Utilizes Pulse Width Modulation technology for efficient battery charging.
- System Voltage: Automatic identification for 12V/24V DC systems.
- High Current Capacity: Supports up to 80A charge and discharge current.
- LCD Display: Provides real-time data display and system status monitoring.
- USB Output: External 5V USB port for charging small electronic devices.
- Smart Protection: Built-in protections against short circuit, overcharge, overcurrent, and reverse connection.
- Temperature Compensation: Automatic temperature compensation for optimal charging.
- Adjustable Parameters: User-adjustable charge and discharge control parameters.
- Durable Construction: Anti-fall ABS housing with high-efficiency aluminum alloy heat sink.

Image 2.1: The PowMr L80 Solar Charge Controller highlighting its six main functions, including reset, easy setting, dual timer & light control, full battery protection, friendly interface, and USB 5V 1A output.
3. Product Components and Interface
Familiarize yourself with the various components and connection points of the PowMr L80 Solar Charge Controller.
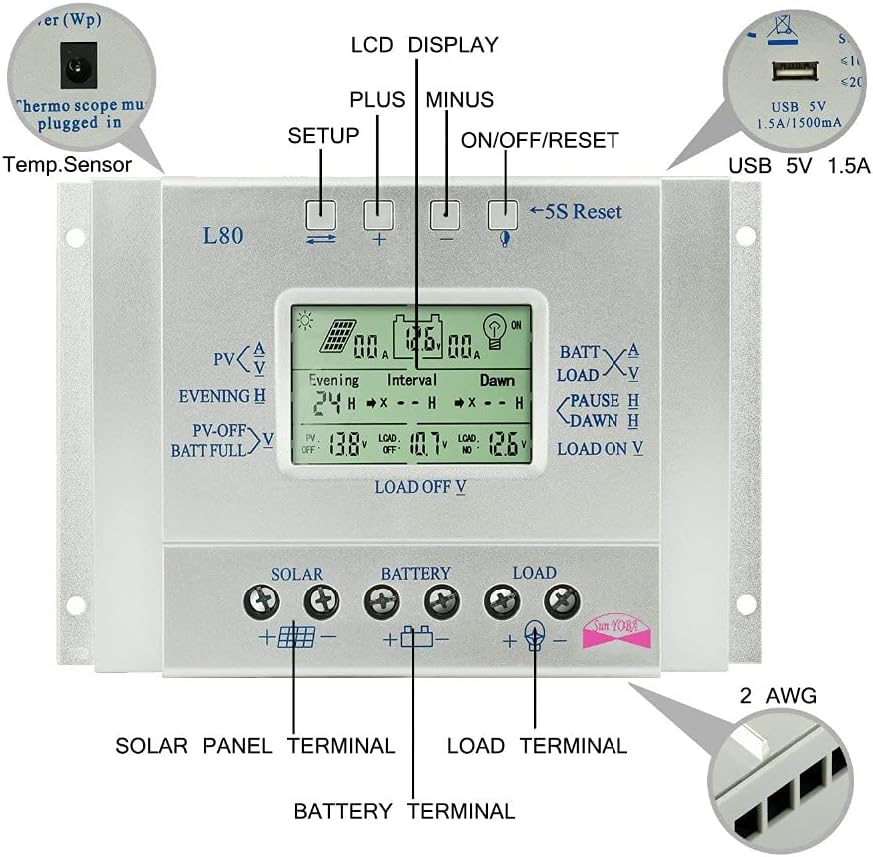
Image 3.1: This diagram illustrates the front panel of the PowMr L80 controller, identifying the LCD display, Setup button, Plus button, Minus button, ON/OFF/Reset button, 5S Reset function, USB 5V 1.5A port, and the Solar Panel, Battery, and Load terminals at the bottom. A temperature sensor port is also indicated.
- LCD Display: Shows real-time system parameters and status.
- Buttons:
- Setup Button (Leftmost): Used to enter and navigate through setting menus.
- Plus Button (+): Increases values or moves forward in menus.
- Minus Button (-): Decreases values or moves backward in menus.
- ON/OFF/Reset Button (Rightmost): Controls load output, and a 5-second press initiates a reset.
- USB 5V 1.5A Port: For charging compatible USB devices.
- Temperature Sensor Port: For connecting an external temperature sensor (must be plugged in for accurate temperature compensation).
- Solar Panel Terminals (+/-): Connect your solar panel array here.
- Battery Terminals (+/-): Connect your battery bank here.
- Load Terminals (+/-): Connect your DC loads here.
4. Setup and Installation
Proper installation is crucial for the safe and efficient operation of your solar charge controller. Please follow these steps carefully.
4.1 Safety Precautions
- Ensure all connections are tight to avoid loose connections that can cause excessive heat.
- Install the controller in a well-ventilated area, away from direct sunlight and moisture.
- Always connect the battery first, then the solar panel, and finally the load. Disconnect in reverse order.
- Use appropriate wire gauges for your system's current to prevent overheating.
- Ensure the battery voltage matches the controller's supported voltage (12V/24V).
4.2 Wiring Diagram and Connection Steps
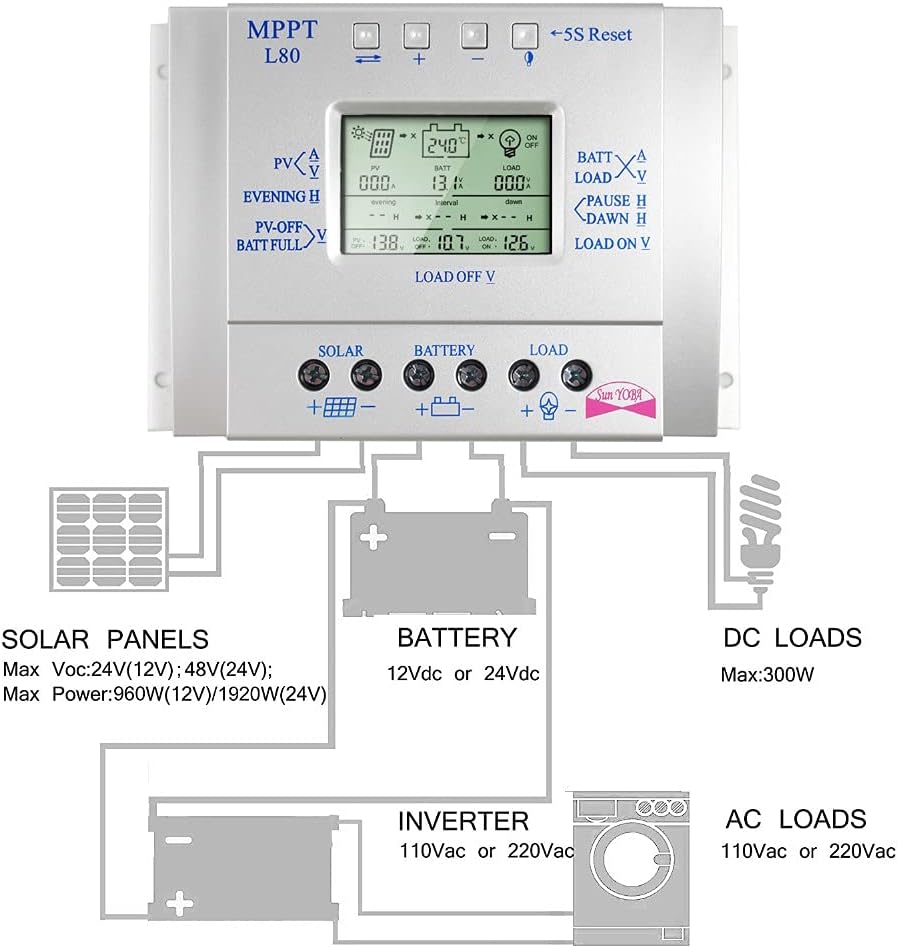
Image 4.1: This diagram illustrates the correct wiring sequence for the PowMr L80 Solar Charge Controller. It shows solar panels connected to the controller's solar input, the controller connected to a 12Vdc or 24Vdc battery, and the controller's load output connected to DC loads. An inverter can be connected to the battery for AC loads.
- Connect the Battery: Connect the positive and negative terminals of your battery to the corresponding battery terminals on the controller. The controller will automatically detect the system voltage (12V or 24V).
- Connect the Solar Panel: Connect the positive and negative terminals of your solar panel array to the corresponding solar panel terminals on the controller. Ensure correct polarity.
- Connect the DC Load: Connect your DC loads (e.g., LED lights, fans) to the corresponding load terminals on the controller. Ensure correct polarity.
- Connect Temperature Sensor (Optional but Recommended): If using an external temperature sensor, plug it into the designated port for accurate battery temperature compensation.
Important: Always connect the battery first to allow the controller to recognize the system voltage. Connecting the solar panel or load first may damage the controller.
5. Operating Instructions
Once installed, the controller will begin operating automatically. The LCD display provides various screens to monitor your system and adjust settings.
5.1 LCD Display Overview
The LCD displays real-time information such as solar panel voltage (PV), battery voltage (BATT), load current (LOAD), battery state of charge, temperature, and various charging/discharging parameters. Use the Setup button to cycle through different display screens.
5.2 Button Functions
- Setup Button: Short press to cycle through display screens. Long press (5 seconds) to enter parameter setting mode.
- Plus (+) Button: In setting mode, increases the selected value. In display mode, may show additional information or switch modes depending on the screen.
- Minus (-) Button: In setting mode, decreases the selected value. In display mode, may show additional information or switch modes depending on the screen.
- ON/OFF/Reset Button: Short press to manually turn the DC load output ON or OFF. Long press (5 seconds) to reset the controller to factory default settings.
5.3 Parameter Settings
To adjust charging and discharging parameters, long press the Setup button until the display enters setting mode. Use the Plus (+) and Minus (-) buttons to change values, and the Setup button to confirm and move to the next parameter. The controller will automatically save settings after a few seconds of inactivity or by pressing the Setup button until you exit the setting mode.
Video 5.1: This video demonstrates the basic operation of the PowMr L80 Solar Charge Controller, including navigating through the LCD display screens and adjusting parameters using the control buttons. It shows how to view solar input, battery status, and load output, as well as how to change settings like evening and dawn load timers.
Common adjustable parameters include:
- Evening Hours: Sets the duration for the load to be ON after sunset.
- Interval Hours: Sets a pause duration for the load.
- Dawn Hours: Sets the duration for the load to be ON before sunrise.
- PV Off Voltage: The voltage at which the solar charging stops.
- Battery Full Voltage: The voltage indicating a full battery.
- Load Off Voltage: The low voltage disconnect point for the load.
- Load On Voltage: The voltage at which the load reconnects after low voltage disconnect.
6. Maintenance
Regular maintenance ensures the longevity and optimal performance of your solar charge controller.
- Inspect Connections: Periodically check all wiring connections for tightness and corrosion. Tighten any loose connections.
- Clean the Controller: Keep the controller clean and free from dust and debris. Use a dry cloth for cleaning. Ensure the heat sink fins are clear for proper ventilation.
- Check Battery Health: Monitor your battery's health and voltage regularly. Ensure it is not overcharged or deeply discharged.
- Environmental Conditions: Ensure the installation environment remains within the recommended temperature and humidity ranges.
7. Troubleshooting
If you encounter issues with your PowMr L80 Solar Charge Controller, refer to the following common problems and solutions:
| Problem | Possible Cause | Solution |
|---|---|---|
| Controller not powering on / LCD blank | No battery connected or battery voltage too low. Reverse polarity connection. | Ensure battery is connected first and has sufficient voltage. Check battery polarity. |
| Battery not charging | Solar panel not connected or insufficient sunlight. Reverse polarity of solar panel. Faulty solar panel or wiring. | Check solar panel connections and polarity. Ensure adequate sunlight. Test solar panel output. |
| Load not working | Load output turned off. Low battery voltage (LVD activated). Overcurrent/short circuit on load. Reverse polarity of load. | Press ON/OFF button to activate load. Charge battery. Check load for short circuits or excessive current draw. Check load polarity. |
| Inaccurate temperature reading | External temperature sensor not connected or faulty. | Ensure temperature sensor is properly connected. Replace if faulty. |
If the problem persists after attempting these solutions, please contact PowMr customer support for further assistance.
8. Specifications
The following table outlines the technical specifications for the PowMr 80A PWM Solar Charge Controller L80.
| Feature | Specification |
|---|---|
| Model | L80 |
| Rated Charge Current | 80A |
| System Voltage | 12V/24V Auto |
| Max Solar Panel Voltage | 50V |
| Max Solar Panel Power (12V) | 960W |
| Max Solar Panel Power (24V) | 1920W |
| USB Output | 5V/1.5A |
| Operating Temperature | -35°C to +60°C |
| Dimensions | 0.39 x 0.39 x 0.39 inches |
| Weight | 1.63 pounds |
| Housing Material | ABS |
9. Warranty and Support
PowMr products are designed for reliability and performance. For warranty information or technical support, please refer to the documentation included with your purchase or visit the official PowMr website. If you encounter any problems during use, contact PowMr customer service for assistance.
PowMr is committed to providing excellent after-sales support and will provide technical answers within 24 hours.


