1. Safety Information
Please read and understand all instructions before beginning installation. Failure to follow these instructions may result in electric shock, fire, or other hazards that could cause property damage or personal injury.
- WARNING: Ensure power is OFF at the circuit breaker before installing or servicing the fixture.
- WARNING: Use only 0-10V low voltage dimmers or wall switches. This fixture is not compatible with 120V triac dimmers.
- All wiring must be in accordance with national and local electrical codes. If you are unsure about wiring, consult a qualified electrician.
- Do not modify the fixture or its components.
- Suitable for indoor use only.
2. Product Overview
The CycevSun 2x4 LED Flat Panel Light is designed for various indoor applications, offering adjustable lighting options and efficient performance.
Key Features:
- Selectable Color Temperature: Choose between 3000K (Warm White), 4000K (Cool White), and 5000K (Daylight) using a slide switch.
- Selectable Wattage: Adjust power consumption to 30W, 40W, or 50W via a slide switch.
- 0-10V Dimmable: Compatible with 0-10V dimming systems for smooth brightness control from 100% down to 0%.
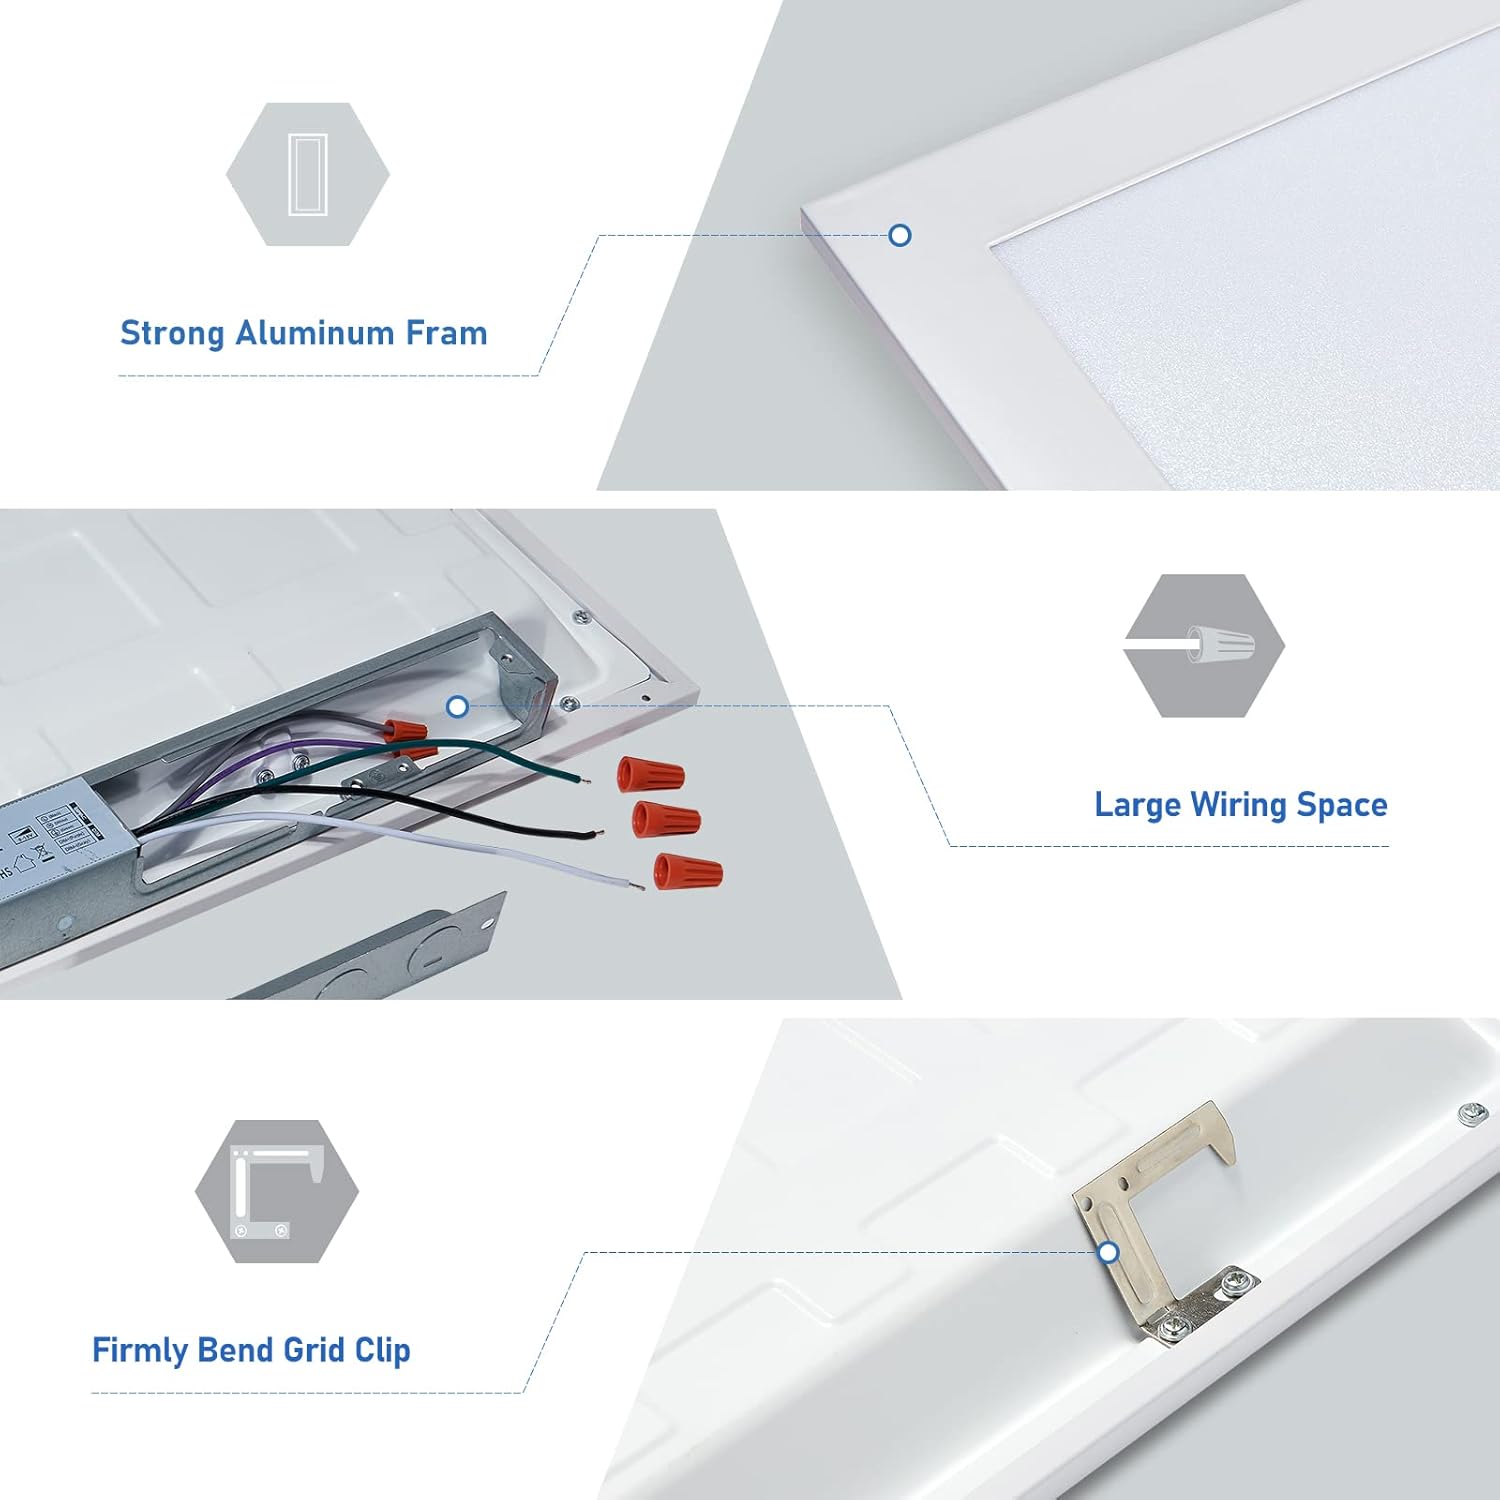
- Durable Construction: Features a strong aluminum frame and PMMA lenses designed to resist yellowing over time.
- Certifications: ETL and FCC approved for safety and reliability.
What's in the Box:
- CycevSun 2x4 LED Flat Panel Light(s)
- Wire nuts
3. Setup and Installation
This LED panel light supports three primary installation methods: Drop Ceiling, Surface Mount, and Suspended Mount. Surface mount and suspended mount kits are sold separately.
Installation Methods Overview:

Drop Ceiling Installation Steps:
- Prepare the Ceiling Grid: Identify the empty grid space where the panel light will be installed.
- Position the Panel: Tilt the LED panel light and raise it up into the empty grid space. Carefully lower it until it rests securely on the grid.
- Secure with Grid Clips: Ensure the integrated grid clips on the back of the panel catch onto the tee-grid bars for a stable installation.
- Access Wiring Compartment: Remove one conduit knock-out from the driver's junction box using a screwdriver or punch tool.
- Connect Wiring:
- Connect the black wire from the fixture to the black (live) wire from the power supply using a wire nut.
- Connect the white wire from the fixture to the white (neutral) wire from the power supply using a wire nut.
- Connect the green (ground) wire from the fixture to the green (ground) wire from the power supply using a wire nut.
- For 0-10V dimming, connect the purple (D+) and gray (D-) wires from the fixture to the corresponding dimming lines from your 0-10V dimmer.
- Secure Wiring: Carefully push all connected wires and wire nuts into the junction box. Close the junction box cover and secure it with the screw.
- Final Check: Ensure all connections are secure and the panel is properly seated in the ceiling grid.
Video: Step-by-step guide for installing the CycevSun LED Drop Ceiling Panel Light. This video demonstrates the process of securing the panel, connecting electrical wires, and setting the color temperature and wattage.

4. Operating Instructions
The CycevSun LED Flat Panel Light offers adjustable settings for color temperature and wattage to suit your lighting needs.
Adjusting Color Temperature and Wattage:
On the back of each panel light, there are two slide switches: one for color temperature (CCT) and one for wattage. These adjustments must be made before installation or by accessing the back of the installed panel.
- Color Temperature (CCT) Switch: Select 3000K (Warm White), 4000K (Cool White), or 5000K (Daylight).
- Wattage Switch: Choose between 30W, 40W, or 50W to control brightness and energy consumption.


0-10V Dimming:
The fixture is designed for smooth 0-10V dimming, allowing you to adjust the light output from 100% to 0% with a compatible 0-10V dimmer switch. Ensure your dimmer is a low-voltage 0-10V type and not a 120V triac dimmer.
5. Maintenance
Regular maintenance helps ensure the longevity and optimal performance of your LED panel light.
- Cleaning: Disconnect power before cleaning. Use a soft, dry, or slightly damp cloth to wipe the surface of the panel. Avoid abrasive cleaners, solvents, or harsh chemicals that could damage the finish or optical components.
- Inspection: Periodically check for any loose connections or visible damage. If any issues are found, consult a qualified electrician.
6. Troubleshooting
If you encounter issues with your LED panel light, refer to the following common troubleshooting steps:
| Problem | Possible Cause | Solution |
|---|---|---|
| Light does not turn on | No power supply Loose wiring connection Faulty switch or dimmer | Check circuit breaker and power source Verify all wire connections are secure Test switch/dimmer functionality |
| Light flickers or buzzes | Incompatible dimmer Loose wiring | Ensure a 0-10V dimmer is used (not triac) Check wiring connections |
| Incorrect color temperature or brightness | CCT/Wattage switch set incorrectly | Adjust the CCT and wattage slide switches on the back of the panel to desired settings |
If the problem persists after attempting these solutions, please contact CycevSun customer support.
7. Specifications
| Feature | Detail |
|---|---|
| Model Number | MI-2x4FT3CCT-4P |
| Dimensions | 48"L x 24"W x 1.6"H |
| Wattage | 30W / 40W / 50W (Selectable) |
| Color Temperature | 3000K / 4000K / 5000K (Selectable) |
| Voltage | 100-277V AC |
| Brightness (Max) | 5500 Lumens |
| Dimmability | 0-10V Dimmable (100%-0%) |
| Color Rendering Index (CRI) | 80.00 |
| Average Life | 30,000 Hours |
| Material | Aluminum, PMMA (Shade) |
| Certifications | ETL, FCC |
| Mounting Type | Drop ceiling mount (Surface/Suspended kits sold separately) |
8. Warranty and Support
CycevSun is committed to providing quality products and customer satisfaction.
- Warranty: This product comes with a 5-year quality promise.
- Customer Support: For any defects or inquiries, CycevSun aims to reply within 12 hours and provide a satisfactory solution.
For further assistance, please refer to the contact information provided with your purchase or visit the official CycevSun website.


