1. Introduction
This manual provides detailed instructions for the installation, operation, and maintenance of your EONON Android 10.0 Double Din Car Stereo, model GA2189S. Please read this manual thoroughly before using the product to ensure proper function and to prevent damage.
2. Safety Information
- Always operate the vehicle safely. Distracted driving can lead to accidents.
- Ensure all wiring is correctly connected to prevent short circuits or electrical fires.
- Do not attempt to disassemble or modify the unit. This may cause damage and void the warranty.
- Keep the volume at a level that allows you to hear outside traffic sounds.
- Consult a professional for installation if you are unsure about any steps.
3. Package Contents
Verify that all items are present in the package:
- EONON Android 10.0 Double Din Car Stereo (GA2189S)
- Car Dash Cam
- User Manual (this document)
- Necessary wiring harnesses and accessories (specific items may vary)
4. Product Overview
The EONON GA2189S is an advanced Android 10.0 double din car stereo featuring a 10.1-inch IPS display, Octa Core processor, 4GB RAM, and 64GB internal storage. It supports Bluetooth 5.0, GPS navigation, built-in Apple CarPlay, DSP, and Android Auto.

Figure 4.1: The EONON GA2189S car stereo showcasing its main interface with Apple CarPlay and Android Auto functionalities.
Key Features:
- Operating System: Android 10.0
- Processor: Octa Core Unisoc UIS8581A 8-core A55 CPU
- Memory: 4GB RAM + 64GB ROM
- Display: 10.1-inch IPS touchscreen with 1280x720 HD resolution
- Connectivity: Bluetooth 5.0, Wi-Fi, USB
- Smartphone Integration: Built-in Wireless & Wired Apple CarPlay and Android Auto
- Audio: Built-in DSP (Digital Sound Processor) with 48-band equalizer, 4x48W Max output power
- Navigation: GPS with offline maps and real-time traffic support
- Additional Features: Split-screen multitasking, multiple themes, steering wheel control support, app installation

Figure 4.2: An overview of the EONON GA2189S's extensive features, highlighting its smart assistant compatibility, display quality, audio processing, and connectivity options.

Figure 4.3: Close-up details of the EONON GA2189S hardware, including screen specifications, physical dimensions, and the powerful Octa Core processor.

Figure 4.4: The Digital Sound Processor (DSP) interface, demonstrating the extensive audio customization options available, including a 48-band equalizer and sound field adjustments.
5. Installation
Proper installation is crucial for the optimal performance and safety of your car stereo. It is highly recommended to have the unit installed by a qualified professional.
5.1. Pre-Installation Checks
- Ensure your vehicle's dashboard has a double din opening (178x100mm).
- If your original car radio size is not 178x100mm, an extra installation kit may be required.
- Verify the power cable of your original car radio. If it is not an ISO plug, an adapter cable will be necessary.

Figure 5.1: Illustrates the required dashboard dimensions (178x100mm) for compatible installation of the double din unit.
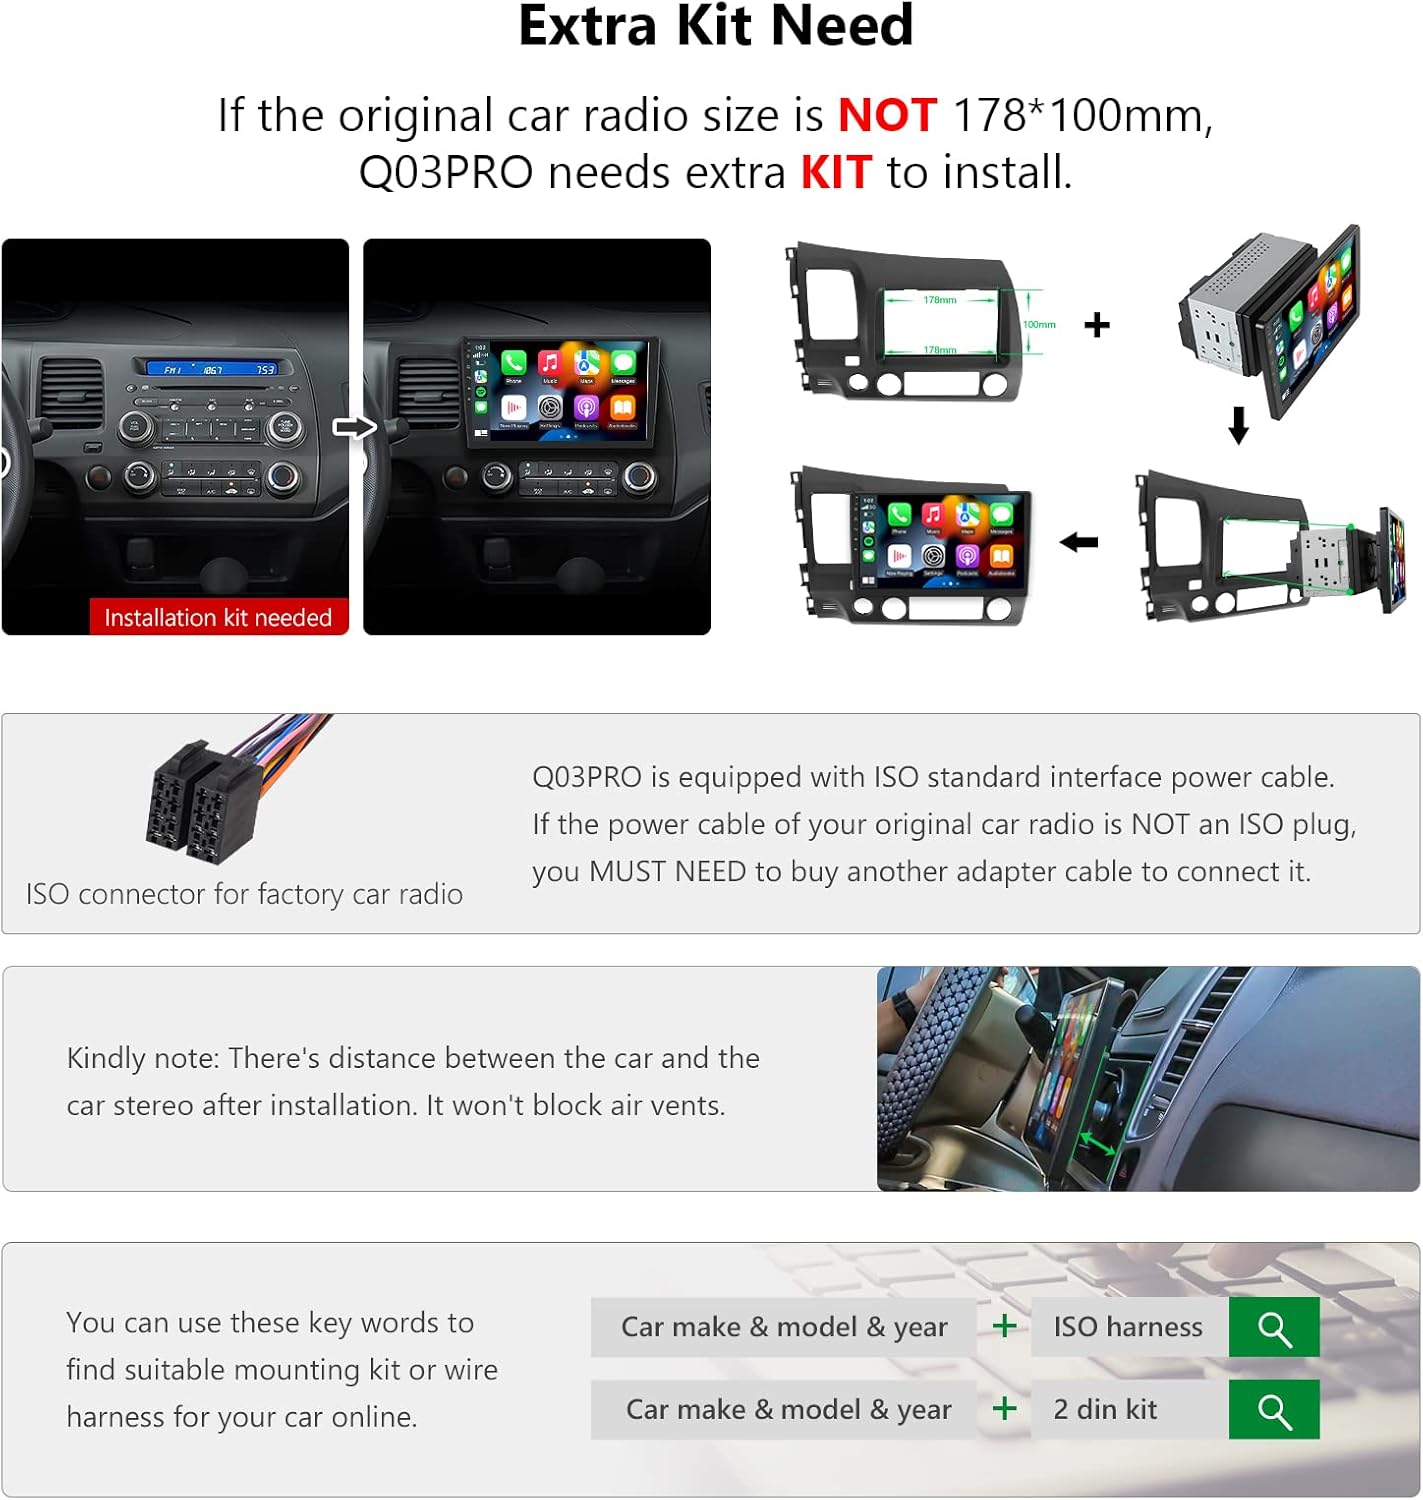
Figure 5.2: Details the necessity of an extra installation kit for non-standard dashboard sizes and the use of an ISO connector for power cable adaptation.
5.2. General Installation Steps (Consult a professional for detailed vehicle-specific instructions)
- Disconnect Battery: Before starting, disconnect the negative terminal of your vehicle's battery to prevent electrical shorts.
- Remove Old Head Unit: Carefully remove the existing car stereo and any trim panels.
- Connect Wiring Harness: Connect the EONON wiring harness to the vehicle's wiring. Use an adapter if necessary. Ensure all connections (power, ground, speakers, antenna, etc.) are secure.
- Connect External Devices: Connect the GPS antenna, USB cables, backup camera, and dash cam as required.
- Mount the Unit: Secure the EONON GA2189S into the dashboard opening. Ensure it is firmly seated.
- Reconnect Battery: Reconnect the negative terminal of the battery.
- Test Functionality: Turn on the vehicle and test all functions of the stereo before reassembling the dashboard trim.
6. Initial Setup
After installation, perform the following initial setup steps:
- Power On: Start your vehicle. The stereo should power on automatically.
- Language and Time: Follow the on-screen prompts to select your preferred language and set the correct date and time.
- Wi-Fi Connection: Connect to a Wi-Fi network to enable internet access for app downloads and updates.
- GPS Calibration: Ensure the GPS antenna is properly positioned and calibrate the navigation system if prompted.
- Steering Wheel Control Learning: If your vehicle supports steering wheel controls, configure them through the stereo's settings menu.
7. Operating Instructions
The EONON GA2189S operates similarly to an Android tablet, offering intuitive touchscreen controls and a wide range of functions.
7.1. Touchscreen Navigation
- Tap: Select an icon or option.
- Swipe: Navigate through menus or screens.
- Pinch-to-Zoom: Adjust map views or image sizes.
7.2. Apple CarPlay & Android Auto
The unit supports both wireless and wired Apple CarPlay and Android Auto for seamless smartphone integration.
- Connection: Connect your iPhone or Android phone via USB or wirelessly via Bluetooth and Wi-Fi.
- Access: Select the CarPlay or Android Auto icon on the stereo's main menu.
- Features: Access navigation, music, calls, and messages directly from your phone's interface on the stereo screen.

Figure 7.1: Demonstrates the Apple CarPlay and Android Auto interfaces running on the EONON GA2189S, integrated within a vehicle's dashboard.
7.3. GPS Navigation
Utilize the built-in GPS for accurate navigation. The unit supports offline maps and real-time traffic updates when connected to the internet.
- Map Access: Tap the 'Navigation' or 'Maps' icon.
- Destination Input: Enter your destination using the on-screen keyboard or voice commands.
7.4. Bluetooth Functions
Connect your smartphone via Bluetooth 5.0 for hands-free calling and audio streaming.
- Pairing: Go to Bluetooth settings on the stereo and your phone, search for and pair with the GA2189S.
- Calling: Make and receive calls directly from the stereo interface.
- Audio Streaming: Play music from your phone through the car's speakers.
7.5. Radio (FM/AM)
Access local radio stations using the built-in FM/AM tuner.
- Tuning: Manually tune or use the auto-scan feature to find stations.
- Presets: Save your favorite stations for quick access.
7.6. DSP Audio Settings
Customize your audio experience with the Digital Sound Processor (DSP).
- Equalizer: Adjust the 48-band equalizer to fine-tune sound frequencies.
- Sound Field: Modify sound staging and surround sound effects.
8. Maintenance
To ensure the longevity and optimal performance of your EONON GA2189S, follow these maintenance guidelines:
- Cleaning: Use a soft, dry cloth to clean the screen and exterior. Avoid abrasive cleaners or solvents.
- Software Updates: Periodically check for and install software updates to ensure the system runs efficiently and has the latest features. Updates can typically be found in the system settings or on the EONON support website.
- Temperature: Avoid exposing the unit to extreme temperatures for prolonged periods.
9. Troubleshooting
If you encounter issues with your EONON GA2189S, refer to the following common problems and solutions:
| Problem | Possible Cause | Solution |
|---|---|---|
| Unit does not power on. | Incorrect wiring, blown fuse, vehicle battery issue. | Check power connections, inspect vehicle fuses, ensure battery is charged. Consult installation professional. |
| No sound. | Speaker wiring issues, volume too low, mute activated, DSP settings. | Verify speaker connections, increase volume, check mute status, adjust DSP settings. |
| GPS signal lost or inaccurate. | GPS antenna placement, environmental interference. | Ensure GPS antenna has a clear view of the sky. Avoid placing near metal objects. |
| Bluetooth connection issues. | Device not in pairing mode, interference, incorrect pairing process. | Ensure both devices are in pairing mode, try re-pairing, restart both devices. |
| Screen unresponsive or slow. | System overload, temporary software glitch. | Restart the unit. Close unnecessary applications. Perform a factory reset if issues persist (note: this will erase data). |
If the problem persists after attempting these solutions, please contact EONON customer support for further assistance.
10. Specifications
Detailed technical specifications for the EONON GA2189S:
- Brand: EONON
- Model Number: GA2189S (Standard Android 10.0-GA2189CA)
- Operating System: Android 10.0
- Processor: Unisoc UIS8581A 8-core A55 CPU
- RAM: 4GB
- Internal Storage: 64GB
- Display: 10.1-inch IPS Touchscreen, 1280x720 HD Resolution
- Connectivity: Bluetooth 5.0, USB, Wi-Fi
- Special Features: Apple CarPlay & Android Auto (Built-in), Offline Maps, Real-time Traffic, DSP
- Audio Output Mode: Stereo
- Output Power: 48 Watts (Max 45 Watts per channel, 4 channels)
- Item Weight: 6.41 pounds
- Package Dimensions: 13.5 x 11.65 x 7.44 inches
11. Warranty and Support
EONON products come with a standard manufacturer's warranty. For specific warranty details, registration, or technical support, please visit the official EONON website or contact their customer service directly. Keep your purchase receipt as proof of purchase.
EONON Official Website: www.eonon.com


