1. Introduction
The X-Sense SD2K0AX Smoke Alarm is designed to provide early warning of smoke and fire hazards in your home. Featuring a 10-year sealed lithium battery, this photoelectric smoke detector offers reliable, long-term protection without the need for frequent battery changes. Its advanced sensor technology ensures quick response to smoldering fires, giving you crucial time to react. The sleek, compact design integrates seamlessly into any living space.

2. Product Overview
The X-Sense SD2K0AX smoke alarm is engineered for both performance and aesthetics. Key components and features include:
- 85-dB Alarm Horn: Emits a loud alert to ensure it is heard throughout your home.
- Flashing LED Indicator: Provides visual status updates (e.g., normal operation, alarm, low battery).
- Test/Silence Button: Allows for easy testing of the alarm's functionality and silencing false alarms.
- Air Vents: Designed for optimal smoke entry and detection.
- Photoelectric Sensor: Highly sensitive to detect smoke from smoldering fires quickly.
- 10-Year Sealed Battery: Provides long-lasting power, eliminating the need for battery replacement.
- Durable ABS Housing: Fire-retardant and heat-resistant for enhanced safety.


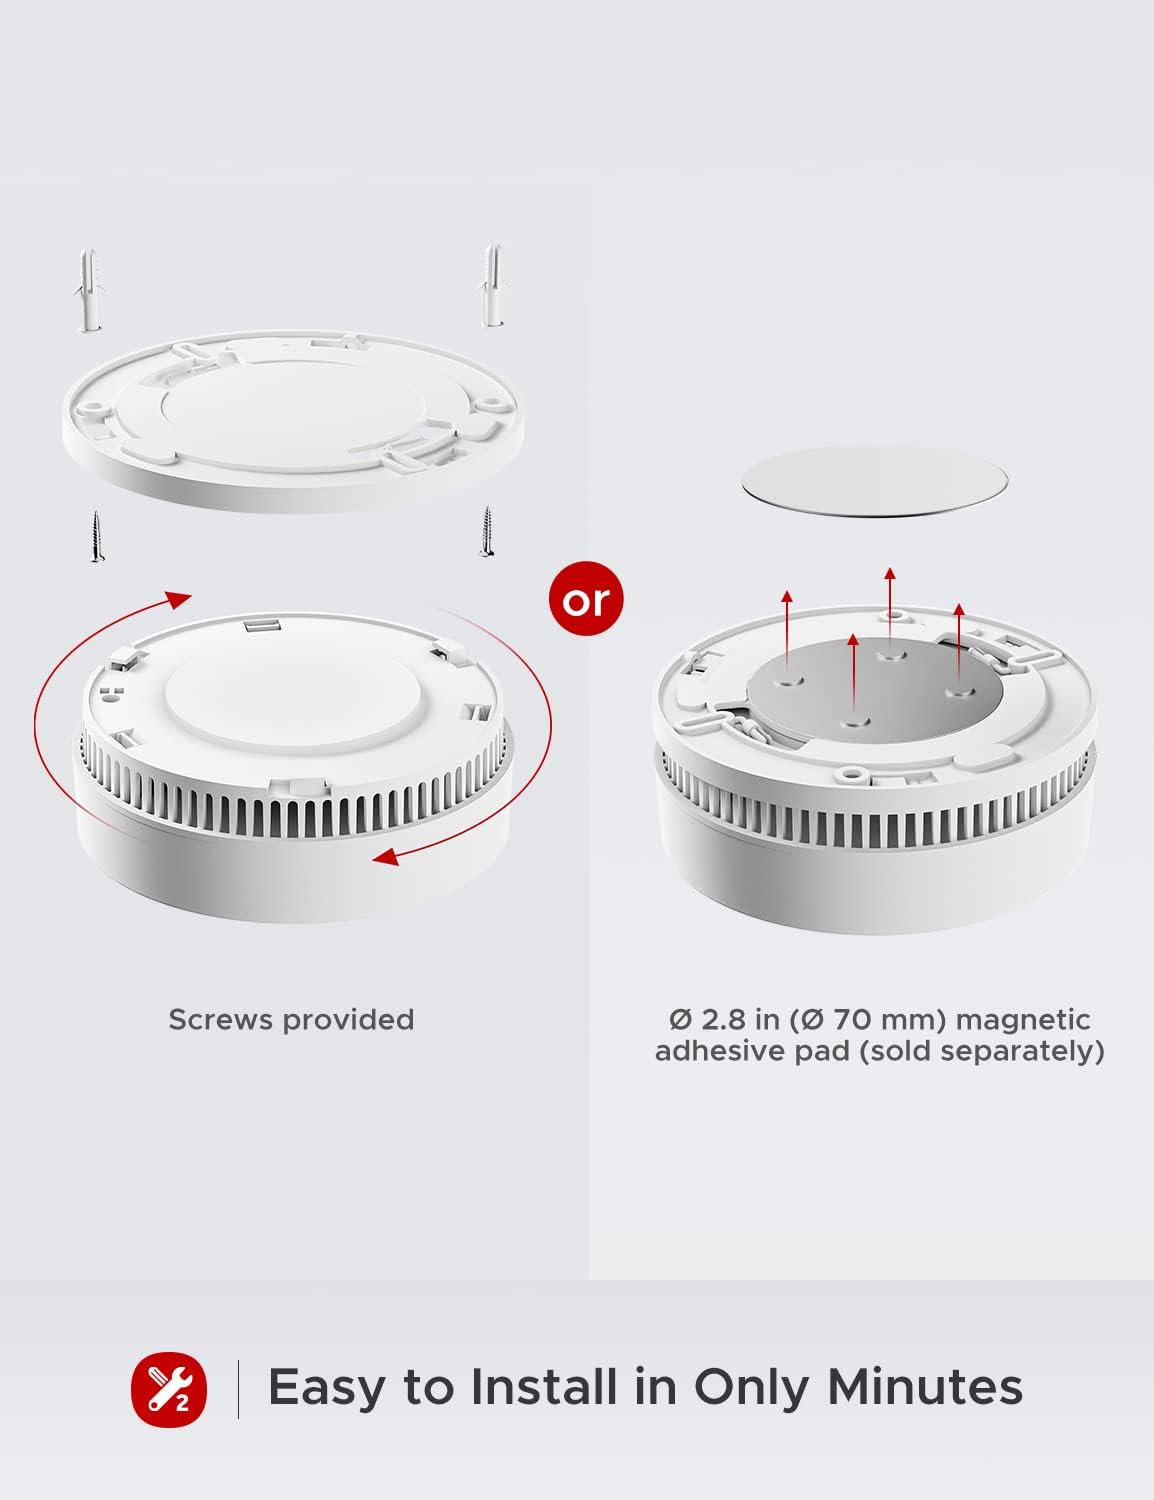
3. Installation
The X-Sense SD2K0AX smoke alarm is designed for quick and easy installation. No complex rewiring is necessary. Follow these steps to securely mount your device:
- Choose a Location: Select a suitable location on a wall or ceiling, away from vents, windows, and areas prone to steam or cooking fumes. Ensure the alarm is within the recommended detection coverage area of 215-430 ft² (20-40 m²).
- Mounting Bracket: Use the included screws and anchor plugs to attach the mounting bracket firmly to the chosen surface. Alternatively, Ø 2.8 inch (70 mm) magnetic adhesive pads (not included) can be used for effortless installation.
- Attach the Alarm: Align the smoke alarm with the mounting bracket and twist it clockwise until it clicks securely into place.
- Activate: Once attached, the alarm will automatically activate. The LED indicator will flash to confirm it is operational.

4. Operation
Understanding the operation of your X-Sense SD2K0AX smoke alarm is crucial for effective home safety.
4.1 Normal Operation
During normal operation, the LED indicator will flash periodically (e.g., every 60 seconds) to confirm the unit is functioning correctly. The alarm continuously monitors for smoke, analyzing smoke concentration every 10 seconds for accurate alerts.
4.2 Testing the Alarm
It is recommended to test your smoke alarm weekly to ensure proper functionality. Press and hold the Test/Silence button for approximately 3 seconds. The alarm will emit a series of loud beeps, and the LED will flash. Release the button to stop the test.
4.3 Silence Function
In case of a false alarm (e.g., from cooking fumes), you can temporarily silence the alarm by pressing the Test/Silence button. The alarm will enter a temporary silence mode for a set period (typically 9 minutes), after which it will automatically reset to normal monitoring.

5. Maintenance
Regular maintenance ensures the longevity and effectiveness of your smoke alarm.
- Weekly Testing: As mentioned in the Operation section, test your alarm weekly using the Test/Silence button.
- Cleaning: Dust and debris can affect the sensor's performance. Gently vacuum the alarm's vents and exterior once a month using a soft brush attachment. Do not paint the alarm.
- 10-Year Battery: The built-in lithium battery is designed to last for 10 years. No battery replacement is needed during its lifespan.
- Low-Battery Warning: The alarm will emit a distinct chirp and the LED indicator will flash to signal a low battery. This indicates the unit is nearing the end of its 10-year life and should be replaced.
- End-of-Life Indication: After approximately 10 years, the alarm will signal its end-of-life, requiring replacement of the entire unit.

6. Troubleshooting
If your X-Sense SD2K0AX smoke alarm is not functioning as expected, refer to the following common issues and solutions:
- Alarm Chirps Periodically: This typically indicates a low battery. Since the battery is sealed for 10 years, this means the unit is nearing its end-of-life and needs to be replaced.
- Alarm Sounds Without Visible Smoke: This could be a false alarm caused by steam, cooking fumes, or dust. Use the silence button to temporarily quiet the alarm. If false alarms persist, clean the unit as described in the Maintenance section. Ensure proper placement away from sources of steam or heavy fumes.
- Alarm Fails to Test: If the alarm does not sound when the Test/Silence button is pressed, ensure the unit is properly mounted and activated. If it still fails, the unit may be faulty and requires replacement.
- LED Indicator Not Flashing: If the LED indicator is not flashing during normal operation, the unit may not be receiving power or could be faulty. Verify proper installation. If the issue persists, replace the unit.
7. Specifications
Detailed technical specifications for the X-Sense SD2K0AX Smoke Alarm:
| Specification | Detail |
|---|---|
| Brand | X-Sense |
| Model Number | SD2K0AX |
| Power Source | Battery Powered (10-Year Sealed Lithium Battery) |
| Sensor Type | Photoelectric |
| Alarm Volume | 85 dB at 10 feet (3 meters) |
| Color | White |
| Item Weight | 0.67 Kilograms (1.48 pounds) |
| Dimensions (Diameter x Thickness) | 4.8 inches (122 mm) x 1.7 inches (44 mm) |
| Operating Temperature | Not specified (typical range 40-100°F / 4.4-37.8°C) |
| Operating Humidity | Not specified (typical range 10-95% RH non-condensing) |
| Housing Material | Fire-retardant ABS |

