1. Introduction
The RALENO W30 UHF Wireless Lavalier Microphone system provides clear and stable audio for various recording needs, including interviews, vlogs, video production, and presentations. Designed for compatibility with a range of devices such as cameras, smartphones, and other recording equipment, this system offers flexibility and ease of use. This manual will guide you through the setup, operation, and maintenance of your wireless microphone system.
2. Package Contents
Please verify that all items listed below are included in your package:
- Transmitter x 1
- Receiver x 1
- Lavalier Microphone x 1
- Charging Cable (Micro USB) x 1
- 3.5mm to Type-C Adapter Cable x 1
- TRS Cable for Camera x 1
- TRRS Cable for Phone x 1
- User Manual x 1

Image: All components included in the RALENO W30 Wireless Lavalier Microphone package.
Video: An unboxing demonstration of the RALENO W30 wireless microphone, showcasing all included items and their initial appearance.
3. Product Overview
The RALENO W30 system consists of a transmitter and a receiver, designed for portability and ease of use. The transmitter is equipped with a display for frequency and battery status, while the receiver is compact and rechargeable.

Image: The RALENO W30 Wireless Lavalier Microphone system, highlighting the transmitter, receiver, and lavalier microphone.
Component Identification
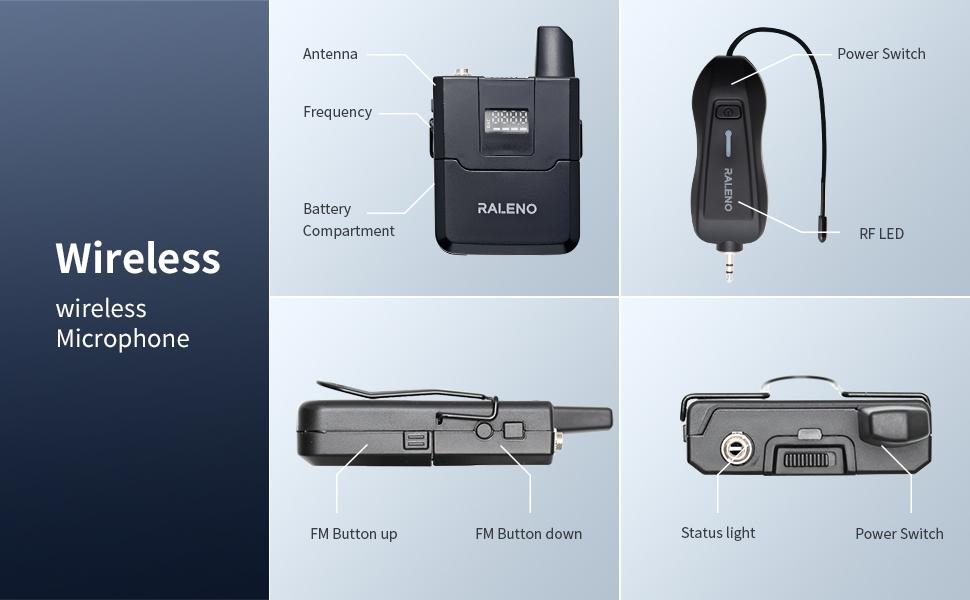
Image: Detailed diagram of the RALENO W30 wireless microphone components.
- Transmitter: Features an antenna, frequency display, battery compartment, and FM buttons for frequency adjustment.
- Receiver: Includes a power switch, RF LED indicator, and status light.
- Lavalier Microphone: Connects to the transmitter for audio input.
4. Setup
4.1. Battery Installation (Transmitter)
- Locate the battery compartment on the back of the transmitter unit.
- Open the battery compartment cover.
- Insert two (2) AA batteries, ensuring correct polarity. Note: Batteries are not included and must be purchased separately.
- Close the battery compartment cover securely.

Image: The transmitter unit with its battery compartment open, illustrating where to insert AA batteries.
4.2. Charging the Receiver
The receiver unit is rechargeable via a Micro USB cable.
- Connect the provided Micro USB charging cable to the receiver's charging port.
- Connect the other end of the charging cable to a USB power source (e.g., computer, USB wall adapter).
- The status light on the receiver will indicate charging status.
4.3. Connecting the Lavalier Microphone
- Plug the lavalier microphone's 3.5mm connector into the microphone input jack on the transmitter.
- Secure the connection by screwing the threaded collar of the microphone connector onto the transmitter's jack. This prevents accidental disconnection.
- Clip the lavalier microphone to your clothing, approximately 6-8 inches from your mouth, for optimal sound pickup.
4.4. Pairing the Transmitter and Receiver
The units should automatically pair upon power-on. If pairing fails, follow these steps:
- Ensure both the transmitter and receiver are powered off.
- Power on the receiver. Check if the receiving light is sufficient.
- Power on the transmitter.
- Press the power button of the transmitter once until the light does not flash, and both the upper red and lower green lights appear.
- The units should now be paired. Connect the receiver to your recording equipment for normal use.
5. Operating Instructions
5.1. Connecting to Recording Devices
The RALENO W30 system includes various cables for broad compatibility:
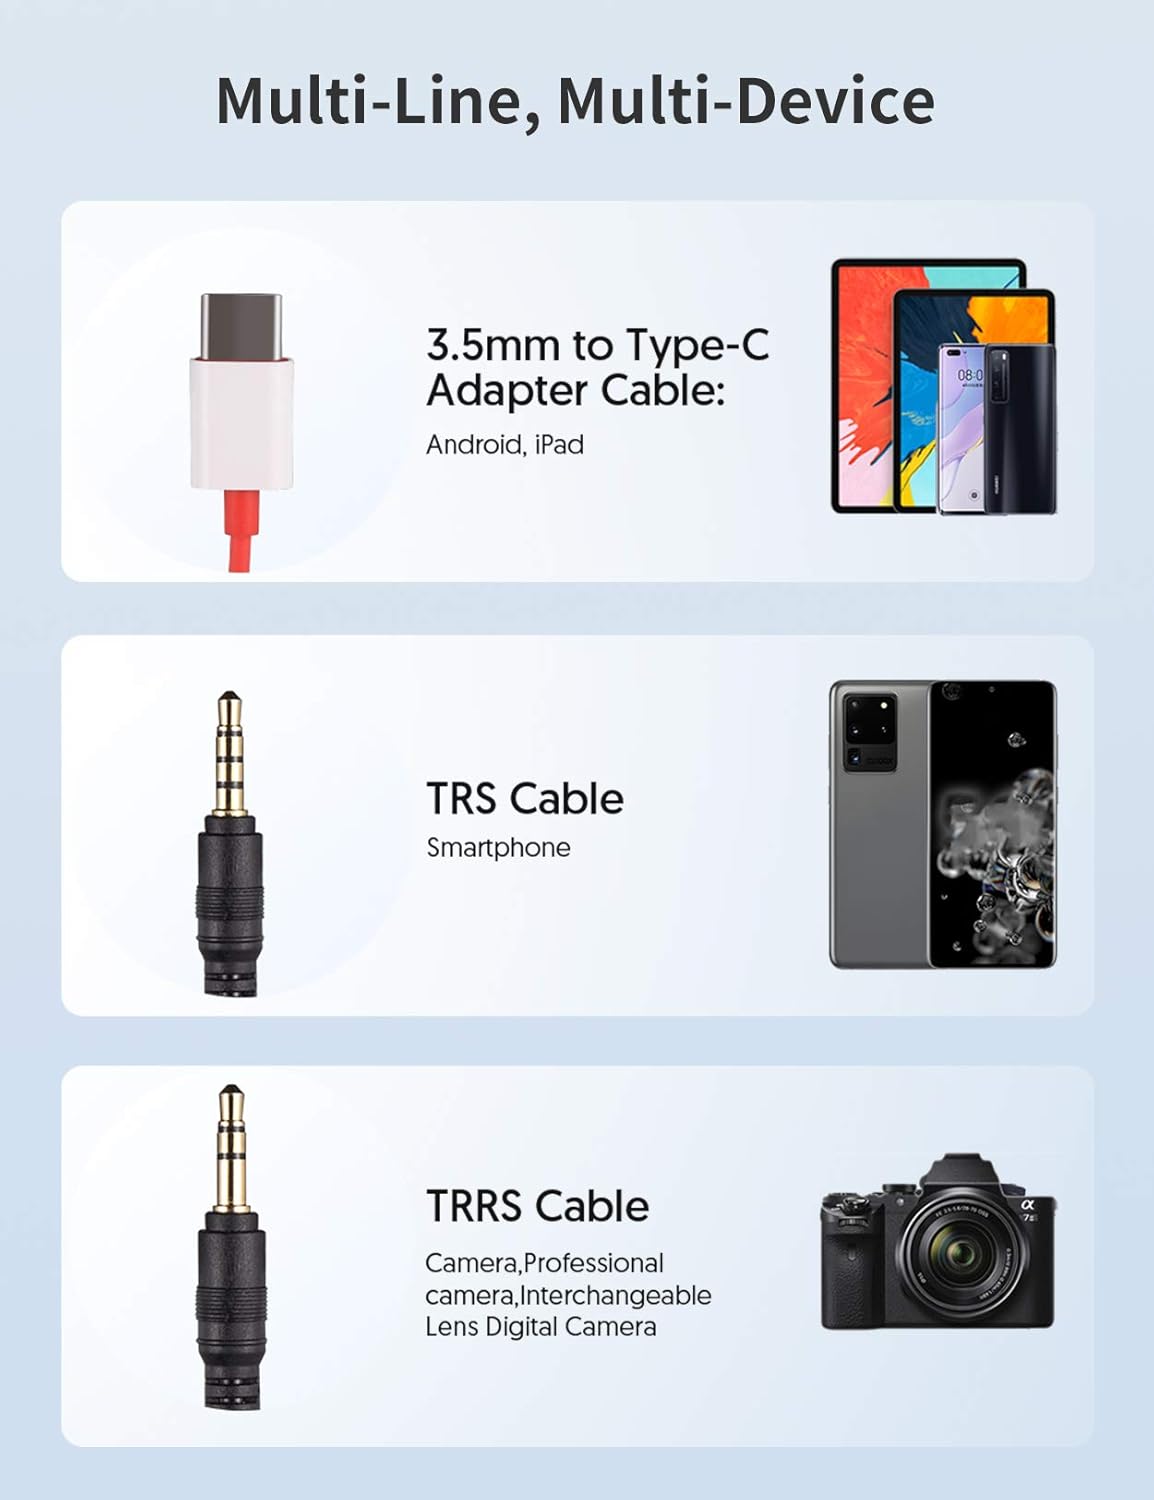
Image: Cable types and their compatible devices for the RALENO W30 wireless microphone.
- For Smartphones (with 3.5mm jack): Use the provided TRRS cable. Plug one end into the receiver's output and the other into your smartphone's headphone/microphone jack.
- For Smartphones/Tablets (with USB-C port): Use the 3.5mm to Type-C Adapter Cable. Connect the TRRS cable to the adapter, then plug the adapter into your device's USB-C port.
- For Cameras (DSLR, Mirrorless): Use the provided TRS cable. Plug one end into the receiver's output and the other into your camera's microphone input.
5.2. Adjusting Frequency
The system supports up to 20 different frequencies to avoid interference. If you experience signal issues, you can change the operating frequency:
- On the transmitter, use the FM Up and FM Down buttons to cycle through available frequencies.
- Ensure the receiver automatically adjusts to the new frequency.
5.3. Monitoring Audio
Some receivers may offer a headphone output for real-time audio monitoring. Refer to your specific receiver model for this feature.
6. Key Features
- UHF Wireless Technology: Provides stable and reliable signal transmission over a range of up to 20 meters.
- Multi-Frequency Support: Offers up to 20 selectable frequencies to minimize interference when multiple units are in use or in crowded RF environments.
- Omnidirectional Lavalier Microphone: Captures sound from all directions, ensuring clear voice pickup with comprehensive detail.
- Wide Device Compatibility: Includes cables and adapters for seamless connection to smartphones (iOS/Android), cameras (DSLR, Mirrorless), and other recording devices.
- Compact and Portable Design: Both transmitter and receiver units are lightweight and small, making them easy to carry and discreetly attach.
- Convenient Operation: Simple controls for power and frequency adjustment.

Image: Illustration of the 20-meter stable signal range of the RALENO W30 system.
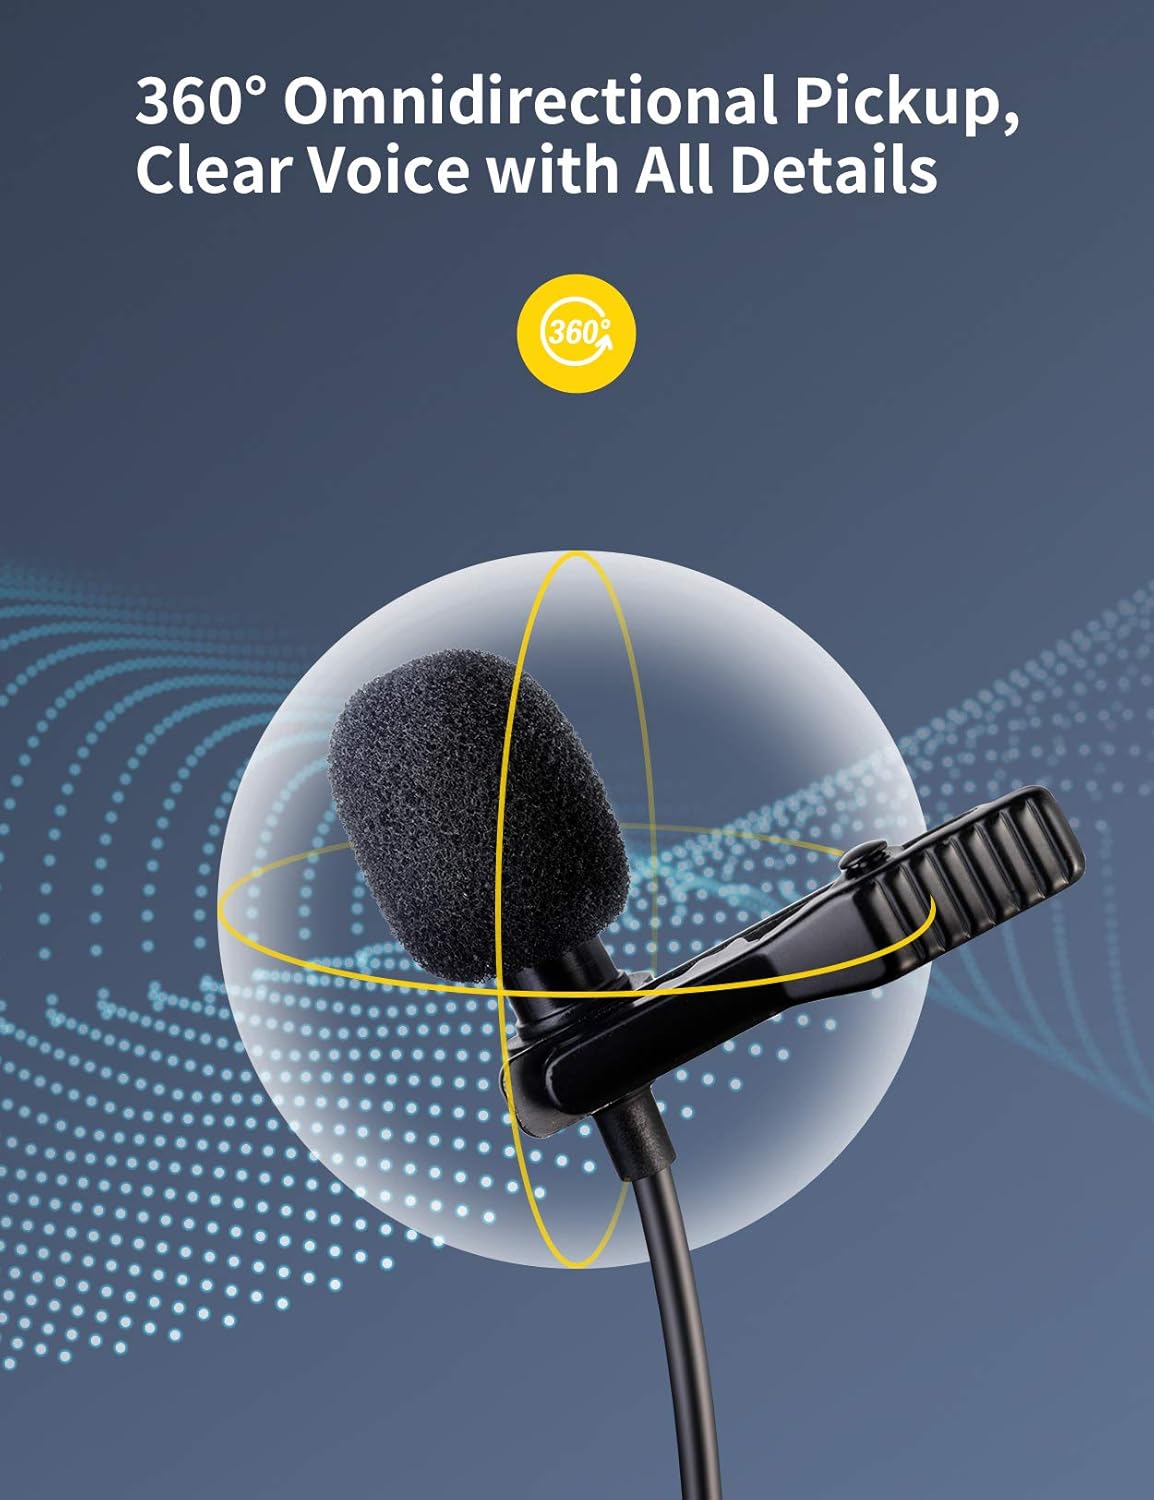
Image: Visual representation of the lavalier microphone's 360-degree omnidirectional sound pickup.

Image: The compact design of the RALENO W30 transmitter worn discreetly.
7. Maintenance
- Cleaning: Use a soft, dry cloth to clean the units. Avoid using harsh chemicals or abrasive materials.
- Storage: Store the microphone system in a cool, dry place away from direct sunlight and extreme temperatures.
- Battery Care: Remove AA batteries from the transmitter if not in use for extended periods to prevent leakage. Fully charge the receiver before long-term storage.
- Cable Management: Gently coil cables after use to prevent tangling and damage. Avoid sharp bends.
8. Troubleshooting
If you encounter issues with your RALENO W30 wireless microphone, refer to the common problems and solutions below:
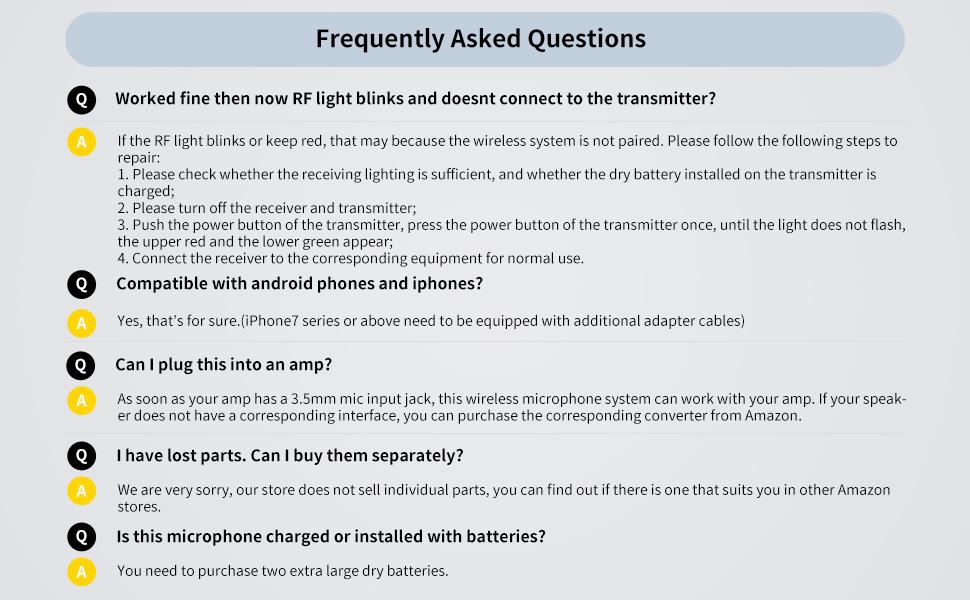
Image: Frequently Asked Questions and answers for the RALENO W30 wireless microphone.
Common Issues and Solutions:
- RF light blinks or stays red, not connecting to transmitter:
- Check if the receiving light is sufficient and if the dry battery installed on the transmitter is charged.
- Turn off both the receiver and transmitter.
- Push the power button of the transmitter once until the light stops flashing, and both the upper red and lower green lights appear.
- Connect the receiver to the corresponding equipment for normal use.
- Compatibility with Android phones and iPhones:
Yes, the system is compatible. For iPhone 7 series or above, an additional adapter cable (not included) may be required if your phone lacks a 3.5mm jack.
- Can I plug this into an amplifier?
If your amplifier has a 3.5mm mic input jack, this wireless microphone system can work with it. If not, you may need to purchase a corresponding converter.
- Lost parts:
Individual parts are not sold separately by the manufacturer. You may check other retailers for compatible replacements.
- Is this microphone charged or installed with batteries?
The transmitter requires two (2) AA dry batteries (not included). The receiver unit is rechargeable via Micro USB.
9. Specifications
| Specification | Detail |
|---|---|
| Brand | RaLeno |
| Model | W30 |
| Connectivity Technology | UHF Wireless |
| Connector Type | 3.5 mm Jack, USB |
| Number of Channels | 20 |
| Polar Pattern | Omnidirectional |
| Microphone Form Factor | Microphone System |
| Compatible Devices | Camera, Smartphone |
| Power Source | Battery Powered (Transmitter: 2 AA batteries; Receiver: Rechargeable) |
| Item Dimensions (L x W x H) | 3.82 x 4.06 x 1.26 inches |
| Item Weight | 13.4 ounces |
| ASIN | B093K773PG |
| UPC | 613497281595 |
10. Warranty and Support
For warranty information and customer support, please refer to the documentation included with your product or visit the official RaLeno website. Keep your purchase receipt for warranty claims.


